
Overview
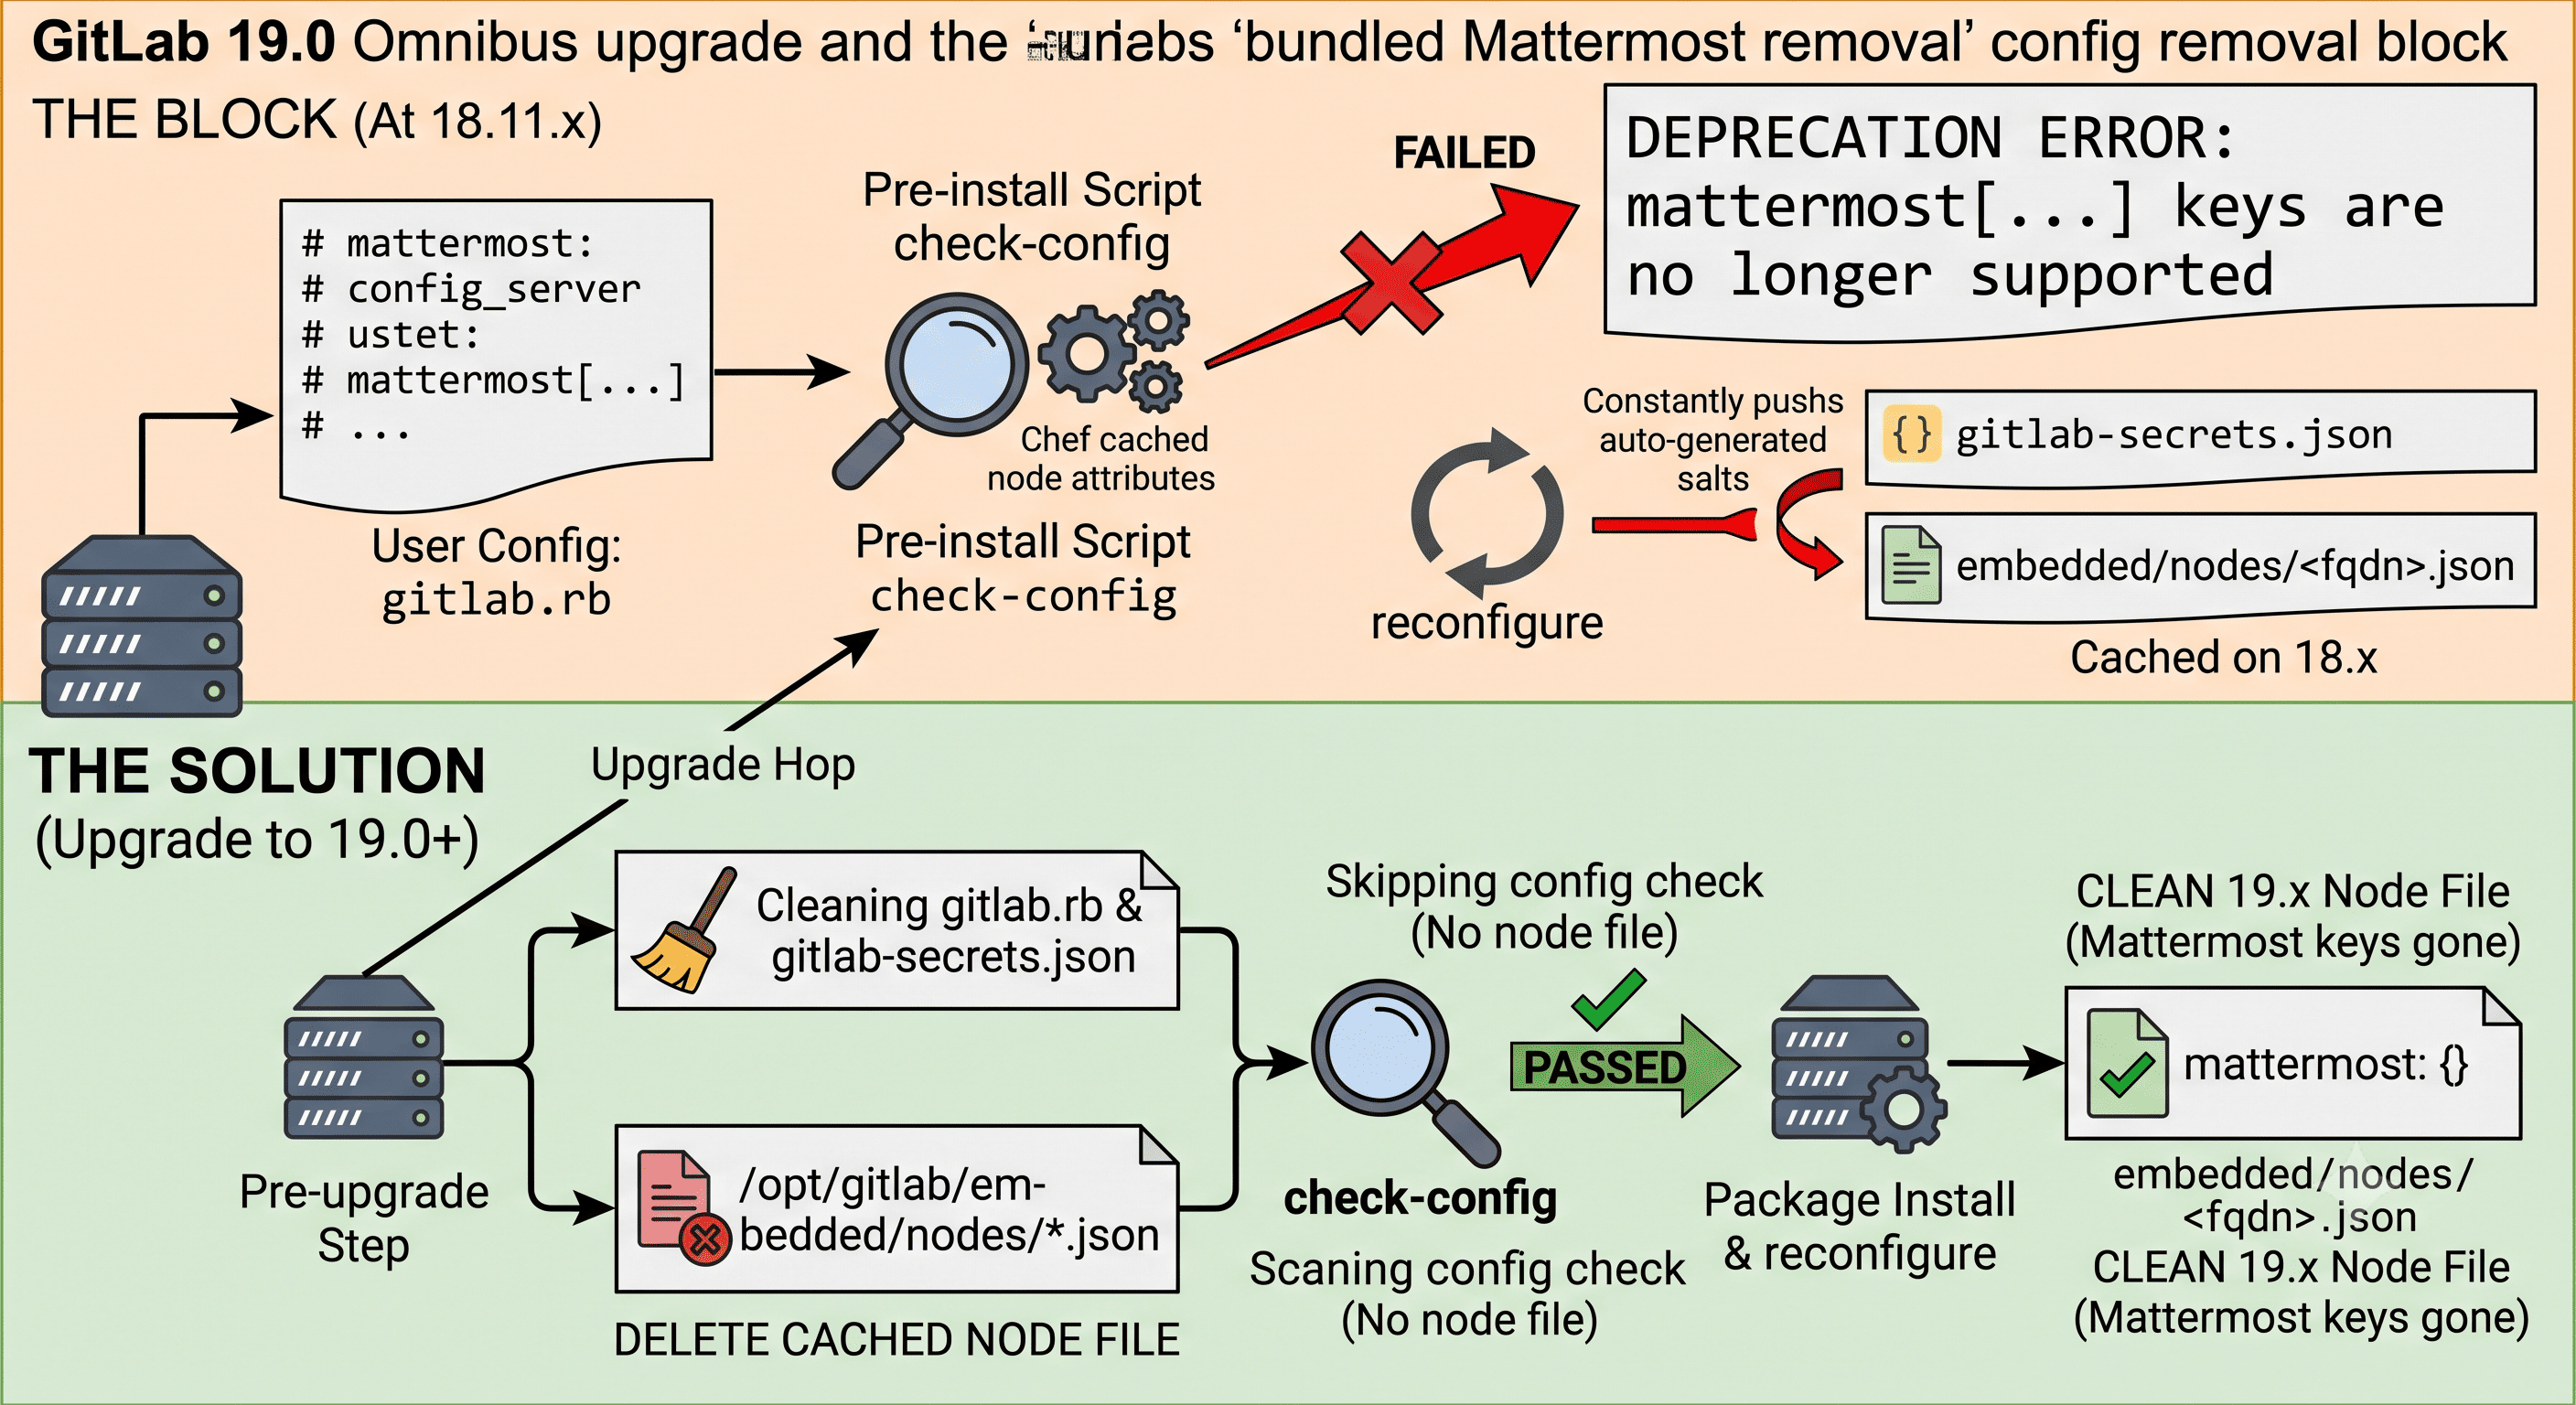
GitLab 19.0 버전부터는 Linux 패키지(Omnibus) 내부에 포함되어 있던 번들 Mattermost가 완전히 제거되었다. 이로 인해 기존에 Mattermost를 사용했던 인스턴스뿐만 아니라, 단순히 설정값만 생성되어 있던 인스턴스조차 GitLab 18.11.x에서 19.x로 업그레이드할 때 사전 설치(Pre-install) 단계에서 `mattermost[...] keys are no longer supported` 식의 지원 중단(Deprecation) 에러와 함께 업그레이드가 중단되는 현상이 발생한다.
가장 난감한 점은 `/etc/gitlab/gitlab.rb` 파일에서 모든 `mattermost` 관련 주석을 해제하거나 삭제한 뒤 다시 시도해도 동일한 에러가 계속해서 발생한다는 것이다.
본 글에서는 이러한 현상이 발생하는 근본적인 원인을 분석하고, 실제 18.11.7 → 19.1.2 업그레이드 사례를 바탕으로 문제를 완벽히 해결하는 순서를 정리한다.
현상 분석
18.11.7 버전에서 19.1.2 버전으로 `apt-get install gitlab-ce=19.1.2-ce.0` 명령을 통해 업그레이드를 진행하면 패키지 압축 해제 단계에서 다음과 같이 실패한다.
Preparing to unpack .../gitlab-ce_19.1.2-ce.0_amd64.deb ...
* mattermost has been deprecated since 19.0 and was removed in 19.0. Bundled
  Mattermost has been removed from the Linux package in 19.0; mattermost[...]
  keys are no longer supported. Deploy Mattermost separately and point GitLab
  at it with gitlab_rails['mattermost_host'].
Deprecations found. Please correct them and try again.
dpkg: error processing archive /var/cache/apt/archives/gitlab-ce_19.1.2-ce.0_amd64.deb (--unpack):
new gitlab-ce package pre-installation script subprocess returned error exit status 1- 에러 메시지는 `mattermost[...]` 키값을 지우라고 지적한다.
1차 시도: gitlab.rb 검사 (그리고 실패하는 이유)
가장 먼저 `/etc/gitlab/gitlab.rb` 파일 내 활성화된 mattermost 설정이 있는지 확인한다.
grep -nE "^\s*mattermost" /etc/gitlab/gitlab.rb
그러나 실제 확인 결과 활성화된 라인은 없었다. 모든 `mattermost` 관련 항목은 기본 주석 처리된 상태였다.
# mattermost_external_url 'http://mattermost.example.com'
# mattermost['enable'] = false
# mattermost['username'] = 'mattermost'
# ...
- `gitlab.rb` 파일이 깨끗함에도 업그레이드가 실패하는 이유는, 사전 검사 로직이 `gitlab.rb` 를 직접 읽는 것이 아니기 때문이다.
원인: 캐시된 Chef Node Attributes 파일 조회
`.deb` 패키지의 사전 설치 스크립트(preinst)를 추출해 확인해 보면 다음과 같은 로직이 실행된다.
deb=/var/cache/apt/archives/gitlab-ce_19.1.2-ce.0_amd64.deb
tmp=$(mktemp -d); dpkg-deb -e "$deb" "$tmp/DEBIAN"
grep -n "check-config" "$tmp/DEBIAN/preinst"
`preinst` 내부에서는 아래 명령을 호출한다.
gitlab-ctl check-config --version="19.1"
그리고 `check-config` 스크립트(`/opt/gitlab/embedded/service/omnibus-ctl/check_config.rb`)는 `gitlab.rb` 대신 가장 최근 `gitlab-ctl reconfigure` 실행 당시 생성된 Chef Node Attributes(캐시 JSON 파일)를 읽는다.
# reconfigure 실행 시 생성된 fqdn.json 파일에서 JSON을 추출
node_json_file = Dir.glob("#{base_path}/embedded/nodes/*.json")[0]
unless node_json_file
  log "JSON file with existing configuration not found ..."
  log "Skipping config check."
  Kernel.exit 0
end

node_json      = JSON.load_file(node_json_file)
existing_config = node_json['normal']
messages = Gitlab::Deprecations.check_config(opts[:version], existing_config, :removal)
실제로 `/opt/gitlab/embedded/nodes/<fqdn>.json` 파일 내부의 `["normal"]["mattermost"]` 항목을 조회해 보면 관련 설정 데이터가 여전히 잔재해 있음을 확인할 수 있다.
grep -c mattermost /opt/gitlab/embedded/nodes/*.json
# 결과: 17
- `gitlab.rb` 를 수정하더라도, 이 캐시 파일이 갱신되지 않으면 사전 검사는 계속 실패한다.
비밀키(Secrets)의 출처
Mattermost를 직접 사용하지 않았더라도 `/etc/gitlab/gitlab-secrets.json` 파일에는 관련 암호화 Salt 및 Key 정보가 기본적으로 생성되어 존재한다.
python3 -c "import json; d=json.load(open('/etc/gitlab/gitlab-secrets.json')); \
print(list(d.get('mattermost',{}).keys()))"
# 출력: ['email_invite_salt', 'file_public_link_salt', 'sql_at_rest_encrypt_key', 'register_as_oauth_app']
- `reconfigure` 가 실행될 때 Omnibus는 이 `gitlab-secrets.json` 내용을 Node Attributes에 병합하므로, 결과적으로 `["normal"]["mattermost"]` 블록이 노드 파일에 남게 되는 것이다.
주의: 18.x 버전에서 reconfigure를 실행하면 안 되는 이유
흔히 하는 실수가 "secrets 파일에서 `mattermost` 를 지운 후 `gitlab-ctl reconfigure` 를 돌려 노드 파일을 갱신해야지"라고 생각하는 것이다. 18.x 버전에서는 이 방법이 동작하지 않는다.
18.x의 `gitlab/libraries/gitlab_mattermost.rb` 내 내부 로직을 보면 Salt 생성 함수가 조건 없이 실행되도록 되어 있다.
def parse_secrets
  Gitlab['mattermost']['email_invite_salt']       ||= SecretsHelper.generate_hex(16)
  Gitlab['mattermost']['file_public_link_salt']   ||= SecretsHelper.generate_hex(16)
  Gitlab['mattermost']['sql_at_rest_encrypt_key'] ||= SecretsHelper.generate_hex(16)
  Gitlab['mattermost']['gitlab_id']               ||= SecretsHelper.generate_urlsafe_base64
  Gitlab['mattermost']['gitlab_secret']           ||= SecretsHelper.generate_urlsafe_base64
end
즉, 18.x 버전 환경에서 `reconfigure` 를 다시 실행하면 삭제했던 `Mattermost` 관련 키가 자동으로 재생성되어 `gitlab-secrets.json` 과 노드 JSON 파일에 다시 기록된다.
따라서 핵심은 18.x에서 깨끗한 노드 파일을 만들려고 시도하는 대신, 노드 검사 단계를 우회하여 바로 19.x 패키지 설치로 넘어가는 것이다.
해결 방법
`check_config.rb` 스크립트는 노드 JSON 파일이 존재하지 않으면 `Skipping config check.` 를 출력하고 정상 종료(exit 0)한다는 점을 이용한다.
1. 사전 백업
작업 전 반드시 설정 및 데이터를 백업한다.
sudo gitlab-backup create
sudo cp -a /etc/gitlab/gitlab.rb /etc/gitlab/gitlab.rb.bak.$(date +%F)
sudo cp -a /etc/gitlab/gitlab-secrets.json /etc/gitlab/gitlab-secrets.json.bak.$(date +%F)
2. gitlab.rb 파일 정리
주석 처리되지 않은 `mattermost` 설정이 남아있지 않은지 확인하고, 존재할 경우 주석 처리한다.
grep -nE "^\s*mattermost" /etc/gitlab/gitlab.rb
# 주석 처리가 필요할 경우
sudo sed -i -E "s/^(\s*)(mattermost(\[|_external_url))/\1# \2/" /etc/gitlab/gitlab.rb
3. gitlab-secrets.json 내 mattermost 블록 제거
파이썬 명령어를 통해 `gitlab-secrets.json` 에서 `mattermost` 관련 섹션을 제거한다.
sudo python3 -c "import json; p='/etc/gitlab/gitlab-secrets.json'; \
d=json.load(open(p)); d.pop('mattermost', None); \
json.dump(d, open(p,'w'), indent=2)"

# 삭제 확인 (0이 출력되어야 함)
grep -c mattermost /etc/gitlab/gitlab-secrets.json
4. 캐시된 노드 파일 삭제
사전 검사를 우회하기 위해 캐시된 Chef 노드 파일을 삭제한다.
sudo rm -f /opt/gitlab/embedded/nodes/*.json
5. reconfigure 실행 없이 즉시 패키지 업그레이드
주의: 노드 파일을 삭제한 후 절대로 `gitlab-ctl reconfigure` 를 실행해서는 안 된다. 18.x 환경에서 `reconfigure` 를 실행하면 키가 재생성된다.
곧바로 19.x 패키지 설치를 진행한다.
sudo apt-get install -y gitlab-ce=19.1.2-ce.0
19.x 패키지의 설치 후(Post-install) 단계에서 동작하는 reconfigure는 더 이상 Mattermost Cookbook을 포함하지 않으므로, 깔끔한 상태의 노드 파일이 새롭게 생성된다.
대체 방법: skip-fail-config-check 바이패스
노드 파일을 직접 삭제하지 않고 우회하고 싶다면 Omnibus에서 제공하는 플래그 파일을 생성할 수도 있다.
sudo touch /etc/gitlab/skip-fail-config-check
sudo apt-get install -y gitlab-ce=19.1.2-ce.0
sudo rm -f /etc/gitlab/skip-fail-config-check
단, 이 방법을 사용할 때에는 사전 검사 실패 원인이 Mattermost 단 하나뿐인지 미리 `gitlab-ctl check-config --version=19.1` 명령을 통해 확인해 두어야 한다.
업그레이드 후 검증
업그레이드 완료 후 정상 동작 여부 및 설정 잔존 여부를 검증한다.
# 버전 확인
head -1 /opt/gitlab/version-manifest.txt

# 서비스 및 헬스체크 확인
sudo gitlab-ctl status
curl -sS -o /dev/null -w "%{http_code}\n" http://localhost/-/health
# 출력: 200
Mattermost 관련 설정이 완전히 제거되었는지 확인한다.
# secrets 확인 (0 출력)
grep -c mattermost /etc/gitlab/gitlab-secrets.json

# 노드 파일 내 mattermost 항목 확인 (빈 객체 {} 출력)
python3 -c "import json,glob; d=json.load(open(glob.glob('/opt/gitlab/embedded/nodes/*.json')[0])); \
print(d['normal'].get('mattermost'))"

# 설정 검사 재시도 (exit: 0 출력)
sudo gitlab-ctl check-config --version=19.1; echo "exit: $?"
백그라운드 마이그레이션 확인 (필수)
메이저 버전(18 → 19) 업데이트 후에는 Batched Background Migrations가 백그라운드에서 수행된다. 다음 업데이트나 추가 작업을 진행하기 전에 모든 마이그레이션 작업이 완료되었는지 확인해야 한다.
- 확인 경로: GitLab 관리자 페이지 → Monitoring → Background Migrations (Finished 상태 확인)
요약
- 사전 검사(check-config) 실패의 주요 원인은 `gitlab.rb` 가 아닌 `/opt/gitlab/embedded/nodes/*.json` 에 남아있는 캐시 설정 때문이다.
- 18.x 버전에서는 Secrets 생성이 강제되므로 `reconfigure` 실행 시 설정이 복구된다.
- 해결 순서: `gitlab.rb` 및 `gitlab-secrets.json` 정리 → 노드 캐시 파일 삭제 → reconfigure 없이 바로 19.x 패키지 업그레이드 실행.
Reference
- GitLab 19 Upgrade Notes — GitLab Docs
- Remove Mattermost from Linux package in 19.0 (#9799) — omnibus-gitlab
- GitLab Mattermost (Deprecated) — GitLab Docs
- Migrating from GitLab Omnibus to Mattermost Standalone — Mattermost Docs
- Upgrade Paths — GitLab Docs
Somaz | DevOps Engineer | Kubernetes & Cloud Infrastructure Specialist
'IaC > CI CD Tool' 카테고리의 다른 글
| Jenkins CI/CD와 Slack을 연동한 APK QR 코드 자동 생성 봇 구축기 (1) | 2026.06.25 |
|---|---|
| GitLab Source Backup & Restore with rclone + Google Drive (0) | 2026.03.26 |
| GitLab CI/CD YAML 파일 최적화: 중복 제거와 재사용성 향상 (0) | 2026.03.17 |
| GitLab CI로 Google Drive에 자동 업로드하기 (0) | 2025.11.12 |
| GitLab 18.0 업그레이드 시 git_data_dirs 설정 변경 가이드 (2) | 2025.11.05 |