
Overview
현대의 웹 애플리케이션에서 CDN(Content Delivery Network)은 더 이상 선택이 아닌 필수가 되었다.
특히 글로벌 서비스를 운영하거나 대용량 트래픽을 처리해야 하는 경우, 적절한 CDN 전략 없이는 사용자 경험과 서버 안정성을 보장하기 어렵다.
이 글에서는 Kubernetes 환경에서 AWS CloudFront를 활용하여 API 서버와 정적 파일 서빙을 모두 최적화하는 완전한 CDN 솔루션을 구축하는 방법을 다룬다.
External-DNS를 통한 자동 DNS 관리부터 ALB + CloudFront, S3 + CloudFront 두 가지 패턴의 Distribution 설정까지 전체 아키텍처를 실무 관점에서 상세히 설명하겠다.
📅 관련 글
2022.02.13 - [AWS] - AWS IAM (Identity and Access Management) 개요 및 설정 방법
2022.02.07 - [AWS] - AWS EC2 인스턴스 생성
2022.02.13 - [AWS] - AWS S3 (Simple Storage Service) 개요 및 활용 방법
2023.03.30 - [AWS] - AWS Secrets Manager란?(OAuth, SSO)
2023.03.29 - [AWS] - AWS CLI 정리
2023.03.28 - [AWS] - AWS IAM이란?
2023.03.28 - [AWS] - AWS S3 권한이란?
2023.03.28 - [AWS] - AWS S3란?(개념, 속성)
2023.03.30 - [AWS] - AWS Cloudfront란? / Canary 및 Blue-Green 배포
2023.04.03 - [AWS] - AWS VPC란?
2023.05.26 - [AWS] - AWS IRSA(IAM Roles for Service Accounts)란?
2024.11.07 - [AWS] - AWS Ingress Annotations 정리
2024.11.04 - [AWS] - AWS Assume Role이란?
2024.11.16 - [AWS] - AWS Network ACL vs Security Group
2024.11.21 - [AWS] - ALB access Log 활성화 → S3 권한 설정 및 로그 저장
2024.11.24 - [AWS] - EKS Pod Identity Addon
2024.11.27 - [AWS] - AWS DynamoDB란?
2025.01.03 - [AWS] - AWS DynamoDB Local 설치
2025.09.05 - [AWS] - AWS CDN 구축 가이드: Kubernetes + AWS CloudFront로 API와 정적 파일 서빙 최적화
AWS CDN 구축 가이드
아키텍처 개요
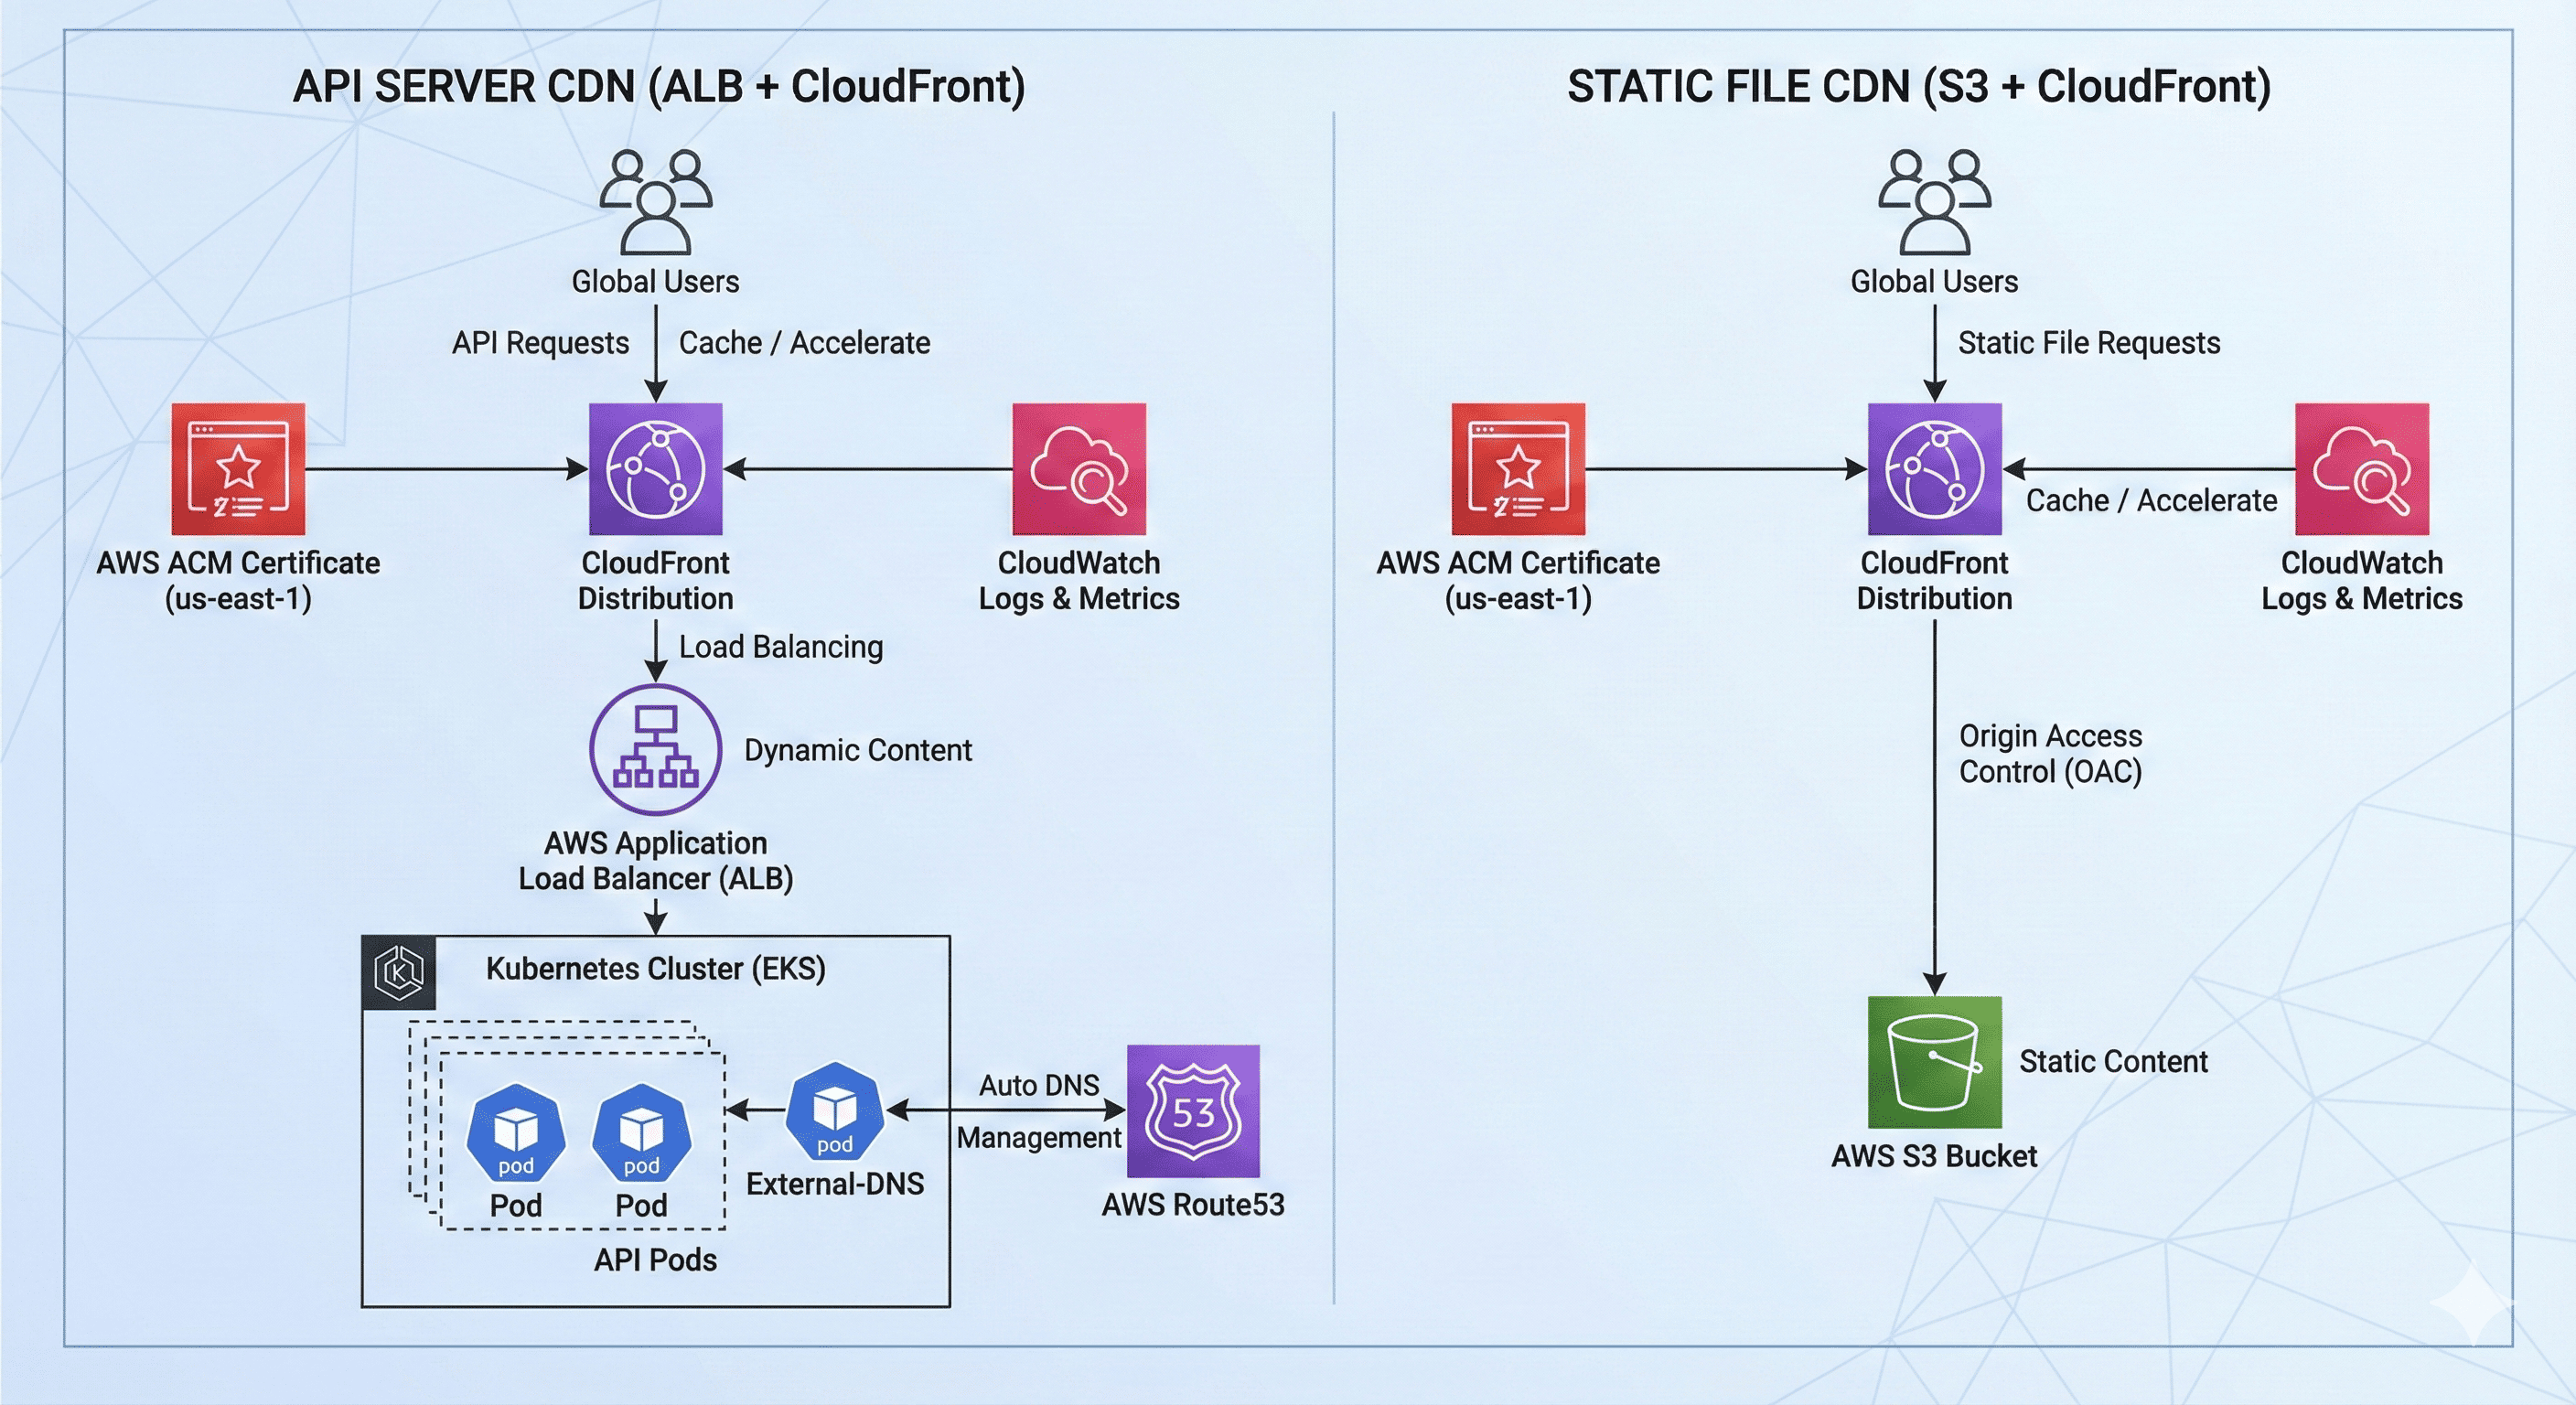
우리가 구축할 CDN 아키텍처는 다음과 같은 하이브리드 구조를 갖는다.
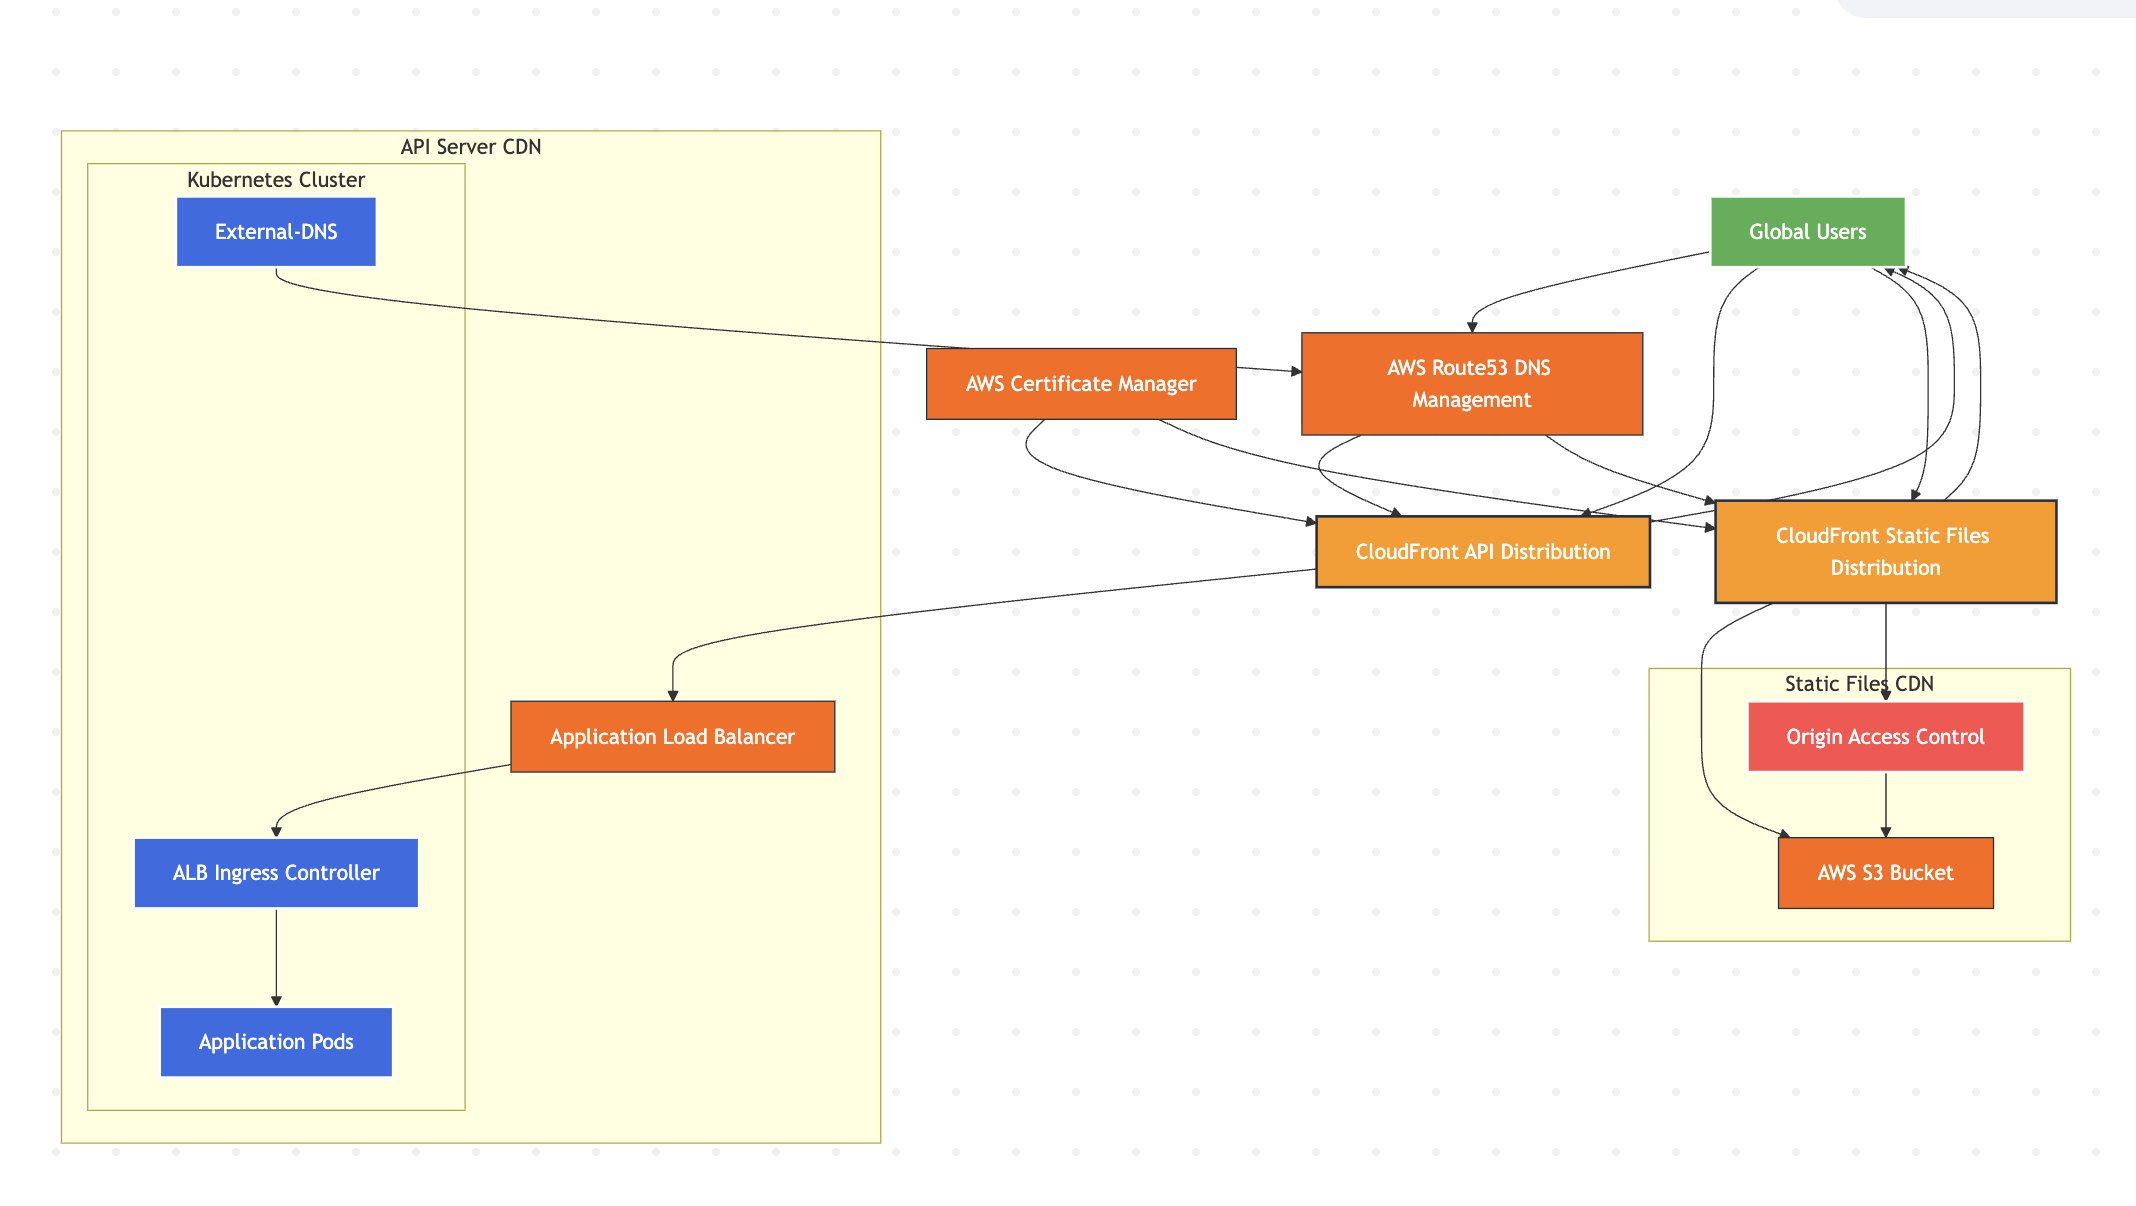
API 서버 CDN (ALB + CloudFront)
- Kubernetes 클러스터: 애플리케이션 실행 환경
- External-DNS: Route53 레코드 자동 관리
- AWS Application Load Balancer: API Origin 서버
- AWS CloudFront: API 응답 캐싱 및 글로벌 배포
정적 파일 CDN (S3 + CloudFront)
- AWS S3: 정적 파일 저장소 (이미지, 문서, 다운로드 파일)
- AWS CloudFront: 정적 콘텐츠 글로벌 배포
- Origin Access Control: S3 보안 강화
1단계: External-DNS 설정
External-DNS는 Kubernetes 리소스의 변경사항을 감지하여 Route53 DNS 레코드를 자동으로 관리해주는 핵심 도구이다.
# external-dns-values.yaml
image:
  repository: registry.k8s.io/external-dns/external-dns
  pullPolicy: IfNotPresent

serviceAccount:
  create: true
  annotations:
    # IRSA (IAM Role for Service Account) 설정
    eks.amazonaws.com/role-arn: arn:aws:iam::123456789012:role/external-dns-role

# 시스템 전용 노드그룹에 배포로 안정성 확보
nodeSelector:
  eks.amazonaws.com/nodegroup: system-nodegroup

# 보안 강화 설정 - 최소 권한 원칙
podSecurityContext:
  runAsNonRoot: true
  fsGroup: 65534

securityContext:
  privileged: false
  allowPrivilegeEscalation: false
  readOnlyRootFilesystem: true
  runAsNonRoot: true
  runAsUser: 65532
  runAsGroup: 65532
  capabilities:
    drop: ["ALL"]

rbac:
  create: true

# 리소스 최적화
resources:
  requests:
    cpu: 50m
    memory: 64Mi
  limits:
    cpu: 200m
    memory: 256Mi

# 로그 및 모니터링 설정
logLevel: info
logFormat: text
interval: 5m

# 모니터링할 리소스 유형
sources:
  - service
  - ingress

# DNS 레코드 관리 정책
policy: upsert-only  # 안전한 레코드 관리
registry: txt
txtOwnerId: "enterprise-external-dns"
txtPrefix: "external-dns-"

# 관리할 도메인 제한 (보안상 중요)
domainFilters:
  - enterprise.example.com

# AWS Route53 프로바이더 설정
provider:
  name: aws

extraArgs:
  - --aws-zone-type=public
  - --aws-prefer-cname
  - --annotation-filter=external-dns.alpha.kubernetes.io/hostname
2단계: CloudFront용 ACM 인증서 생성
CloudFront는 반드시 us-east-1 리전의 ACM 인증서만 사용할 수 있으므로, Terraform을 통해 해당 리전에 인증서를 생성한다.
# acm-certificates.tf
module "cloudfront_certificate" {
  source = "../../../modules/acm/v6.1.0"

  providers = {
    aws = aws.us_east_1  # CloudFront용 인증서는 반드시 us-east-1 리전
  }

  domain_name       = var.root_domain
  zone_id           = aws_route53_zone.main_zone.zone_id
  validation_method = "DNS"

  subject_alternative_names = [
    "*.enterprise.example.com",
    "enterprise.example.com"
  ]

  wait_for_validation = true

  tags = {
    Environment = var.environment
    Project     = var.project
    Terraform   = var.terraform
    Purpose     = "CloudFront-SSL"
    Name        = "cloudfront-acm-certificate"
  }

  depends_on = [aws_route53_zone.main_zone]
}
3단계: API Origin 서버 설정 (Kubernetes Ingress)
CDN이 바라볼 Origin 서버를 위한 별도 도메인을 생성한다. 이는 CDN 트래픽과 직접 트래픽을 분리하여 관리하기 위한 모범 사례이다.
# api-ingress-values.yaml
ingress:
  enabled: true
  className: "alb"
  annotations:
    alb.ingress.kubernetes.io/scheme: internet-facing
    alb.ingress.kubernetes.io/target-type: ip

    # 공유 ALB 그룹 설정으로 비용 최적화
    alb.ingress.kubernetes.io/group.name: enterprise-shared-alb
    alb.ingress.kubernetes.io/group.order: "10"

    # Origin 전용 도메인 설정
    external-dns.alpha.kubernetes.io/hostname: origin-api.enterprise.example.com

    # ALB 이름 명시적 지정
    alb.ingress.kubernetes.io/load-balancer-name: enterprise-shared-alb-loadbalancer

    # SSL 설정 (ALB용 - 서비스 리전 인증서)
    alb.ingress.kubernetes.io/certificate-arn: arn:aws:acm:eu-central-1:123456789012:certificate/cert-id
    alb.ingress.kubernetes.io/listen-ports: '[{"HTTPS": 443}]'  # HTTPS만 허용

    # CDN 최적화를 위한 ALB 설정
    alb.ingress.kubernetes.io/target-group-attributes: |
      deregistration_delay.timeout_seconds=30,
      stickiness.enabled=false

    # 용도 식별을 위한 태깅
    alb.ingress.kubernetes.io/tags: "Purpose=CDN-Origin,Environment=production"

  hosts:
    - host: origin-api.enterprise.example.com
      paths:
        - path: /
          pathType: Prefix
4단계: API CloudFront Distribution 구성
API 서버를 위한 CloudFront Distribution을 생성한다. 각 API 엔드포인트의 특성에 따라 캐시 전략을 세밀하게 조정하는 것이 핵심이다.
# cloudfront-api.tf
module "api_cdn" {
  source = "terraform-aws-modules/cloudfront/aws"

  aliases = ["api.enterprise.example.com"]
  comment = "Enterprise API CloudFront Distribution"

  enabled             = true
  is_ipv6_enabled     = true
  price_class         = "PriceClass_100"  # 북미, 유럽 위주 서비스
  retain_on_delete    = false
  wait_for_deployment = false

  # ALB Origin 설정
  origin = {
    alb_api_origin = {
      domain_name = "origin-api.enterprise.example.com"
      custom_origin_config = {
        http_port                = 443
        https_port               = 443
        origin_protocol_policy   = "https-only"
        origin_ssl_protocols     = ["TLSv1.2"]
        origin_read_timeout      = 60
        origin_keepalive_timeout = 5
      }

      # Origin Shield로 캐시 히트율 향상
      origin_shield = {
        enabled              = true
        origin_shield_region = "eu-central-1"  # 서비스 리전과 동일
      }
    }
  }

  # 기본 캐시 동작 - 보편적 API 응답
  default_cache_behavior = {
    target_origin_id       = "alb_api_origin"
    viewer_protocol_policy = "redirect-to-https"
    allowed_methods        = ["DELETE", "GET", "HEAD", "OPTIONS", "PATCH", "POST", "PUT"]
    cached_methods         = ["GET", "HEAD", "OPTIONS"]
    compress               = true

    use_forwarded_values = true
    query_string         = true
    headers              = ["Host", "Origin", "Referer", "CloudFront-Forwarded-Proto"]
    cookies_forward      = "none"

    min_ttl     = 0
    default_ttl = 3600   # 1시간 기본 캐시
    max_ttl     = 86400  # 최대 24시간
  }

  # API 특성별 세밀한 캐시 제어
  ordered_cache_behavior = [
    # 헬스체크 - 빠른 장애 감지를 위한 짧은 캐시
    {
      path_pattern           = "/health"
      target_origin_id       = "alb_api_origin"
      viewer_protocol_policy = "redirect-to-https"
      allowed_methods        = ["GET", "HEAD", "OPTIONS"]
      cached_methods         = ["GET", "HEAD"]
      compress               = true

      use_forwarded_values = true
      query_string         = false
      headers              = ["Host"]
      cookies_forward      = "none"

      min_ttl     = 0
      default_ttl = 30     # 30초
      max_ttl     = 300    # 최대 5분
    },

    # 정적 설정 데이터 - 중간 길이 캐시
    {
      path_pattern           = "/api/configs/*"
      target_origin_id       = "alb_api_origin"
      viewer_protocol_policy = "redirect-to-https"
      allowed_methods        = ["GET", "HEAD", "OPTIONS"]
      cached_methods         = ["GET", "HEAD"]
      compress               = true

      use_forwarded_values = true
      query_string         = true
      headers              = ["Host", "Authorization", "Content-Type"]
      cookies_forward      = "all"

      min_ttl     = 0
      default_ttl = 1800   # 30분
      max_ttl     = 3600   # 1시간
    },

    # 제품 목록 - 상품 변경 빈도 고려
    {
      path_pattern           = "/api/products/list"
      target_origin_id       = "alb_api_origin"
      viewer_protocol_policy = "redirect-to-https"
      allowed_methods        = ["GET", "HEAD", "OPTIONS"]
      cached_methods         = ["GET", "HEAD"]
      compress               = true

      use_forwarded_values = true
      query_string         = true
      headers              = ["Host", "Authorization"]
      cookies_forward      = "all"

      min_ttl     = 0
      default_ttl = 900    # 15분
      max_ttl     = 1800   # 30분
    },

    # 인증 관련 - 캐시 완전 비활성화
    {
      path_pattern           = "/auth/*"
      target_origin_id       = "alb_api_origin"
      viewer_protocol_policy = "redirect-to-https"
      allowed_methods        = ["DELETE", "GET", "HEAD", "OPTIONS", "PATCH", "POST", "PUT"]
      cached_methods         = ["GET", "HEAD"]
      compress               = true

      use_forwarded_values = true
      query_string         = true
      headers              = ["*"]  # 모든 헤더 전달
      cookies_forward      = "all"

      min_ttl     = 0
      default_ttl = 0      # 캐시 없음
      max_ttl     = 0
    },

    # 사용자별 데이터 - 캐시 비활성화
    {
      path_pattern           = "/api/users/*"
      target_origin_id       = "alb_api_origin"
      viewer_protocol_policy = "redirect-to-https"
      allowed_methods        = ["DELETE", "GET", "HEAD", "OPTIONS", "PATCH", "POST", "PUT"]
      cached_methods         = ["GET", "HEAD"]
      compress               = true

      use_forwarded_values = true
      query_string         = true
      headers              = ["*"]
      cookies_forward      = "all"

      min_ttl     = 0
      default_ttl = 0
      max_ttl     = 0
    }
  ]

  # SSL 인증서 설정
  viewer_certificate = {
    acm_certificate_arn      = module.cloudfront_certificate.acm_certificate_arn
    ssl_support_method       = "sni-only"
    minimum_protocol_version = "TLSv1.2_2021"
  }

  # 지리적 제한 (필요시 설정)
  geo_restriction = {
    restriction_type = "none"
  }

  # SPA 지원을 위한 에러 페이지 처리
  custom_error_response = [
    {
      error_code         = 404
      response_code      = 200
      response_page_path = "/index.html"
    }
  ]

  tags = {
    Environment = var.environment
    Project     = var.project
    Terraform   = var.terraform
    Name        = "enterprise-api-cdn"
    Purpose     = "API-Distribution"
  }

  depends_on = [module.cloudfront_certificate]
}
5단계: S3 기반 정적 파일 CDN 구성
이제 정적 파일 서빙을 위한 S3 + CloudFront 조합을 구성해보겠다.
Route53 Zone 및 Record 생성
# Route53 Zone 및 A/AAAA Record 생성
# route53.tf
resource "aws_route53_zone" "main_zone" {
  name = var.domain_name

  tags = {
    Environment = var.environment
    Project     = var.project
    Terraform   = var.terraform
    Name        = "main-route53-zone"
  }
}

# API CDN A 레코드 (IPv4)
resource "aws_route53_record" "api_cdn" {
  zone_id = aws_route53_zone.main_zone.zone_id
  name    = "api.enterprise.example.com"
  type    = "A"

  alias {
    name                   = module.api_cdn.cloudfront_distribution_domain_name
    zone_id                = module.api_cdn.cloudfront_distribution_hosted_zone_id
    evaluate_target_health = false
  }

  depends_on = [
    aws_route53_zone.main_zone,
    module.api_cdn
  ]
}

# API CDN AAAA 레코드 (IPv6)
resource "aws_route53_record" "api_cdn_ipv6" {
  zone_id = aws_route53_zone.main_zone.zone_id
  name    = "api.enterprise.example.com"
  type    = "AAAA"

  alias {
    name                   = module.api_cdn.cloudfront_distribution_domain_name
    zone_id                = module.api_cdn.cloudfront_distribution_hosted_zone_id
    evaluate_target_health = false
  }

  depends_on = [
    aws_route53_zone.main_zone,
    module.api_cdn
  ]
}

# 정적 파일 CDN A 레코드 (IPv4)
resource "aws_route53_record" "static_files_cdn" {
  zone_id = aws_route53_zone.main_zone.zone_id
  name    = "cdn.enterprise.example.com"
  type    = "A"

  alias {
    name                   = module.static_files_cdn.cloudfront_distribution_domain_name
    zone_id                = module.static_files_cdn.cloudfront_distribution_hosted_zone_id
    evaluate_target_health = false
  }

  depends_on = [
    aws_route53_zone.main_zone,
    module.static_files_cdn
  ]
}

# 정적 파일 CDN AAAA 레코드 (IPv6)
resource "aws_route53_record" "static_files_cdn_ipv6" {
  zone_id = aws_route53_zone.main_zone.zone_id
  name    = "cdn.enterprise.example.com"
  type    = "AAAA"

  alias {
    name                   = module.static_files_cdn.cloudfront_distribution_domain_name
    zone_id                = module.static_files_cdn.cloudfront_distribution_hosted_zone_id
    evaluate_target_health = false
  }

  depends_on = [
    aws_route53_zone.main_zone,
    module.static_files_cdn
  ]
}
AAAA 레코드 추가 이유와 중요성
1. IPv6 지원의 필요성
- IPv4 주소 고갈 문제: IPv4 주소 공간(약 43억 개)이 이미 고갈되어 새로운 인터넷 서비스에서는 IPv6가 필수가 되었다.
- 미래 지향적 설계: 현재 많은 ISP와 모바일 네트워크가 IPv6를 우선적으로 사용하며, 특히 모바일 환경에서 IPv6 Only 네트워크가 증가하고 있다.
2. CloudFront의 IPv6 지원
- 기본 IPv6 지원: AWS CloudFront는 기본적으로 IPv6를 지원하며, is_ipv6_enabled = true 설정으로 활성화된다.
- 동일한 Distribution 사용: IPv4와 IPv6 모두 같은 CloudFront Distribution을 사용하므로, AAAA 레코드도 동일한 alias 설정을 사용할 수 있다.
3. 성능 최적화 효과
- 더 빠른 연결: IPv6는 NAT(Network Address Translation) 오버헤드가 없어 더 직접적이고 빠른 연결을 제공한다.
- 듀얼 스택 환경: 클라이언트가 IPv6와 IPv4를 모두 지원할 때, 일반적으로 IPv6가 우선 선택되어 더 나은 성능을 제공한다.
4. 글로벌 접근성 향상
- 아시아-태평양 지역: 특히 한국, 일본, 중국 등에서 IPv6 채택률이 높아 더 나은 사용자 경험을 제공한다.
- 모바일 네트워크: LTE/5G 네트워크에서 IPv6가 기본으로 사용되는 경우가 많다.
S3 버킷 생성 및 보안 설정
# s3-static-files.tf
module "static_files_bucket" {
  source = "terraform-aws-modules/s3-bucket/aws"

  bucket = var.static_files_bucket_name

  # Private bucket으로 완전 격리
  control_object_ownership = true
  object_ownership         = "ObjectWriter"

  # 모든 퍼블릭 액세스 차단 (보안 강화)
  block_public_acls       = true
  block_public_policy     = true
  ignore_public_acls      = true
  restrict_public_buckets = true

  # 서버 사이드 암호화 설정
  server_side_encryption_configuration = {
    rule = {
      apply_server_side_encryption_by_default = {
        sse_algorithm = "AES256"
      }
    }
  }

  # 버전 관리 활성화 (파일 복구 및 변경 추적)
  versioning = {
    enabled = true
  }

  # 라이프사이클 관리로 비용 최적화
  lifecycle_configuration = {
    rule = [
      {
        id     = "delete_old_versions"
        status = "Enabled"

        noncurrent_version_expiration = {
          noncurrent_days = 30
        }

        abort_incomplete_multipart_upload = {
          days_after_initiation = 7
        }
      }
    ]
  }

  tags = {
    Environment = var.environment
    Project     = var.project
    Terraform   = var.terraform
    Name        = var.static_files_bucket_name
    Purpose     = "Static-File-Storage"
  }

  depends_on = [aws_route53_zone.main_zone]
}

# S3 버킷 정책 - CloudFront만 접근 허용 (보안 강화)
resource "aws_s3_bucket_policy" "static_files" {
  bucket = module.static_files_bucket.s3_bucket_id

  policy = jsonencode({
    Version = "2012-10-17"
    Statement = [
      {
        Sid    = "AllowCloudFrontServicePrincipal"
        Effect = "Allow"
        Principal = {
          Service = "cloudfront.amazonaws.com"
        }
        Action   = "s3:GetObject"
        Resource = "${module.static_files_bucket.s3_bucket_arn}/*"
        Condition = {
          StringEquals = {
            "AWS:SourceArn" = module.static_files_cdn.cloudfront_distribution_arn
          }
        }
      }
    ]
  })

  depends_on = [
    module.static_files_bucket,
    module.static_files_cdn
  ]
}
S3 기반 CloudFront Distribution 구성
# cloudfront-s3.tf
module "static_files_cdn" {
  source = "terraform-aws-modules/cloudfront/aws"

  aliases = ["cdn.enterprise.example.com"]
  comment = "Enterprise Static Files CDN Distribution"

  enabled             = true
  is_ipv6_enabled     = true
  price_class         = "PriceClass_100"
  retain_on_delete    = false
  wait_for_deployment = false

  # Origin Access Control 설정 (최신 방식, OAI 대신 사용)
  create_origin_access_control = true
  origin_access_control = {
    s3_oac = {
      description      = "CloudFront access to S3 static files"
      origin_type      = "s3"
      signing_behavior = "always"
      signing_protocol = "sigv4"
    }
  }

  # S3 Origin 설정
  origin = {
    s3_static_files = {
      domain_name           = module.static_files_bucket.s3_bucket_bucket_regional_domain_name
      origin_access_control = "s3_oac"
    }
  }

  # 기본 캐시 동작 - 정적 파일용 긴 캐시
  default_cache_behavior = {
    target_origin_id       = "s3_static_files"
    viewer_protocol_policy = "redirect-to-https"
    allowed_methods        = ["GET", "HEAD", "OPTIONS"]
    cached_methods         = ["GET", "HEAD"]
    compress               = true

    # S3는 쿠키나 쿼리스트링이 불필요
    use_forwarded_values = true
    query_string         = false
    cookies_forward      = "none"

    # 정적 파일용 긴 TTL 설정
    min_ttl     = 0
    default_ttl = 86400    # 24시간
    max_ttl     = 31536000 # 1년
  }

  # 파일 유형별 세밀한 캐시 제어
  ordered_cache_behavior = [
    # 이미지 파일 - 매우 긴 캐시 (변경 빈도 낮음)
    {
      path_pattern           = "*.{jpg,jpeg,png,gif,webp,svg,ico}"
      target_origin_id       = "s3_static_files"
      viewer_protocol_policy = "https-only"
      allowed_methods        = ["GET", "HEAD"]
      cached_methods         = ["GET", "HEAD"]
      compress               = true

      use_forwarded_values = true
      query_string         = false
      cookies_forward      = "none"

      min_ttl     = 0
      default_ttl = 2592000  # 30일
      max_ttl     = 31536000 # 1년
    },

    # CSS/JS 파일 - 긴 캐시 (압축 최적화)
    {
      path_pattern           = "*.{css,js}"
      target_origin_id       = "s3_static_files"
      viewer_protocol_policy = "https-only"
      allowed_methods        = ["GET", "HEAD"]
      cached_methods         = ["GET", "HEAD"]
      compress               = true

      use_forwarded_values = true
      query_string         = false
      cookies_forward      = "none"

      min_ttl     = 0
      default_ttl = 604800   # 7일
      max_ttl     = 2592000  # 30일
    },

    # 다운로드 파일 - 긴 캐시 + CORS 헤더
    {
      path_pattern           = "/downloads/*"
      target_origin_id       = "s3_static_files"
      viewer_protocol_policy = "https-only"
      allowed_methods        = ["GET", "HEAD", "OPTIONS"]
      cached_methods         = ["GET", "HEAD"]
      compress               = true

      use_forwarded_values = true
      query_string         = true
      headers              = ["Origin", "Access-Control-Request-Headers", "Access-Control-Request-Method"]
      cookies_forward      = "none"

      min_ttl     = 0
      default_ttl = 86400    # 1일
      max_ttl     = 31536000 # 1년
    },

    # 문서 파일 - 중간 길이 캐시 (압축 비활성화)
    {
      path_pattern           = "*.{pdf,doc,docx,xls,xlsx,ppt,pptx,zip,rar}"
      target_origin_id       = "s3_static_files"
      viewer_protocol_policy = "https-only"
      allowed_methods        = ["GET", "HEAD"]
      cached_methods         = ["GET", "HEAD"]
      compress               = false  # 이미 압축된 파일은 추가 압축 불필요

      use_forwarded_values = true
      query_string         = false
      cookies_forward      = "none"

      min_ttl     = 0
      default_ttl = 604800   # 7일
      max_ttl     = 2592000  # 30일
    }
  ]

  # SSL 인증서 설정
  viewer_certificate = {
    acm_certificate_arn      = module.cloudfront_certificate.acm_certificate_arn
    ssl_support_method       = "sni-only"
    minimum_protocol_version = "TLSv1.2_2021"
  }

  # 지리적 제한 없음
  geo_restriction = {
    restriction_type = "none"
  }

  # 기본 인덱스 파일
  default_root_object = "index.html"

  # 에러 페이지 설정
  custom_error_response = [
    {
      error_code         = 403
      response_code      = 404
      response_page_path = "/errors/404.html"
    },
    {
      error_code         = 404
      response_code      = 404
      response_page_path = "/errors/404.html"
    }
  ]

  tags = {
    Environment = var.environment
    Project     = var.project
    Terraform   = var.terraform
    Name        = "enterprise-static-files-cdn"
    Purpose     = "Static-File-Distribution"
  }

  depends_on = [
    module.static_files_bucket,
    module.cloudfront_certificate
  ]
}
6단계: 고급 최적화 및 보안 설정
CloudFront 함수를 통한 보안 헤더 추가
# cloudfront-functions.tf
resource "aws_cloudfront_function" "security_headers" {
  name    = "add-security-headers"
  runtime = "cloudfront-js-1.0"
  comment = "Add security headers to all responses"
  publish = true

  code = <<-EOT
function handler(event) {
    var response = event.response;
    var headers = response.headers;

    // 보안 헤더 추가
    headers['strict-transport-security'] = {
        value: 'max-age=31536000; includeSubdomains; preload'
    };
    headers['content-security-policy'] = {
        value: "default-src 'self'; img-src 'self' data: https:; script-src 'self' 'unsafe-inline'; style-src 'self' 'unsafe-inline'"
    };
    headers['x-frame-options'] = {value: 'DENY'};
    headers['x-content-type-options'] = {value: 'nosniff'};
    headers['referrer-policy'] = {value: 'strict-origin-when-cross-origin'};
    headers['permissions-policy'] = {
        value: 'geolocation=(), camera=(), microphone=()'
    };

    return response;
}
EOT
}
CI/CD를 위한 IAM 역할 설정
# iam-deployment.tf
resource "aws_iam_role" "cicd_deployment_role" {
  name = "enterprise-cicd-deployment-role"

  assume_role_policy = jsonencode({
    Version = "2012-10-17"
    Statement = [
      {
        Action = "sts:AssumeRole"
        Effect = "Allow"
        Principal = {
          Service = "codebuild.amazonaws.com"  # CodeBuild 또는 필요한 서비스
        }
      }
    ]
  })

  tags = {
    Environment = var.environment
    Purpose     = "CI-CD-Deployment"
  }
}

resource "aws_iam_role_policy" "s3_deployment_policy" {
  name = "s3-deployment-policy"
  role = aws_iam_role.cicd_deployment_role.id

  policy = jsonencode({
    Version = "2012-10-17"
    Statement = [
      {
        Effect = "Allow"
        Action = [
          "s3:PutObject",
          "s3:PutObjectAcl",
          "s3:GetObject",
          "s3:DeleteObject",
          "s3:ListBucket"
        ]
        Resource = [
          module.static_files_bucket.s3_bucket_arn,
          "${module.static_files_bucket.s3_bucket_arn}/*"
        ]
      },
      {
        Effect = "Allow"
        Action = [
          "cloudfront:CreateInvalidation",
          "cloudfront:GetInvalidation",
          "cloudfront:ListInvalidations"
        ]
        Resource = [
          module.static_files_cdn.cloudfront_distribution_arn,
          module.api_cdn.cloudfront_distribution_arn
        ]
      }
    ]
  })
}
7단계: 배포 및 검증
모든 설정이 완료되면 다음과 같이 체계적으로 검증한다.
# 1. DNS 전파 확인
echo "=== DNS 전파 확인 ==="
dig api.enterprise.example.com
dig cdn.enterprise.example.com
dig origin-api.enterprise.example.com

# 2. API CDN 동작 확인
echo "=== API CDN 동작 확인 ==="
curl -I https://api.enterprise.example.com/health
curl -I https://api.enterprise.example.com/api/configs/app

# 3. 정적 파일 CDN 동작 확인
echo "=== 정적 파일 CDN 동작 확인 ==="
curl -I https://cdn.enterprise.example.com/images/logo.png
curl -I https://cdn.enterprise.example.com/downloads/manual.pdf

# 4. 캐시 동작 검증
echo "=== 캐시 동작 검증 ==="
# 첫 번째 요청 (Miss 예상)
curl -I https://api.enterprise.example.com/api/configs/static | grep -E "(X-Cache|Cache-Control)"

# 두 번째 요청 (Hit 예상)
curl -I https://api.enterprise.example.com/api/configs/static | grep -E "(X-Cache|Cache-Control)"

# 5. 동적 API 캐시 우회 확인
echo "=== 동적 API 캐시 우회 확인 ==="
curl -I https://api.enterprise.example.com/api/users/profile | grep "X-Cache"
# 결과: X-Cache: Miss from cloudfront (항상 Miss여야 함)

# 6. 정적 파일 캐시 확인
echo "=== 정적 파일 캐시 확인 ==="
curl -I https://cdn.enterprise.example.com/images/logo.png | grep -E "(X-Cache|Cache-Control)"
# 결과: X-Cache: Hit from cloudfront, Cache-Control: max-age=2592000

# 7. 보안 헤더 확인
echo "=== 보안 헤더 확인 ==="
curl -I https://cdn.enterprise.example.com/ | grep -E "(Strict-Transport-Security|X-Frame-Options|X-Content-Type-Options)"

# 8. 압축 확인
echo "=== 압축 확인 ==="
curl -H "Accept-Encoding: gzip" -I https://api.enterprise.example.com/api/configs/large | grep "Content-Encoding"

# 9. Origin Shield 효과 확인 (CloudWatch 메트릭에서 확인)
echo "=== CloudWatch에서 Origin Shield 히트율 확인하세요 ==="
echo "CloudFront > Monitoring > Additional metrics > Origin Shield requests"
운영 고려사항
캐시 전략 최적화
캐시 전략은 비즈니스 요구사항과 데이터 특성에 따라 세밀하게 조정해야 한다.
1. API 응답 캐시 전략
- 인증 데이터: 캐시 없음 (0초)
- 사용자별 데이터: 캐시 없음 (0초)
- 설정 데이터: 중간 캐시 (30분~1시간)
- 정적 목록: 짧은 캐시 (15분~30분)
- 헬스체크: 매우 짧은 캐시 (30초~5분)
2. 정적 파일 캐시 전략
- 이미지 파일: 매우 긴 캐시 (30일 이상)
- CSS/JS 파일: 긴 캐시 (7일~30일)
- 문서 파일: 중간 캐시 (7일~30일)
- 다운로드 파일: 긴 캐시 (1일~1년)
보안 강화
# WAF 연동으로 추가 보안 계층 구성
resource "aws_wafv2_web_acl" "cdn_protection" {
  name  = "enterprise-cdn-protection"
  scope = "CLOUDFRONT"

  default_action {
    allow {}
  }

  rule {
    name     = "AWSManagedRulesCommonRuleSet"
    priority = 1

    override_action {
      none {}
    }

    statement {
      managed_rule_group_statement {
        name        = "AWSManagedRulesCommonRuleSet"
        vendor_name = "AWS"
      }
    }

    visibility_config {
      cloudwatch_metrics_enabled = true
      metric_name                = "CommonRuleSetMetric"
      sampled_requests_enabled   = true
    }
  }

  tags = {
    Environment = var.environment
    Name        = "enterprise-cdn-waf"
  }
}

# CloudFront Distribution에 WAF 연결
web_acl_id = aws_wafv2_web_acl.cdn_protection.arn
모니터링 및 로깅
# CloudFront 접근 로그 설정
logging_config = {
  enabled         = true
  bucket          = aws_s3_bucket.cloudfront_logs.bucket_domain_name
  prefix          = "cloudfront-logs/"
  include_cookies = false
}

# CloudWatch 알람 설정
resource "aws_cloudwatch_metric_alarm" "high_error_rate" {
  alarm_name          = "cloudfront-high-error-rate"
  comparison_operator = "GreaterThanThreshold"
  evaluation_periods  = "2"
  metric_name         = "4xxErrorRate"
  namespace           = "AWS/CloudFront"
  period              = "300"
  statistic           = "Average"
  threshold           = "5.0"
  alarm_description   = "This metric monitors cloudfront 4xx error rate"
  alarm_actions       = [aws_sns_topic.alerts.arn]

  dimensions = {
    DistributionId = module.api_cdn.cloudfront_distribution_id
  }
}
비용 최적화
# 적절한 Price Class 선택으로 비용 절감
price_class = "PriceClass_100"  # 북미, 유럽만
# price_class = "PriceClass_200"  # 북미, 유럽, 아시아, 아프리카
# price_class = "PriceClass_All"  # 전 세계 모든 엣지

# Origin Shield 활성화로 Origin 요청 감소
origin_shield = {
  enabled              = true
  origin_shield_region = "eu-central-1"  # 주요 사용자 기반 리전
}

# 압축 활성화로 전송량 감소
compress = true

# 적절한 TTL 설정으로 Origin 요청 최소화
default_ttl = 3600    # 1시간
max_ttl     = 86400   # 24시간
장애 대응 및 복구
# 긴급 캐시 무효화 (Invalidation)
aws cloudfront create-invalidation \
  --distribution-id E123456789ABCD \
  --paths "/*"

# 특정 파일만 무효화
aws cloudfront create-invalidation \
  --distribution-id E123456789ABCD \
  --paths "/api/configs/*" "/images/logo.png"

# 무효화 상태 확인
aws cloudfront get-invalidation \
  --distribution-id E123456789ABCD \
  --id I123456789ABCD

# 실시간 로그 확인 (CloudWatch Logs Insights)
fields @timestamp, c-ip, sc-status, cs-uri-stem
| filter sc-status >= 400
| sort @timestamp desc
| limit 100
성능 최적화 팁
HTTP/2 및 HTTP/3 활성화
CloudFront는 자동으로 HTTP/2를 지원하며, HTTP/3는 별도 설정으로 활성화할 수 있다.
# HTTP/3 지원 활성화 (선택사항)
http_version = "http2and3"
압축 최적화
# Brotli 압축 활성화 (기본적으로 gzip과 함께 지원)
compress = true

# 압축 대상 파일 유형 확인
# CloudFront는 자동으로 다음 파일들을 압축:
# - text/html, text/css, text/javascript
# - application/javascript, application/json
# - image/svg+xml
캐시 키 최적화
# CloudFront Cache Policy 사용 (권장)
cache_policy_id = aws_cloudfront_cache_policy.optimized.id

resource "aws_cloudfront_cache_policy" "optimized" {
  name        = "enterprise-optimized-cache-policy"
  comment     = "Optimized cache policy for API responses"
  default_ttl = 3600
  max_ttl     = 86400
  min_ttl     = 0

  parameters_in_cache_key_and_forwarded_to_origin {
    query_strings_config {
      query_string_behavior = "whitelist"
      query_strings {
        items = ["page", "limit", "sort"]  # 필요한 쿼리 파라미터만
      }
    }

    headers_config {
      header_behavior = "whitelist"
      headers {
        items = ["Authorization", "Content-Type"]  # 필요한 헤더만
      }
    }

    cookies_config {
      cookie_behavior = "none"  # API에서는 일반적으로 쿠키 불필요
    }
  }
}
마무리
이번 가이드를 통해 Kubernetes 환경에서 AWS CloudFront를 활용한 완전한 CDN 구축 과정을 상세히 살펴보았다. ALB 기반 API 서버와 S3 기반 정적 파일 서빙 두 가지 패턴을 모두 다뤄서, 실제 운영 환경에서 직면하는 다양한 시나리오를 종합적으로 커버했다.
핵심 성공 포인트는 다음과 같다.
- 적절한 캐시 전략: 콘텐츠 특성에 맞는 TTL 설정으로 성능과 실시간성의 균형 확보
- 보안 강화: Origin Access Control(OAC)와 보안 헤더를 통한 다층 보안 구현
- 비용 최적화: Price Class, Origin Shield, 압축 등을 통한 효율적인 비용 관리
- 모니터링: CloudWatch 메트릭과 알람을 통한 프로액티브 장애 대응
특히 S3 + CloudFront 조합에서는 최신 Origin Access Control(OAC)을 사용하여 S3 버킷을 완전히 프라이빗하게 유지하면서도 CloudFront를 통한 접근만 허용하는 제로 트러스트 보안 모델을 구현했다. 이는 기존 OAI 방식보다 훨씬 안전하고 유연한 접근 제어를 제공한다.
실제 운영에서는 지속적인 성능 모니터링과 캐시 히트율 분석을 통해 설정을 최적화하고, 비즈니스 요구사항 변화에 따라 캐시 전략을 조정하는 것이 중요하다. 또한 정기적인 보안 검토와 AWS 신규 기능 적용을 통해 CDN 인프라를 지속적으로 개선해 나가시기 바란다.
Reference
- AWS CloudFront Developer Guide
- External-DNS Documentation
- AWS Load Balancer Controller
- Terraform AWS Provider CloudFront
- Kubernetes Ingress Documentation
- AWS CloudFront Cache Behaviors
- Origin Access Control (OAC) Guide
- CloudFront Security Headers Best Practices
'AWS' 카테고리의 다른 글
| AWS EFS와 Kubernetes를 활용한 영구 스토리지 구축 가이드 (1) | 2026.01.06 |
|---|---|
| AWS 네트워크 연결 방식 완전 비교: VPC Peering vs Transit Gateway vs VPN (0) | 2025.09.22 |
| AWS DynamoDB Local 설치 (2) | 2025.01.03 |
| AWS DynamoDB란? (0) | 2024.11.27 |
| EKS Pod Identity Addon (0) | 2024.11.24 |