
Overview
이번 주는 CloudNet@에서 진행하는 Terraform 101 Study(T101) 스터디의 3주차로, Terraform의 선언적 문법과 실전 활용을 위한 다양한 고급 기능들을 학습하였다.
학습 내용은 테라폼으로 시작하는 IaC 책을 기반으로 실습을 병행하였고, 실제 코드 기반 실습 및 공식 문서 예제를 바탕으로 조건문, 함수, 프로비저너, null 리소스, moved 블록 등 고급 기능들을 다뤘다.
또한 GCP Provider를 활용하여 GKE 클러스터 배포까지 실습하면서 멀티 클라우드 환경에서 Terraform을 어떻게 확장할 수 있는지도 함께 확인하였다.
이번 주 주요 학습 내용은 다음과 같다.
- 조건문을 활용한 동적 리소스 선언 및 환경 분기
- 내장 함수(upper, max, cidrnetmask 등)를 통한 유틸리티 기능 익히기
- 프로비저너(local-exec, remote-exec, file)의 개념과 주의점, 실습
- null_resource를 통한 리소스 생성 간 종속성 해결
- moved 블록을 이용한 리소스 이름 변경 시 상태 유지 방법
- 시스템 환경 변수 활용 (TF_VAR_, TF_LOG, TF_INPUT, TF_CLI_ARGS, TF_DATA_DIR)
- GCP Provider를 활용한 GKE 클러스터 실습 (공식 모듈 기반)
모든 실습내용은 아래의 github에 정리하였다.
https://github.com/somaz94/t101-study
GitHub - somaz94/t101-study: t101-study
t101-study. Contribute to somaz94/t101-study development by creating an account on GitHub.
github.com
1. 조건문
테라폼에서의 조건식은 3항 연산자 형태를 갖는다. 조건은 true 또는 false로 확인되는 모든 표현식을 사용할 수 있다
일반적으로 비교, 논리 연산자를 사용해 조건을 확인한다.
조건식은 ? 기호를 기준으로 왼쪽은 조건이며, 오른쪽은 : 기호를 기준으로 왼쪽이 조건에 대해 true가 반환되는 경우이고 오른쪽이 false가 반환되는 경우이다.
간단히 예시를 보면 `var.a`가 빈 문자열이 아니라면 `var.a`를 나타내지만, 비어 있을 때는 `default-a`를 반환한다.
# <조건 정의> ? <옳은 경우> : <틀린 경우>
var.a != "" ? var.a : "default-a"

# 조건식 형태 권장 사항
var.example ? 12 : "hello"            # 비권장
var.example ? "12" : "hello"          # 권장
var.example ? tostring(12) : "hello"  # 권장
이제 간단한 실습을 해본다.
cat <<'EOT' > main.tf
variable "enable_file" {
  default = true
}

resource "local_file" "foo" {
  count    = var.enable_file ? 1 : 0
  content  = "foo!"
  filename = "${path.module}/foo.bar"
}

output "content" {
  value = var.enable_file ? local_file.foo[0].content : ""
}
EOT
실행한다. 즉, `enable_file` 변수의 값에 따라 리소스를 생성할지 말지 정한다.
var.enable_file이 true이면 count 값은 1이 되고, 리소스가 생성된다.
반대로 false이면 count 값은 0이 되며, 리소스는 생성되지 않는다.
# 변수 우선순위3 : 환경 변수 (TF_VAR 변수 이름)
export TF_VAR_enable_file=false
export | grep TF_VAR_enable_file

#
terraform init && terraform plan && terraform apply -auto-approve
...
content = ""

terraform state list

# 환경 변수 삭제
unset TF_VAR_enable_file
export | grep TF_VAR_enable_file

# 재실행
terraform plan && terraform apply -auto-approve
...
content = "foo!"

terraform state list

#
echo "local_file.foo[0]" | terraform console
echo "local_file.foo[0].content" | terraform console
2. 함수
테라폼은 프로그래밍 언어적인 특성을 가지고 있어서, 값의 유형을 변경하거나 조합할 수 있는 내장 함수를 사용 할 수 있다

가장 중요한 점은 내장된 함수 외에 사용자가 구현하는 별도의 사용자 정의 함수를 지원하지 않는다!
cat <<'EOT' > main.tf
resource "local_file" "foo" {
  content  = upper("foo! bar!")
  filename = "${path.module}/foo.bar"
}
EOT
#
terraform init && terraform plan && terraform apply -auto-approve

cat foo.bar ; echo
FOO! BAR!

# 내장 함수 간단 사용
terraform console
>
-----------------
upper("foo!")
"FOO!"

max(5, 12, 9)
12

lower(local_file.foo.content)
"foo! bar!"

cidrnetmask("172.16.0.0/12")
"255.240.0.0"

exit
-----------------
3. 프로비저너
프로비저너는 프로바이더와 비슷하게 ‘제공자’로 해석되나, 프로바이더로 실행되지 않는 커맨드와 파일 복사 같은 역할을 수행한다.
프로비저너로 실행된 결과는 테라폼의 상태 파일과 동기화되지 않으므로 프로비저닝에 대한 결과가 항상 같다고 보장할 수 없다 ⇒ 선언적 보장 안된다.
따라서 프로비저너 사용을 최소화하는 것이 좋다. 프로비저너의 종류에는 파일 복사와 명령어 실행을 위한 file, local-exec, remote-exec가 있다.
cat <<'EOT' > main.tf
variable "sensitive_content" {
  default   = "secret"
  sensitive = true
}

resource "local_file" "foo" {
  content  = upper(var.sensitive_content)
  filename = "${path.module}/foo.bar"

  provisioner "local-exec" {
    command = "echo The content is ${self.content}"
  }

  provisioner "local-exec" {
    command    = "abc"
    #on_failure = continue
  }

  provisioner "local-exec" {
    when    = destroy
    command = "echo The deleting filename is ${self.filename}"
  }
}
EOT
# 민감 정보 참조 부분의 실행 및 결과 내용은 출력 안됨
# 실행 실패 시 에러 발생되면 중지
terraform apply -auto-approve
...
Plan: 1 to add, 0 to change, 0 to destroy.
local_file.foo: Creating...
local_file.foo: Provisioning with 'local-exec'...
local_file.foo (local-exec): (output suppressed due to sensitive value in config)
local_file.foo (local-exec): (output suppressed due to sensitive value in config)
local_file.foo: Provisioning with 'local-exec'...
local_file.foo (local-exec): Executing: ["/bin/sh" "-c" "abc"]
local_file.foo (local-exec): /bin/sh: 1: abc: not found
╷
│ Error: local-exec provisioner error
│
│   with local_file.foo,
│   on main.tf line 14, in resource "local_file" "foo":
│   14:   provisioner "local-exec" {
│
│ Error running command 'abc': exit status 127. Output: /bin/sh: 1: abc: not found
│
local-exec 프로비저너
테라폼이 실행되는 환경에서 수행할 커맨드를 정의한다.
- 리눅스나 윈도우 등 테라폼을 실행하는 환경에 맞게 커맨드를 정의, 아래 사용하는 인수 값
- command(필수) : 실행할 명령줄을 입력하며 << 연산자를 통해 여러 줄의 커맨드 입력 가능
- working_dir(선택) : command의 명령을 실행할 디렉터리를 지정해야 하고 상대/절대 경로로 설정
- interpreter(선택) : 명령을 실행하는 데 필요한 인터프리터를 지정하며, 첫 번째 인수로 인터프리터 이름이고 두 번째부터는 인터프리터 인수 값
- environment(선택) : 실행 시 환경 변수 는 실행 환경의 값을 상속받으며, 추가 또는 재할당하려는 경우 해당 인수에 key = value 형태로 설정
예시코드
# UNIX / LINUX / MacOS
resource "null_resource" "example1" {

  provisioner "local-exec" {
    command = <<EOF
      echo Hello!! > file.txt
      echo $ENV >> file.txt
      EOF

    interpreter = [ "bash" , "-c" ]

    working_dir = "/tmp"

    environment = {
      ENV = "world!!"
    }

  }
}

# Window
resource "null_resource" "example1" {

  provisioner "local-exec" {
    command = <<EOF
      Hello!! > file.txt
      Get-ChildItem Env:ENV >> file.txt
      EOF

    interpreter = [ "PowerShell" , "-Command" ]

    working_dir = "C:\\windows\temp"

    environment = {
      ENV = "world!!"
    }

  }
}
이제 실습을 진행해본다.
cat <<'EOT' > main.tf
resource "null_resource" "example1" {

  provisioner "local-exec" {
    command = <<EOF
      echo Hello!! > file.txt
      echo $ENV >> file.txt
      EOF

    interpreter = [ "bash" , "-c" ]

    working_dir = "/tmp"

    environment = {
      ENV = "world!!"
    }

  }
}
EOT
실행해본다.
# null plugin 다운
terraform init -upgrade

terraform plan && terraform apply -auto-approve
...
null_resource.example1: Creating...
null_resource.example1: Provisioning with 'local-exec'...
null_resource.example1 (local-exec): Executing: ["bash" "-c" "      echo Hello!! > file.txt\n      echo $ENV >> file.txt\n"]
...

#
terraform state list
null_resource.example1

terraform state show null_resource.example1
# null_resource.example1:
resource "null_resource" "example1" {
    id = "8181753913216571572"
}

cat /tmp/file.txt
Hello!!
world!!
remote-exec(원격지 연결)
remote-exec와 file 프로비저너를 사용하기 위해 원격지에 연결할 SSH, WinRM 연결 정의가 필요하다connection 블록 리소스 선언 시, 해당 리소스 내에 구성된 프로비저너에 대해 공통으로 선언되고, 프로비저너 내에 선언되는 경우, 해당 프로비저너에서만 적용된다.
# connection 블록으로 원격지 연결 정의
resource "null_resource" "example1" {

  connection {
    type     = "ssh"
    user     = "root"
    password = var.root_password
    host     = var.host
  }

  provisioner "file" {
    source      = "conf/myapp.conf"
    destination = "/etc/myapp.conf"
  }

  provisioner "file" {
    source      = "conf/myapp.conf"
    destination = "C:/App/myapp.conf"

    connection {
        type     = "winrm"
        user     = "Administrator"
        password = var.admin_password
        host     = var.host
    }
  }
}
file 프로비저너
테라폼을 실행하는 시스템에서 연결 대상으로 파일 또는 디렉터리를 복사하는 데 사용된다.
- 사용되는 인수
- source : 소스 파일 또는 디렉터리로, 현재 작업 중인 디렉터리에 대한 상대 경로 또는 절대 경로로 지정할 수 있다. content와 함께 사용할 수 없다.
- content : 연결 대상에 복사할 내용을 정의하며 대상이 디렉터리인 경우 tf-file-content 파일이 생성되고, 파일인 경우 해당 파일에 내용이 기록된다. source와 함께 사용할 수 없다.
- destination : 필수 항목으로 항상 절대 경로로 지정되어야 하며, 파일 또는 디렉터리다.
file 프로비저너 예시
resource "null_resource" "foo" {

  # myapp.conf 파일이 /etc/myapp.conf 로 업로드
  provisioner "file" {
    source      = "conf/myapp.conf"
    destination = "/etc/myapp.conf"
  }

  # content의 내용이 /tmp/file.log 파일로 생성
  provisioner "file" {
    content     = "ami used: ${self.ami}"
    destination = "/tmp/file.log"
  }

  # configs.d 디렉터리가 /etc/configs.d 로 업로드
  provisioner "file" {
    source      = "conf/configs.d"
    destination = "/etc"
  }

  # apps/app1 디렉터리 내의 파일들만 D:/IIS/webapp1 디렉터리 내에 업로드
  provisioner "file" {
    source      = "apps/app1/"
    destination = "D:/IIS/webapp1"
  }

}
remote-exec 프로비저너
원격지 환경에서 실행할 커맨드와 스크립트를 정의한다.
예를 들면 AWS의 EC2 인스턴스를 생성하고 해당 VM에서 명령을 실행하고 패키지를 설치하는 등의 동작을 의미한다.
- 사용하는 인수는 다음과 같고 각 인수는 서로 배타적이다.
- inline : 명령에 대한 목록으로 [ ] 블록 내에 “ “로 묶인 다수의 명령을 , 로 구분해 구성한다.
- script : 로컬의 스크립트 경로를 넣고 원격에 복사해 실행한다.
- scripts : 로컬의 스크립트 경로의 목록으로 [ ] 블록 내에 “ “로 묶인 다수의 스크립트 경로를 , 로 구분해 구성한다
remote-exec 프로비저너 예시
resource "aws_instance" "web" {
  # ...

  # Establishes connection to be used by all
  # generic remote provisioners (i.e. file/remote-exec)
  connection {
    type     = "ssh"
    user     = "root"
    password = var.root_password
    host     = self.public_ip
  }

  provisioner "file" {
    source      = "script.sh"
    destination = "/tmp/script.sh"
  }

  provisioner "remote-exec" {
    inline = [
      "chmod +x /tmp/script.sh",
      "/tmp/script.sh args",
    ]
  }
}
4. null resource와 terraform data
아무 작업도 수행하지 않는 리소스를 구현한다.
리소스가 필요한 이유는 테라폼 프로비저닝 동작을 설계하면서 사용자가 의도적으로 프로비저닝하는 동작을 조율해야 하는 상황이 발생하여, 프로바이더가 제공하는 리소스 수명주기 관리만으로는 이를 해결하기 어렵기 때문이다.
예를 들어보자면 아래와 같다.
AWS EC2 인스턴스를 프로비저닝하면서 웹서비스를 실행시킨다.
웹서비스 설정에는 노출되어야 하는 고정된 외부 IP가 포함된 구성이 필요하다. 따라서 aws_eip 리소스를 생성해야 한다.
provider "aws" {
  region = "ap-northeast-2"
}

resource "aws_security_group" "instance" {
  name = "t101sg"

  ingress {
    from_port   = 80
    to_port     = 80
    protocol    = "tcp"
    cidr_blocks = ["0.0.0.0/0"]
  }

  ingress {
    from_port   = 22
    to_port     = 22
    protocol    = "tcp"
    cidr_blocks = ["0.0.0.0/0"]
  }

}

resource "aws_instance" "example" {
  ami                    = "ami-0c9c942bd7bf113a2"
  instance_type          = "t2.micro"
  subnet_id              = "subnet-dbc571b0"
  private_ip             = "172.31.1.100"
  vpc_security_group_ids = [aws_security_group.instance.id]

  user_data = <<-EOF
              #!/bin/bash
              echo "Hello, T101 Study" > index.html
              nohup busybox httpd -f -p 80 &
              EOF

  tags = {
    Name = "Single-WebSrv"
  }

  provisioner "remote-exec" {
    inline = [
      "echo ${aws_eip.myeip.public_ip}"
     ]
  }
}

resource "aws_eip" "myeip" {
  #vpc = true
  instance = aws_instance.example.id
  associate_with_private_ip = "172.31.1.100"
}

output "public_ip" {
  value       = aws_instance.example.public_ip
  description = "The public IP of the Instance"
}- aws_eip가 생성되는 고정된 IP를 할당하기 위해서는 대상인 aws_instance의 id값이 필요하다
- aws_instance의 프로비저너 동작에서는 aws_eip가 생성하는 속성 값인 public_ip가 필요하다
따라서 테라폼 구성 정의에서 상호 참조가 발생하는 상황으로, 실제 실행되는 코드를 작성하여 plan 수행 시 에러 발생한다.
# 두 리소스의 종속성이 상호 참조되어 발생하는 에러
terraform init
terraform plan
Error: Cycle: aws_eip.myeip, aws_instance.example
`main.tf` 파일 내용 수정 : 둘 중 하나의 실행 시점을 한 단계 뒤로 미뤄야 한다.
- 이런 경우 실행에 간격을 추가하여 실제 리소스와는 무관한 동작을 수행하기 위해 `null_resource` 를 활용한다.
provider "aws" {
  region = "ap-northeast-2"
}

resource "aws_security_group" "instance" {
  name = "t101sg"

  ingress {
    from_port   = 80
    to_port     = 80
    protocol    = "tcp"
    cidr_blocks = ["0.0.0.0/0"]
  }

  ingress {
    from_port   = 22
    to_port     = 22
    protocol    = "tcp"
    cidr_blocks = ["0.0.0.0/0"]
  }

}

resource "aws_instance" "example" {
  ami                    = "ami-0c9c942bd7bf113a2"
  instance_type          = "t2.micro"
  subnet_id              = "subnet-0b92d8356a0cbca38"
  private_ip             = "172.31.0.100"
  key_name               = "kp-kaje" # 각자 자신의 EC2 SSH Keypair 이름 지정
  vpc_security_group_ids = [aws_security_group.instance.id]

  user_data = <<-EOF
              #!/bin/bash
              echo "Hello, T101 Study" > index.html
              nohup busybox httpd -f -p 80 &
              EOF

  tags = {
    Name = "Single-WebSrv"
  }

}

resource "aws_eip" "myeip" {
  #vpc = true
  instance = aws_instance.example.id
  associate_with_private_ip = "172.31.0.100"
}

resource "null_resource" "echomyeip" {
  provisioner "remote-exec" {
    connection {
      host = aws_eip.myeip.public_ip
      type = "ssh"
      user = "ubuntu"
      private_key =  file("/home/kaje/kp-kaje.pem") # 각자 자신의 EC2 SSH Keypair 파일 위치 지정
      #password = "qwe123"
    }
    inline = [
      "echo ${aws_eip.myeip.public_ip}"
      ]
  }
}

output "public_ip" {
  value       = aws_instance.example.public_ip
  description = "The public IP of the Instance"
}

output "eip" {
  value       = aws_eip.myeip.public_ip
  description = "The EIP of the Instance"
}
4. moved 블록
리소스의 이름은 변경되지만 이미 테라폼으로 프로비저닝된 환경을 그대로 유지하고자 하는 경우 테라폼 1.1 버전부터 moved 블록을 사용할 수 있다.
cat <<'EOT' > main.tf
resource "local_file" "a" {
  content  = "foo!"
  filename = "${path.module}/foo.bar"
}

output "file_content" {
  value = local_file.a.content
}
EOT
실행해본다.
terraform init && terraform plan && terraform apply -auto-approve
cat foo.bar ; echo
foo!

terraform state list
local_file.a

echo "local_file.a" | terraform console
main.tf 파일 내용 변경한다. 아래 local_file 의 이름을 a → b로 변경해준다.
cat <<'EOT' > main.tf
resource "local_file" "b" {
  content  = "foo!"
  filename = "${path.module}/foo.bar"
}

output "file_content" {
  value = local_file.b.content
}
EOT

terraform plan
local_file.a: Refreshing state... [id=4bf3e335199107182c6f7638efaad377acc7f452]

Terraform used the selected providers to generate the following execution plan. Resource actions are indicated with the
following symbols:
  + create
  - destroy

Terraform will perform the following actions:

  # local_file.a will be destroyed
  # (because local_file.a is not in configuration)
따라서 main.tf 파일 내용 변경한다.
local_file.a 의 프로비저닝 결과를 유지한 채 이름을 변경하기 위해 moved 블록을 활용한다.
cat <<'EOT' > main.tf
resource "local_file" "b" {
  content  = "foo!"
  filename = "${path.module}/foo.bar"
}

moved {
  from = local_file.a
  to   = local_file.b
}

output "file_content" {
  value = local_file.b.content
}
EOT
terraform plan
local_file.b: Refreshing state... [id=4bf3e335199107182c6f7638efaad377acc7f452]
Terraform will perform the following actions:
# local_file.a has moved to local_file.b
resource "local_file" "b" {
id = "4bf3e335199107182c6f7638efaad377acc7f452"
# (10 unchanged attributes hidden)
}
Plan: 0 to add, 0 to change, 0 to destroy.
───────────────────────────────────────────────────────────────────────────────────────────────────────────────────────
Note: You didn't use the -out option to save this plan, so Terraform can't guarantee to take exactly these actions if
you run "terraform apply" now.
terraform apply -auto-approve
local_file.b: Refreshing state... [id=4bf3e335199107182c6f7638efaad377acc7f452]
Terraform will perform the following actions:
# local_file.a has moved to local_file.b
resource "local_file" "b" {
id = "4bf3e335199107182c6f7638efaad377acc7f452"
# (10 unchanged attributes hidden)
}
Plan: 0 to add, 0 to change, 0 to destroy.
Apply complete! Resources: 0 added, 0 changed, 0 destroyed.
Outputs:
file_content = "foo!"
terraform state list
local_file.b
5. CLI를 위한 시스템 환경 변수
아래의 명령어를 활용해 OS별로 환경변수를 정의할 수 있다.
Mac/리눅스/유닉스: export <환경 변수 이름>=<값>
Windows CMD: set <환경 변수 이름>=<값>
Windows PowerShell: $Env:<환경 변수 이름>='<값>'
TF_LOG : 테라폼의 stderr 로그에 대한 레벨을 정의
TF_INPUT : 값을 false 또는 0으로 설정하면 테라폼 실행 시 인수에 -input=false 를 추가한 것과 동일한 수행 결과를 확인
TF_VAR_NAME : TF_VAR_<변수 이름>을 사용하면 입력 시 또는 default로 선언된 변수 값을 대체
TF_CLI_ARGS / TF_CLI_ARGS_subcommand 테라폼 실행 시 추가할 인수를 정의
TF_DATA_DIR : State 저장 백엔드 설정과 같은 작업 디렉터리별 데이터를 보관하는 위치를 지정
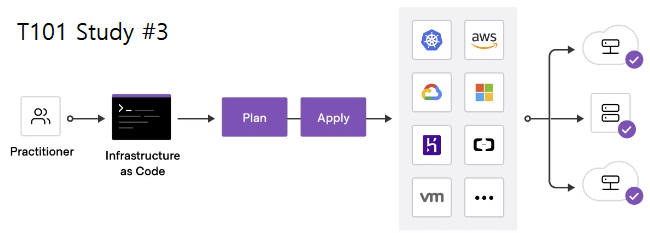
6. Terraform Provider
테라폼 레지스트리의 프로바이더에 유지 보수 및 게시에 대한 권한에 따라 Tier 정보가 제공된다.
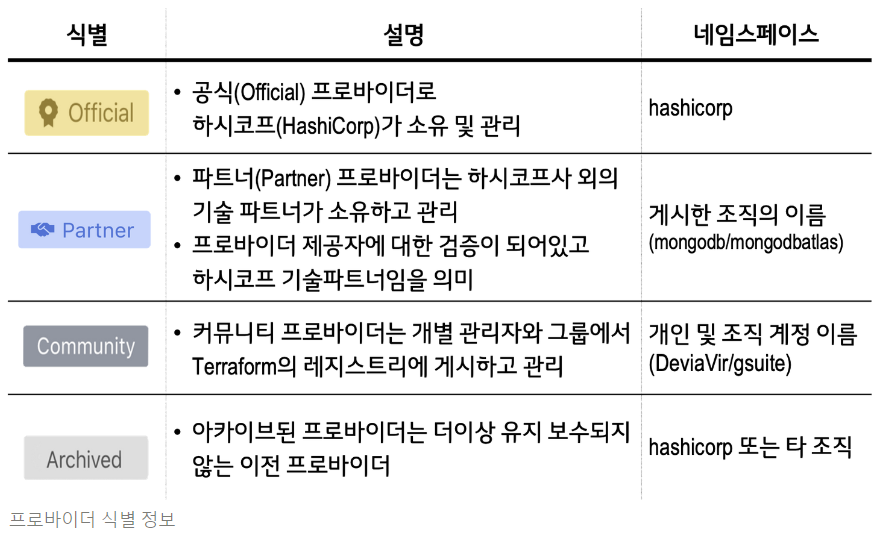
대표적인 프로바이더 종류는 아래와 같다.

<도전과제> GCP Provider를 사용해 GKE 배포하기
모듈은 Terraform gke 공식모듈을 사용하였다. gke는 public으로 간단하게 생성하였다.
`gke.tf`
## GKE IAM Binding 선행 작업 진행하기 ##
## BUG!!! Terraform으로 진행하면, 기존에 binding 되어있는 리소스가 사라짐. ##
## 참고 사이트 https://cloud.google.com/kubernetes-engine/docs/how-to/cluster-shared-vpc?hl=ko#gcloud_3 ##

# Google Kubernetes Cluster Engine(GKE)
# google_client_config and kubernetes provider must be explicitly specified like the following.
data "google_client_config" "default" {}

provider "kubernetes" {
  host                   = "https://${module.gke_autopilot.endpoint}"
  token                  = data.google_client_config.default.access_token
  cluster_ca_certificate = base64decode(module.gke_autopilot.ca_certificate)
}

module "gke_autopilot" {
  source                  = "../../modules/gke_autopilot"
  project_id              = var.project
  network_project_id      = var.project
  cluster_resource_labels = local.default_labels
  name                    = var.mgmt_somaz_gke
  region                  = var.region
  zones                   = ["${var.region}-a", "${var.region}-b"]
  network                 = var.shared_vpc
  subnetwork              = "${var.subnet_share}-mgmt-a"
  ip_range_pods           = "mgmt-somaz-gke-pod"
  ip_range_services       = "mgmt-somaz-gke-service"
  enable_cost_allocation  = false # Enables Cost Allocation Feature and the cluster name and namespace of your GKE workloads appear in the labels field of the billing export to BigQuery
  grant_registry_access   = true
  # service_account                   = var.admin_service_account
  add_cluster_firewall_rules        = true
  add_master_webhook_firewall_rules = true
  firewall_inbound_ports            = ["0-65535"]
  master_authorized_networks = [
    {
      cidr_block   = "${var.public_ip}/32"
      display_name = "Public ip"
    },
  ]
}
`variables.tf`
## common ##
variable "project" {}
variable "region" {}
variable "environment" {}
variable "terraform" {}

## vpc ##
variable "shared_vpc" {}
variable "subnet_share" {}

## GKE ##
variable "mgmt_somaz_gke" {}
`mgmt.tfvars`
## common ##
project     = "somaz-host-project"
region      = "asia-northeast3"
environment = "mgmt"
terraform   = "true"

## vpc ##
shared_vpc       = "mgmt-share-vpc"
subnet_share     = "mgmt-share-sub"

## GKE ##
mgmt_gke = "mgmt-somaz-gke"
`locals.tf`
## common ##

locals {

  default_labels = {
    environment = var.environment
    terraform   = var.terraform
  }
}
마무리
Terraform은 단순한 인프라 배포 도구를 넘어, 코드로서 인프라를 제어하는 데 필요한 다양한 기능들을 제공한다.
3주차에서는 Terraform의 선언적 특징이 충돌할 수 있는 복잡한 의존 관계를 어떻게 우아하게 다룰 수 있는지, 그리고 실제 환경에서 필요한 확장과 자동화 기능들을 어떻게 적용할 수 있는지에 대해 심도 있게 다뤘다.
특히 provisioner의 사용 시 주의점, `null_resource` 를 통한 종속성 제어, `moved` 를 통한 안전한 리팩토링 등은 실무에서 종종 마주치는 문제들에 대한 강력한 해결책이 되며, Terraform의 유연함과 안정성의 조화를 이해하는 계기가 되었다.
또한 GCP 환경에서 GKE를 배포하는 실습을 통해 Terraform의 멀티 클라우드 대응력과 모듈화된 구성의 강점을 직접 체험해볼 수 있었다.
앞으로의 학습에서는 모듈화, 워크스페이스, 테라폼 클라우드 등 더 고도화된 테라폼 기능들을 익히고 실전 환경에 맞게 응용하는 단계로 나아갈 예정이다.
Reference
'교육, 커뮤니티 후기 > T101(Terraform 101 Study) 스터디' 카테고리의 다른 글
| T101(Terraform 101 Study) 6주차 (2) | 2023.10.14 |
|---|---|
| T101(Terraform 101 Study) 5주차 (0) | 2023.09.26 |
| T101(Terraform 101 Study) 4주차 (0) | 2023.09.22 |
| T101(Terraform 101 Study) 2주차 (0) | 2023.09.09 |
| T101(Terraform 101 Study) 1주차 (0) | 2023.08.28 |