
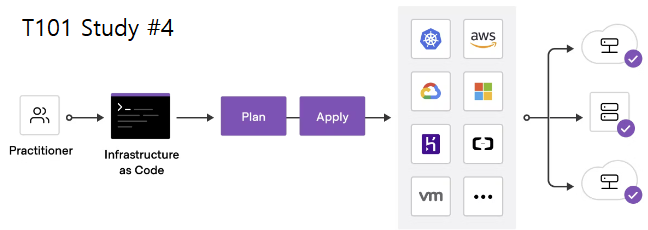
Overview
이번 주는 CloudNet@에서 진행하는 Terraform 101 Study(T101)의 4주차로, 인프라 코드의 핵심이라 할 수 있는 State의 구조와 동작 원리, 워크스페이스를 통한 상태 분리, 모듈화 전략에 대해 실습 중심으로 학습하였다.
특히 Terraform이 단순한 선언형 도구가 아니라 Stateful 시스템이라는 점, 이를 기반으로 리소스 생성/수정/삭제의 실행 여부를 어떻게 판단하는지를 명확하게 이해할 수 있었다. 또한 workspace를 활용한 멀티 환경 구성, 모듈을 통한 재사용 가능한 인프라 템플릿화 등 실제 팀 협업이나 대규모 인프라 운영에 필수적인 개념들을 배웠다.
주요 학습 내용 요약
- Terraform의 상태 파일(`.tfstate`) 구조 및 Serial 관리 원리
- `terraform plan -refresh=false` 옵션을 활용한 성능 최적화
- 리소스와 State 동기화 실습 (6가지 유형별 행동 분석)
- `terraform workspace` 로 멀티 환경 분리 (dev/stage/prod 등)
- 모듈화 전략 및 디렉터리 구조, 레지스트리/깃허브 기반 모듈 사용
- GCP Cloud SQL(MySQL) 및 GCS 모듈 활용 실습 진행
모든 실습내용은 아래의 github에 정리하였다.
https://github.com/somaz94/t101-study
GitHub - somaz94/t101-study: t101-study
t101-study. Contribute to somaz94/t101-study development by creating an account on GitHub.
github.com
1. State 목적의 의미
상태 파일은 배포할 때마다 변경되는 프라이빗 API private API로, 오직 테라폼 내부에서 사용하기 위한 것이다.
테라폼 상태 파일을 직접 편집하거나 직접 읽는 코드로 작성해서는 안된다.
지원되는 원격 백엔드는 CSP의 Object Storage 또는 Database가 있다.
- `AWS S3`, `Azure Blob Storage`, `Google Cloud Storage`, `Consul`, `Postgres database`

상태 파일 확인 실습 → Serial을 기준으로 State backup 관리
cat <<EOT > vpc.tf
provider "aws" {
  region  = "ap-northeast-2"
}

resource "aws_vpc" "myvpc" {
  cidr_block       = "10.10.0.0/16"

  tags = {
    Name = "t101-study"
  }
}
EOT
# 배포
terraform init && terraform plan && terraform apply -auto-approve

# 상태 파일 확인 : JSON 형식
ls
cat terraform.tfstate | jq | grep serial
...
"serial": 1,
...
태그 수정 후 상태 파일 확인한다.
cat <<EOT > vpc.tf
provider "aws" {
  region  = "ap-northeast-2"
}

resource "aws_vpc" "myvpc" {
  cidr_block       = "10.10.0.0/16"

  tags = {
    Name = "tf-state"
  }
}
EOT
아래와 같은 serial을 사용해서 state 파일이 관리된다.
# 배포 : plan 시 tfstate 상태와 코드 내용을 비교해서 검토
terraform plan && terraform apply -auto-approve

# 상태 파일 비교 : 백업 파일 생성됨
ls terraform.tfstate*
terraform.tfstate        terraform.tfstate.backup

diff terraform.tfstate terraform.tfstate.backup
<   "serial": 3,
---
>   "serial": 1,
...
리소스 삭제한다.
terraform destroy -auto-approve
테라폼으로 시작하는 IaC 실습
테라폼은 Stateful 애플리케이션. 프로비저닝 결과 State를 저장하고 추적에 활용
- 개인 1인 : 로컬 환경으로 `terraform.tfstate` 파일에 JSON 형태로 저장
- 팀이나 조직 : 공동 관리를 위해 원격 저장소에 저장해 공유 - 링크
- State에는 작업자가 정의한 코드와 실제 반영된 프로비저닝 결과를 저장하고, 이 정보를 토대로 이후의 리소스 생성, 수정, 삭제에 대한 동작 판단 작업을 수행
mkdir 5.1 && cd 5.1

cat <<EOT > main.tf
resource "random_password" "mypw" {
  length           = 16
  special          = true
  override_special = "!#$%"
}
EOT
랜덤 프로바이더는 테라폼 구성 내에서 무작위로 기입해야 되는 숫자, 패스워드, 문자열 등의 값을 생성하는 데 사용된다.
#
terraform init && terraform plan

#
terraform apply -auto-approve

# State List 및 생성된 Password 확인
terraform state list

terraform state show random_password.mypw
# random_password.mypw:
resource "random_password" "mypw" {
    bcrypt_hash      = (sensitive value)
...

# State에 저장된 result를 확인해보자! -> 어떻게 관리해야할까요?
ls *.tfstate
cat terraform.tfstate | jq
cat terraform.tfstate | jq | grep result
s2CZ3TnsD6$iWfYz

# (참고) sensitive value 내용은 테라폼 콘솔에서 보일까요? (정답: x)
echo "random_password.mypw" | terraform console
echo "random_password.mypw.result" | terraform console
State는 테라폼만을 위한 API로 정의할 수도 있다.
Plan을 실행하면 암묵적으로 refresh 동작을 수행하면서 리소스 생성의 대상(클라우드 등)과 State를 기준으로 비교하는 과정을 거친다.
이 작업은 프로비저닝 대상의 응답 속도와 기존 작성된 State의 리소스 양에 따라 속도 차이가 발생한다.
대량의 리소스를 관리해야 하는 경우 Plan 명령에서 -refresh=false 플래그를 사용해 State를 기준으로 실행 계획을 생성하고, 이를 실행에 활용해 대상 환경과의 동기화 과정을 생략할 수 있다.
# 실행 계획 생성 시 저장되어 있는 State와 실제 형상을 비교하는 기본 실행
time terraform plan

# 실행 계획 생성 시 실제 형상과 비교하지 않고 실행 계획을 생성하는 -refresh=false 옵션
time terraform plan -refresh=false
2. State 동기화
테라폼 구성 파일은 기존 State와 구성을 비교해 실행 계획에서 생성, 수정, 삭제 여부를 결정한다

테라폼 구성과 State 흐름은 아래와 같다.
- Plan 과 Apply 중 각 리소스에 발생할 수 있는 네 가지 사항, 아래 실행 계획 출력 기호와 의미
| 기호 | 의미 |
| + | Create |
| - | Destroy |
| -/+ | Replace |
| ~ | Updated in-place |
- Replace 동작은 기본값을 삭제 후 생성하지만 lifecycle의 create_before_destroy 옵션을 통해 생성 후 삭제 설정 가능
유형 별 실습 + 문제상황 추가
테라폼 구성에 추가된 리소스와 State에 따라 어떤 동작이 발생하는지 다음 표로 살펴본다.
|
유형
|
구성 리소스 정의
|
State 구성 데이터
|
실제 리소스
|
기본 예상 동작
|
|
1
|
있음
|
|
|
리소스 생성
|
|
2
|
있음
|
있음
|
|
리소스 생성
|
|
3
|
있음
|
있음
|
있음
|
동작 없음
|
|
4
|
|
있음
|
있음
|
리소스 삭제
|
|
5
|
|
|
있음
|
동작 없음
|
|
6
|
있음
|
|
있음
|
|
유형1 : 신규 리소스 정의 → Apply ⇒ 리소스 생성(처음부터 Terraform 코드로 작업)
mkdir 5.2 && cd 5.2cat <<'EOT' > main.tf
locals {
name = "mytest"
}
resource "aws_iam_user" "myiamuser1" {
name = "${local.name}1"
}
resource "aws_iam_user" "myiamuser2" {
name = "${local.name}2"
}
EOT#
terraform init && terraform apply -auto-approve
terraform state list
terraform state show aws_iam_user.myiamuser1
# aws_iam_user.myiamuser1:
resource "aws_iam_user" "myiamuser1" {
arn = "arn:aws:iam::611841095956:user/mytest1"
force_destroy = false
id = "mytest1"
name = "mytest1"
path = "/"
tags_all = {}
unique_id = "AIDAY45ESHEKNOAJKN6AB"
}
#
ls *.tfstate
cat terraform.tfstate | jq
#
terraform apply -auto-approve
ls *.tfstate
# iam 사용자 리스트 확인
aws iam list-users | jq
유형2 : 실제 리소스 수동 제거 → Apply ⇒ 리소스 생성
# 실제 리소스 수동 제거
aws iam delete-user --user-name mytest1
aws iam delete-user --user-name mytest2
aws iam list-users | jq

# 아래 명령어 실행 결과 차이는? (refresh 유무)
# 실제 리소스는 제거되었으나 -refrest=false로 인해 변경사항 없으므로 인식
terraform plan
aws_iam_user.myiamuser2: Refreshing state... [id=mytest2]
aws_iam_user.myiamuser1: Refreshing state... [id=mytest1]

Terraform used the selected providers to generate the following execution plan. Resource actions are indicated with the
following symbols:
  + create

Terraform will perform the following actions:

  # aws_iam_user.myiamuser1 will be created
  + resource "aws_iam_user" "myiamuser1" {
      + arn           = (known after apply)
      + force_destroy = false
      + id            = (known after apply)
      + name          = "mytest1"
      + path          = "/"
      + tags_all      = (known after apply)
      + unique_id     = (known after apply)
    }

  # aws_iam_user.myiamuser2 will be created
  + resource "aws_iam_user" "myiamuser2" {
      + arn           = (known after apply)
      + force_destroy = false
      + id            = (known after apply)
      + name          = "mytest2"
      + path          = "/"
      + tags_all      = (known after apply)
      + unique_id     = (known after apply)
    }

Plan: 2 to add, 0 to change, 0 to destroy.

terraform plan -refresh=false

No changes. Your infrastructure matches the configuration.

Terraform has compared your real infrastructure against your configuration and found no differences, so no changes are
needed.

cat terraform.tfstate | jq .serial

#
terraform apply -auto-approve
terraform state list
cat terraform.tfstate | jq .serial

# iam 사용자 리스트 확인
aws iam list-users | jq
유형3 : Apply → Apply - 코드, State, 형상 모두 일치한 경우 ⇒ 변경사항 없음
# Serial 값일 동일!
terraform apply -auto-approve
cat terraform.tfstate | jq .serial
terraform apply -auto-approve
cat terraform.tfstate | jq .serial
terraform apply -auto-approve
cat terraform.tfstate | jq .serial
유형4 : 코드에서 일부 리소스 삭제 → Apply ⇒ 리소스 삭제
유형5 : 리소스만 있으며 코드, State는 없는 경우 → Import 또는 신규코드 작성
유형6 : 실수로 tfstate 파일 삭제 → plan/apply ← 책에는 없는 내용
3. 워크스페이스
State를 관리하는 논리적인 가상 공간을 워크스페이스라고 한다
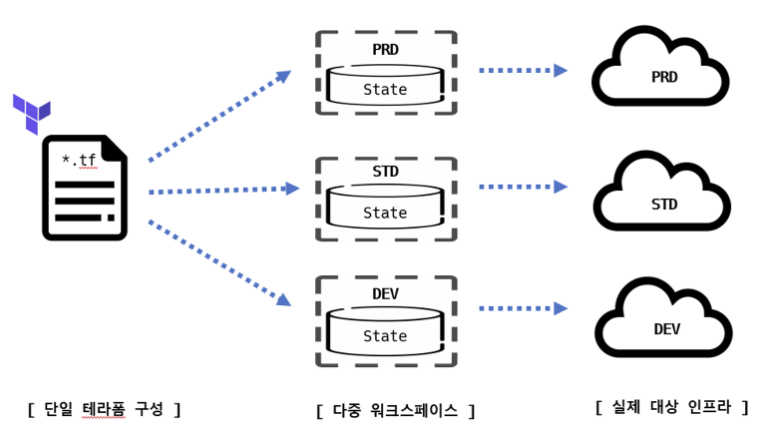
- 테라폼 구성 파일은 동일하지만 작업자는 서로 다른 State를 갖는 실제 대상을 프로비저닝할 수 있다.
- 워크스페이스는 기본 default로 정의된다. 로컬 작업 환경의 워크스페이스 관리를 위한 CLI 명령어로 workspace가 있다.
terraform workspace list
* default
mkdir 5.3 && cd 5.3cat <<'EOT' > main.tf
resource "aws_instance" "mysrv1" {
ami = "ami-0ea4d4b8dc1e46212"
instance_type = "t2.micro"
tags = {
Name = "t101-week4"
}
}
EOT
실행한다.
# [분할/터미널1] 모니터링
export AWS_PAGER=""
while true; do aws ec2 describe-instances --query "Reservations[*].Instances[*].{PublicIPAdd:PublicIpAddress,InstanceName:Tags[?Key=='Name']|[0].Value,Status:State.Name}" --filters Name=instance-state-name,Values=running --output text ; echo "------------------------------" ; sleep 1; done

# [분할/터미널2] 배포
terraform init && terraform apply -auto-approve
terraform state list

#
cat terraform.tfstate | jq -r '.resources[0].instances[0].attributes.public_ip'
cat terraform.tfstate | jq -r '.resources[0].instances[0].attributes.private_ip'

# terraform.tfstate에 private 담긴 내용은?
cat terraform.tfstate | jq -r '.resources[0].instances[0].private' | base64 -d | jq

# 워크스페이스 확인
terraform workspace list

# graph 확인
terraform graph > graph.dot
신규 워크스페이스 생성 및 확인한다.
# 새 작업 공간 workspace 생성 : mywork1
terraform workspace new mywork1
terraform workspace show

# 서브 디렉터리 확인 -> 향후 저장되는 State는 여기에!
tree terraform.tfstate.d
terraform.tfstate.d
└── mywork1

# plan 시 어떤 결과 내용이 출력되나요?
terraform plan

# apply 해보자!
terraform apply -auto-approve


# 워크스페이스 확인
terraform workspace list

# State 확인
cat terraform.tfstate | jq -r '.resources[0].instances[0].attributes.public_ip'
cat terraform.tfstate.d/mywork1/terraform.tfstate | jq -r '.resources[0].instances[0].attributes.public_ip'

# graph 확인
terraform graph > graph.dot


# (실습생략)새 작업 공간 workspace 생성 : mywork2
terraform workspace new mywork2

# 서브 디렉터리 확인
tree terraform.tfstate.d
...

# plan & apply
terraform plan && terraform apply -auto-approve
cat terraform.tfstate | jq -r '.resources[0].instances[0].attributes.public_ip'
cat terraform.tfstate.d/mywork1/terraform.tfstate | jq -r '.resources[0].instances[0].attributes.public_ip'
cat terraform.tfstate.d/mywork2/terraform.tfstate | jq -r '.resources[0].instances[0].attributes.public_ip'

# workspace 정보 확인
terraform workspace show
terraform workspace list

# 실습 리소스 삭제
terraform workspace select default
terraform destroy -auto-approve
terraform workspace select mywork1
terraform destroy -auto-approve
terraform workspace select mywork2
terraform destroy -auto-approve- 장점
- 하나의 루트 모듈에서 다른 환경을 위한 리소스를 동일한 테라폼 구성으로 프로비저닝하고 관리
- 기존 프로비저닝된 환경에 영향을 주지 않고 변경 사항 실험 가능
- 깃의 브랜치 전략처럼 동일한 구성에서 서로 다른 리소스 결과 관리
- 단점
- State가 동일한 저장소(로컬 또는 백엔드)에 저장되어 State 접근 권한 관리가 불가능(어려움)
- 모든 환경이 동일한 리소스를 요구하지 않을 수 있으므로 테라폼 구성에 분기 처리가 다수 발생 가능
- 프로비저닝 대상에 대한 인증 요소를 완벽히 분리하기 어려움
- 가장 큰 단점은 완벽한 격리가 불가능
저도 Terraform을 사용해서 AWS → GCP Migration을 진행하면서 Workspace를 사용해볼까도 했지만, 인프라가 크지 않았기 때문에 사용하지 않았습니다.
4. Module 이란?
모듈은 루트 모듈과 자식 모듈로 구분된다
- 루트 모듈 Root Module : 테라폼을 실행하고 프로비저닝하는 최상위 모듈
- 자식 모듈 Child Module : 루트 모듈의 구성에서 호출되는 외부 구성 집합

모듈은 테라폼 구성의 집합이다.
테라폼으로 관리하는 대상의 규모가 커지고 복잡해져 생긴 문제를 보완하고 관리 작업을 수월하게 하기 위한 방안으로 활용할 수 있다.
- 관리성 : 모듈은 서로 연관 있은 구성의 묶음이다. 원하는 구성요소를 단위별로 쉽게 찾고 업데이트할 수 있다. 모듈은 다른 구성에서 쉽게 하나의 덩어리로 추가하거나 삭제할 수 있다. 또한 모듈이 업데이트되면 이 모듈을 사용하는 모든 구성에서 일관된 변경 작업을 진행할 수 있다.
- 캡슐화 : 테라폼 구성 내에서 각 모듈은 논리적으로 묶여져 독립적으로 프로비저닝 및 관리되며, 그 결과는 은닉성을 갖춰 필요한 항목만을 외부에 노출시킨다.
- 재사용성 : 구성을 처음부터 작성하는 것에는 시간과 노력이 필요하고 작성 중간에 디버깅과 오류를 수정하는 반복 작업이 발생한다. 테라폼 구성을 모듈화하면 이후에 비슷한 프로비저닝에 이미 검증된 구성을 바로 사용할 수 있다.
- 일관성과 표준화 : 테라폼 구성 시 모듈을 활용하는 워크플로는 구성의 일관성을 제공하고 서로 다른 환경과 프로젝트에도 이미 검증한 모듈을 적용해 복잡한 구성과 보안 사고를 방지할 수 있다.
Module 작성 기본 원칙
모듈은 대부분의 프로그래밍 언어에서 쓰이는 라이브러리나 패키지와 역할이 비슷하다
모듈 디렉터리 형식을 `terraform-<프로바이더 이름>-<모듈 이름>` 형식을 제안한다.
이 형식은 Terraform Cloud, Terraform Enterprise에서도 사용되는 방식으로 디렉터리 또는 레지스트리 이름이 테라폼을 위한 것이고, 어떤 프로바이더의 리소스를 포함하고 있으며, 부여된 이름이 무엇인지 판별할 수 있도록 한다.
# 자식모듈과 루트 모듈의 디렉터리 구조(책 P193 그림참조)
modules/
├── cloud_armor						# child-modules-home
│   ├── README.md
│   ├── main.tf
│   ├── outputs.tf
│   ├── variables.tf
│   └── versions.tf
├── basic
    ├── main.tf						# root-module
Module 화 해보기
모듈의 기본적 구조는 테라폼 구성으로 입력 변수를 구성하고 결과를 출력하기 위한 구조로 구성한다.
모듈화라는 용어는 이런 구조를 재활용하기 위한 템플릿 작업을 말한다.
# terraform init 시 생성되는 modules.json 파일 확인
tree .terraform
.terraform
├── modules
│   └── modules.json
...

## 모듈로 묶여진 리소스는 module이라는 정의를 통해 단순하게 재활용하고 반복 사용할 수 있다.
## 모듈의 결과 참조 형식은 module.<모듈 이름>.<output 이름>으로 정의된다.
cat .terraform/modules/modules.json | jq
{
  "Modules": [
    {
      "Key": "",
      "Source": "",
      "Dir": "."
    },
    {
      "Key": "mypw1",
      "Source": "../modules/terraform-random-pwgen",
      "Dir": "../modules/terraform-random-pwgen"
    },
    {
      "Key": "mypw2",
      "Source": "../modules/terraform-random-pwgen",
      "Dir": "../modules/terraform-random-pwgen"
    }
  ]
}
[도전과제4] 테라폼 레지스트리에 공개된 모듈을 사용하여 리소스를 배포해본다.
GCP의 Cloud SQL(mysql)을 배포해본다. 사용한 모듈 링크는 아래에 있다.
- Cloud SQL(mysql) 모듈
# main.tf
## DB(Mysql) ##
module "prod_mysql" {
  source                          = "../../../modules/mysql"
  name                            = var.db_name
  project_id                      = var.project
  database_version                = "MYSQL_8_0"
  region                          = var.region
  zone                            = "${var.region}-a"
  tier                            = "db-custom-2-3840"
  deletion_protection             = false
  root_password                   = var.db_admin_password
  availability_type               = "ZONAL"
  maintenance_window_day          = "1"
  maintenance_window_hour         = "0"
  maintenance_window_update_track = "stable"

  ip_configuration = {
    ipv4_enabled                                  = false
    require_ssl                                   = false
    private_network                               = "projects/${var.host_project}/global/networks/${var.shared_vpc}"
    authorized_networks                           = []
    allocated_ip_range                            = "google-managed-services-mgmt-share-vpc"
    enable_private_path_for_google_cloud_services = true
  }

  user_labels = local.default_labels

  database_flags = [
    {
      name  = "long_query_time"
      value = "1"
    }
  ]

  additional_users = [
    {
      name            = var.db_admin_user
      password        = var.db_admin_password
      host            = "%" // host from where the user can connect.
      random_password = false
      type            = "BUILT_IN" // normal user or admin.
    }
  ]

  additional_databases = var.additional_databases

}
# variables.tf
## common ##
variable "project" {}
variable "host_project" {}
variable "region" {}
variable "environment" {}
variable "terraform" {}
# DB(Mysql) ##
variable "db_admin_user" {}
variable "db_admin_password" {}
variable "db_name" {}
variable "additional_databases" {
description = "Additional databases to be created"
type = list(object({
name = string
charset = string
collation = string
}))
}# somaz.tfvars
## common ##
project = "somaz-service-project-prod"
host_project = "somaz-host-project"
region = "asia-northeast1"
environment = "prod"
terraform = "true"
## DB(Mysql) ##
db_admin_user = "admin"
db_admin_password = "somaz"
db_name = "prod-somaz-db"
additional_databases = [
{
name = "web"
charset = "utf8mb3"
collation = "utf8mb3_general_ci"
},
{
name = "game"
charset = "utf8mb3"
collation = "utf8mb3_general_ci"
},
{
name = "was"
charset = "utf8mb3"
collation = "utf8mb3_general_ci"
}
]
[도전과제7] 자신의 깃허브를 모듈 소스를 설정하여 리소스를 배포해본다.
mkdir github-module-test && cd github-module-test/
모듈 사용 예시는 아래와 같다.
module "my_module" {
  source = "git::https://github.com/<USERNAME>/<REPO_NAME>.git//<PATH_TO_MODULE_DIRECTORY>?ref=<BRANCH_OR_TAG>"
}
이제 아래와 같이 실습해본다.
module "my_module" {
  source = "git::https://github.com/somaz94/terraform-infra-gcp//modules/gcs_buckets?ref=main"
}
terraform init
Initializing the backend...
Initializing modules...
Downloading git::https://github.com/somaz94/terraform-infra-gcp?ref=main for my_module...
- my_module in .terraform/modules/my_module/modules/gcs_buckets
...
ls .terraform/modules/
modules.json my_module
cat .terraform/modules/modules.json
{"Modules":[{"Key":"","Source":"","Dir":"."},{"Key":"my_module","Source":"git::https://github.com/somaz94/terraform-infra-gcp//modules/gcs_buckets?ref=main","Dir":".terraform/modules/my_module/modules/gcs_buckets"}]}
따라서 아래와 같은 방법으로 잘생성할 수 있다.
module "my_module" {
  source = "git::https://github.com/somaz94/terraform-infra-gcp//modules/gcs_buckets?ref=main"

  names      = ["somaz-gcs-bucket"]
  project_id = "somaz-project"
  location   = "asia-northeast3"
}
export GOOGLE_APPLICATION_CREDENTIALS="/home/somaz/.ssh/somaz-project.json"terraform state list
module.my_module.google_storage_bucket.buckets["somaz-gcs-bucket"]
module.my_module.random_id.bucket_suffix
마무리
Terraform 4주차에서는 실무에서 반드시 마주치는 State 관리, 환경 분리, 모듈화 설계라는 세 가지 중요한 주제를 다루었다.
State 파일을 통한 리소스 추적 및 실행 판단, `workspace` 를 이용한 환경 격리, 그리고 모듈화를 통한 코드 재사용과 캡슐화는 IaC(Infrastructure as Code)를 진짜로 잘 쓰기 위한 기본기이자 핵심 기술이다.
특히 이번 주는 단순 리소스 배포에서 한 단계 더 나아가, 생산성과 유지보수성을 모두 고려한 테라폼 운영 전략을 고민해보는 계기가 되었으며, `remote backend, state refresh, module registry, workspace` 분기 등 실무 투입 전 반드시 알아야 할 기능들을 손으로 익힐 수 있었다.
다음 주차에서는 백엔드 스토리지 연동, remote state 공유, output 활용, 의존성 정교화 등 더 발전된 테라폼 활용법을 배워보며, 진정한 DevOps 인프라 자동화 실력을 다져나갈 예정이다.
Reference
https://developer.hashicorp.com/terraform/language/settings/backends/local
https://registry.terraform.io/providers/hashicorp/random/latest/docs/resources/pet
'교육, 커뮤니티 후기 > T101(Terraform 101 Study) 스터디' 카테고리의 다른 글
| T101(Terraform 101 Study) 6주차 (2) | 2023.10.14 |
|---|---|
| T101(Terraform 101 Study) 5주차 (0) | 2023.09.26 |
| T101(Terraform 101 Study) 3주차 (0) | 2023.09.17 |
| T101(Terraform 101 Study) 2주차 (0) | 2023.09.09 |
| T101(Terraform 101 Study) 1주차 (0) | 2023.08.28 |