
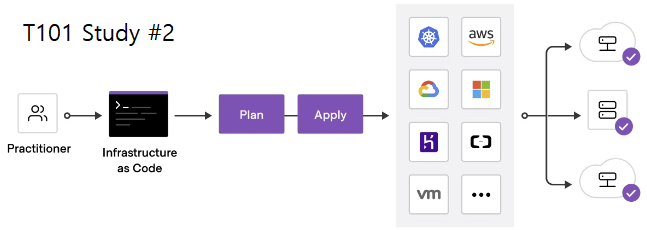
Overview
이번 주는 CloudNet@에서 진행하는 Terraform 101 Study(T101) 스터디 2주차 학습 내용을 정리한 포스팅이다.
지난 1주차에서 Terraform의 기본 개념과 EC2 배포, S3 백엔드 구성 등을 실습했다면, 이번 2주차는 Terraform의 실무 활용도 높은 고급 기능들을 다뤘다.
학습 내용은 테라폼으로 시작하는 IaC 책을 기반으로 하였고, 공식 문서 및 실습 예제들을 통해 직접 손으로 따라하며 이해를 높였다.
주요 학습 내용은 다음과 같다.
- Data Source 활용법 및 실습 (로컬 파일, AWS AZ 등)
- 입력 변수(Input Variables) 선언과 유효성 검사
- 민감 정보(Sensitive Variables) 처리와 보안 고려 사항
- 로컬 변수(Local Values)를 통한 가독성과 재사용성 향상
- 반복문 활용 (count, for_each, for, dynamic)으로 인프라 구성 자동화
- 도전 과제 실습 : VPC + EC2 환경 구성 및 IAM 역할 반복 생성
실습 예제를 바탕으로 Terraform을 어떻게 더 유연하고 안전하게 구성할 수 있는지 체득할 수 있었으며, 실무에서 자주 마주치는 반복 구조, 민감한 변수 처리, 동적 리소스 구성 방식에 대한 감각을 익힐 수 있는 시간이었다.
1. 데이터 소스
데이터 소스는 테라폼으로 정의되지 않은 외부 리소스 또는 저장된 정보를 테라폼 내에서 참조할 때 사용한다.
1-1 데이터 소스 구성
mkdir data-source && cd data-source
mkdir 1-1 && cd 1-1

cat <<'EOT' > main.tf
data "local_file" "abc" {
  filename = "${path.module}/abc.txt"
}
EOT
데이터 소스를 정의할 때 사용 가능한 메타인수는 다음과 같다.
- depends_on : 종속성을 선언하며, 선언된 구성요소와의 생성 시점에 대해 정의
- count : 선언된 개수에 따라 여러 리소스를 생성
- for_each : map 또는 set 타입의 데이터 배열의 값을 기준으로 여러 리소스를 생성
- lifecycle : 리소스의 수명주기 관리
실습 확인
# 실습 확인을 위해서 abc.txt 파일 생성
echo "t101 study - 2week" > abc.txt

terraform init && terraform plan && terraform apply -auto-approve

terraform state list
data.local_file.abc

# 테라폼 콘솔 : 데이터 소스 참조 확인
echo "data.local_file.abc" | terraform console
{
  "content" = <<-EOT
  t101 study - 2week

  EOT
  "content_base64" = "dDEwMSBzdHVkeSAtIDJ3ZWVrCg=="
  "content_base64sha256" = "GTJyISrUCoVCp4KIUl1e1FHeyGeu09qTsFZLsNeCTz8="
  "content_base64sha512" = "tp0cRC/xBlJH4txY6Skb/FmexTrlNXq7OLAJXEYJwEvW+obgAeSYPtmPhvYhgwsXTWJ2jpTJkkiqclybnVu8MA=="
  "content_md5" = "983a604da76dd282581c6d411f3b8291"
  "content_sha1" = "75a47c30031f5fa02f6c4b5170e9539324f95c87"
  "content_sha256" = "193272212ad40a8542a78288525d5ed451dec867aed3da93b0564bb0d7824f3f"
  "content_sha512" = "b69d1c442ff1065247e2dc58e9291bfc599ec53ae5357abb38b0095c4609c04bd6fa86e001e4983ed98f86f621830b174d62768e94c99248aa725c9b9d5bbc30"
  "filename" = "./abc.txt"
  "id" = "75a47c30031f5fa02f6c4b5170e9539324f95c87"
}
1-2 데이터 소스 속성 참조
데이터 소스로 읽은 대상을 참조하는 방식은 리소스와 구별되게 data가 앞에 붙는다.
# Terraform Code
data "<리소스 유형>" "<이름>" {
  <인수> = <값>
}

# 데이터 소스 참조
data.<리소스 유형>.<이름>.<속성>
코드 예시
- 데이터 소스를 활용해 AWS 가용영역 인수를 정의 → 리전 내에서 사용 가능한 가용영역 목록 가져와서 사용하기
# Declare the data source
data "aws_availability_zones" "available" {
  state = "available"
}
resource "aws_subnet" "primary" {
  availability_zone = data.aws_availability_zones.available.names[0]
  # e.g. ap-northeast-2a
}
resource "aws_subnet" "secondary" {
  availability_zone = data.aws_availability_zones.available.names[1]
  # e.g. ap-northeast-2b
}
[도전과제1] 위 리전 내에서 사용 가능한 가용영역 목록 가져오기를 사용한 VPC 리소스 생성 실습 진행, 혹은 아무거나 데이터 소스를 사용한 실습 진행
AWS CLI는 자격 증명 및 설정을 저장하는 데 두개의 파일을 사용한다.
`.aws/credentials` 와 `.aws/config` 이다. 이러한 파일은 AWS CLI을 구성할 때 자동으로 생성된다. 그리고 Terrafrom은 이 파일들을 기본적으로 감지하고 사용한다.
# provider.tf
provider "aws" {
  region  = "ap-northeast-2"
  profile = "default"
}
# vpc.tf
# VPC 생성
resource "aws_vpc" "main" {
cidr_block = "10.0.0.0/16" # 예시 CIDR 블록
tags = {
Name = "main-vpc"
}
}
# Availability Zones 데이터 선언
data "aws_availability_zones" "available" {
state = "available"
}
# Primary 서브넷 생성
resource "aws_subnet" "primary" {
vpc_id = aws_vpc.main.id
cidr_block = "10.0.1.0/24" # 예시 CIDR 블록
availability_zone = data.aws_availability_zones.available.names[0]
map_public_ip_on_launch = true
tags = {
Name = "primary-subnet"
}
}
# Secondary 서브넷 생성
resource "aws_subnet" "secondary" {
vpc_id = aws_vpc.main.id
cidr_block = "10.0.2.0/24" # 예시 CIDR 블록
availability_zone = data.aws_availability_zones.available.names[1]
map_public_ip_on_launch = true
tags = {
Name = "secondary-subnet"
}
}
파일을 전부 작성하였다. 이제 생성해본다.
terraform apply -auto-approve

terraform state list
data.aws_availability_zones.available
aws_subnet.primary
aws_subnet.secondary
aws_vpc.main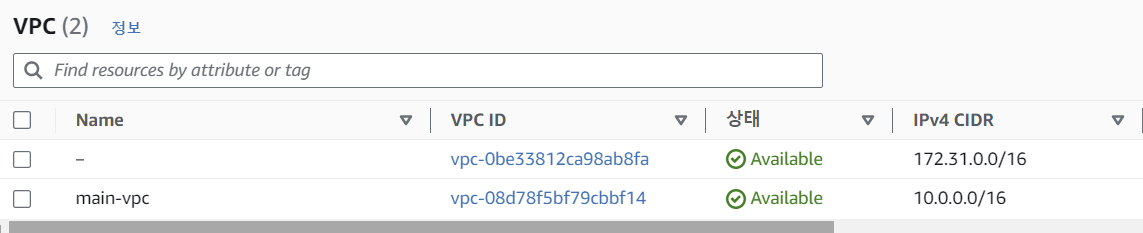
terraform destroy -auto-approve
terraform state list
`main.tf` 파일 코드 수정
mkdir 1-2 && cd 1-2

cat <<'EOT' > main.tf
resource "local_file" "abc" {
  content  = "123!"
  filename = "${path.module}/abc.txt"
}

data "local_file" "abc" {
  filename = local_file.abc.filename
}

resource "local_file" "def" {
  content  = data.local_file.abc.content
  filename = "${path.module}/def.txt"
}
EOT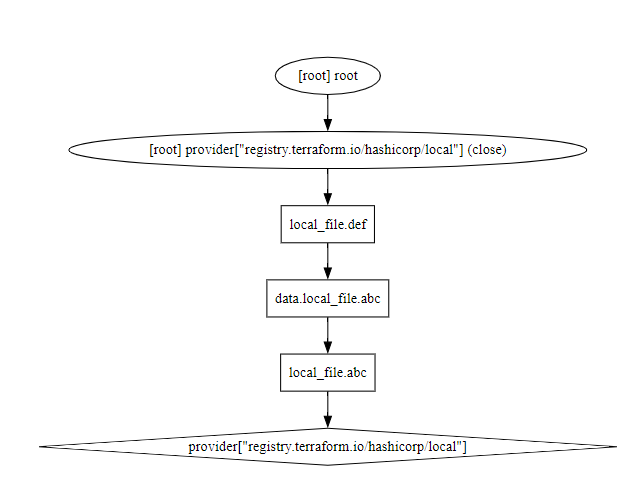
terraform init && terraform plan && terraform apply -auto-approve

terraform state list
data.local_file.abc
local_file.abc
local_file.def

ls
abc.txt  def.txt  main.tf  terraform.tfstate  terraform.tfstate.backup

# 테라폼 콘솔 : 데이터 소스 참조 확인
echo "local_file.abc" | terraform console
echo "local_file.def" | terraform console

# 파일 확인
ls *.txt
diff abc.txt def.txt

# graph 확인
terraform graph > graph.dot
digraph {
        compound = "true"
        newrank = "true"
        subgraph "root" {
                "[root] data.local_file.abc (expand)" [label = "data.local_file.abc", shape = "box"]
                "[root] local_file.abc (expand)" [label = "local_file.abc", shape = "box"]
                "[root] local_file.def (expand)" [label = "local_file.def", shape = "box"]
                "[root] provider[\"registry.terraform.io/hashicorp/local\"]" [label = "provider[\"registry.terraform.io/hashicorp/local\"]", shape = "diamond"]
                "[root] data.local_file.abc (expand)" -> "[root] local_file.abc (expand)"
                "[root] local_file.abc (expand)" -> "[root] provider[\"registry.terraform.io/hashicorp/local\"]"
                "[root] local_file.def (expand)" -> "[root] data.local_file.abc (expand)"
                "[root] provider[\"registry.terraform.io/hashicorp/local\"] (close)" -> "[root] local_file.def (expand)"
                "[root] root" -> "[root] provider[\"registry.terraform.io/hashicorp/local\"] (close)"
        }
}
1-3 (추가 실습) az.tf 파일 생성 - az datasource - 링크
cat <<'EOT' > main.tf
data "aws_availability_zones" "available" {
  state = "available"
}
EOT
확인
terraform init -upgrade && terraform apply -auto-approve

terraform state list
data.aws_availability_zones.available

 terraform state show data.aws_availability_zones.available
# data.aws_availability_zones.available:
data "aws_availability_zones" "available" {
    group_names = [
        "ap-northeast-2",
    ]
    id          = "ap-northeast-2"
    names       = [
        "ap-northeast-2a",
        "ap-northeast-2b",
        "ap-northeast-2c",
        "ap-northeast-2d",
    ]
    state       = "available"
    zone_ids    = [
        "apne2-az1",
        "apne2-az2",
        "apne2-az3",
        "apne2-az4",
    ]
}

terraform console
> data.aws_availability_zones.available
{
  "all_availability_zones" = tobool(null)
  "exclude_names" = toset(null) /* of string */
  "exclude_zone_ids" = toset(null) /* of string */
  "filter" = toset(null) /* of object */
  "group_names" = toset([
    "ap-northeast-2",
  ])
  "id" = "ap-northeast-2"
  "names" = tolist([
    "ap-northeast-2a",
    "ap-northeast-2b",
    "ap-northeast-2c",
    "ap-northeast-2d",
  ])
  "state" = "available"
  "timeouts" = null /* object */
  "zone_ids" = tolist([
    "apne2-az1",
    "apne2-az2",
    "apne2-az3",
    "apne2-az4",
  ])
}
2. 입력 변수 Variable
입력 변수는 인프라를 구성하는 데 필요한 속성 값을 정의해 코드의 변경 없이 여러 인프라를 생성하는 데 목적이 있다.
2-1 변수 선언 방식
변수는 variable로 시작되는 블록으로 구성된다.
# variable 블록 선언의 예
variable "<이름>" {
 <인수> = <값>
}

variable "image_id" {
 type = string
}
변수 설명은 아래의 블로그로 대체하겠다.
2023.04.05 - [IaC/Infrastructure Provisioning] - 2. Terraform 변수 사용법(use-variable) - AWS
2. Terraform 변수 사용법(use-variable) - AWS
Overview 2023.04.04 - [Hashicorp] - 1. Terraform 기초 : 설치 및 .tf 파일 설명 오늘은 Terraform 의 변수사용법에 대해 알아보려고 한다. Terraform 변수 사용법 먼저 소스코드 주소는 아래와 같다. https://github.com/s
somaz.tistory.com
2023.04.09 - [IaC/Infrastructure Provisioning] - 3. Terraform 다양한 변수(variable, local, data...output, input) - AWS
3. Terraform 다양한 변수(variable, local, data...output, input) - AWS
Overview 2023.04.04 - [Hashicorp] - 1. Terraform 기초 : 설치 및 .tf 파일 설명 2023.04.06 - [Hashicorp] - 2. Terraform 변수 사용법(use-variable) 오늘은 테라폼의 다양한 변수들에 대해 공부해보려고 한다. 1. variable 변수
somaz.tistory.com
2-2 변수 유형
- 기본 유형
- string : 글자 유형
- number : 숫자 유형
- bool : true 또는 false
- any : 명시적으로 모든 유형이 허용됨을 표시
- 집합 유형
- list (<유형>): 인덱스 기반 집합
- map (<유형>): 값 = 속성 기반 집합이며 키값 기준 정렬
- set (<유형>): 값 기반 집합이며 정렬 키값 기준 정렬
- object ({<인수 이름>=<유형>, …})
- tuple ([<유형>, …])
list와 set은 선언하는 형태가 비슷하지만 참조 방식이 인덱스와 키로 각각 차이가 있고, map과 set의 경우 선언된 값이 정렬되는 특징을 가진다.
2-3 유효성 검사
- 변수 블록 내에 validation 블록에서 조건인 condition에 지정되는 규칙이 true 또는 false를 반환해야 하며, error_message는 condition 값의 결과가 false 인 경우 출력되는 메시지를 정의한다.
- regex 함수는 대상의 문자열에 정규식을 적용하고 일치하는 문자열을 반환하는데, 여기에 can 함수를 함께 사용하면 정규식에 일치하지 않는 경우의 오류를 검출한다.
- validation 블록은 중복으로 선언할 수 있다.
cat <<'EOT' > main.tf
variable "image_id" {
  type        = string
  description = "The id of the machine image (AMI) to use for the server."

  validation {
    condition     = length(var.image_id) > 4
    error_message = "The image_id value must exceed 4."
  }

  validation {
    # regex(...) fails if it cannot find a match
    condition     = can(regex("^ami-", var.image_id))
    error_message = "The image_id value must starting with \"ami-\"."
  }
}
EOT
terraform apply -auto-approve
var.image_id
The id of the machine image (AMI) to use for the server.
Enter a value: ami-
╷
│ Error: Invalid value for variable
│
│ on main.tf line 1:
│ 1: variable "image_id" {
│ ├────────────────
│ │ var.image_id is "ami-"
│
│ The image_id value must exceed 4.
│
│ This was checked by the validation rule at main.tf:5,3-13.
...
terraform apply -auto-approve
var.image_id
The id of the machine image (AMI) to use for the server.
Enter a value: ami-12345
No changes. Your infrastructure matches the configuration.
Terraform has compared your real infrastructure against your configuration and found no differences, so no changes are
needed.
2-4 변수 참조 & 2-5 민감한 변수 취급
variable은 코드 내에서 `var.<이름>`으로 참조된다.
입력 변수의 민감 여부를 선언할 수 있다.
cat <<'EOT' > main.tf
variable "my_password" {
  default   = "password"
  sensitive = true
}

resource "local_file" "abc" {
  content  = var.my_password
  filename = "${path.module}/abc.txt"
}
EOT
실행한다.
terraform apply -auto-approve

Terraform used the selected providers to generate the following execution plan. Resource actions are indicated with the
following symbols:
  + create

Terraform will perform the following actions:

  # local_file.abc will be created
  + resource "local_file" "abc" {
      + content              = (sensitive value)
      + content_base64sha256 = (known after apply)
      + content_base64sha512 = (known after apply)
      + content_md5          = (known after apply)
      + content_sha1         = (known after apply)
      + content_sha256       = (known after apply)
      + content_sha512       = (known after apply)
      + directory_permission = "0777"
      + file_permission      = "0777"
      + filename             = "./abc.txt"
      + id                   = (known after apply)
    }

Plan: 1 to add, 0 to change, 0 to destroy.
local_file.abc: Creating...
local_file.abc: Creation complete after 0s [id=5baa61e4c9b93f3f0682250b6cf8331b7ee68fd8]
그러나 민감한 변수로 지정해도 `terraform.tfstate` 파일에는 결과물이 평문으로 기록되므로 State 파일의 보안에 유의해야 한다.
terraform apply -auto-approve

Terraform used the selected providers to generate the following execution plan. Resource actions are indicated with the
following symbols:
  + create

Terraform will perform the following actions:

  # local_file.abc will be created
  + resource "local_file" "abc" {
      + content              = (sensitive value)
      + content_base64sha256 = (known after apply)
      + content_base64sha512 = (known after apply)
      + content_md5          = (known after apply)
      + content_sha1         = (known after apply)
      + content_sha256       = (known after apply)
      + content_sha512       = (known after apply)
      + directory_permission = "0777"
      + file_permission      = "0777"
      + filename             = "./abc.txt"
      + id                   = (known after apply)
    }

Plan: 1 to add, 0 to change, 0 to destroy.
local_file.abc: Creating...
local_file.abc: Creation complete after 0s [id=5baa61e4c9b93f3f0682250b6cf8331b7ee68fd8]
# 결과물 파일 확인
cat abc.txt ; echo
password
cat terraform.tfstate | grep '"content":'
"content": "password",
2-6 변수 입력 방식과 우선순위
[우선순위 수준]의 숫자가 작을수록 우선순위도 낮다.
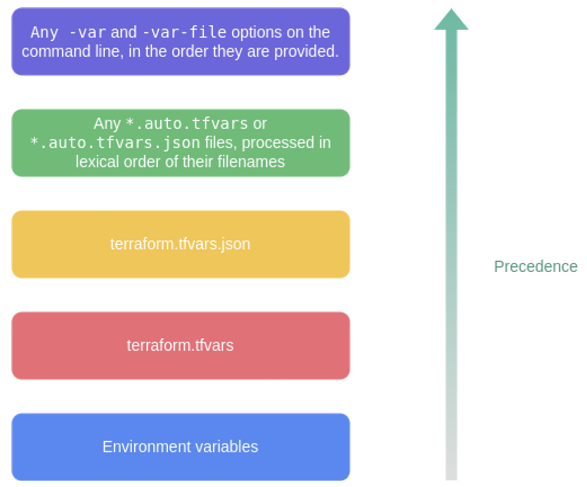
우선순위
[우선순위 수준 1] 실행 후 입력
[우선순위 수준 2] variable 블록의 default 값
[우선순위 수준 3] 환경 변수 (TF_VAR 변수 이름)
[우선순위 수준 4] terraform.tfvars에 정의된 변수 선언
[우선순위 수준 5] *.auto.tfvars에 정의된 변수 선언
[우선순위 수준 6] *.auto.tfvars.json에 정의된 변수 선언
[우선순위 수준 7] CLI 실행 시 -var 인수에 지정 또는 -var-file로 파일 지정
[스터디 전용/실습1] VPC + 보안그룹 + EC2 배포 (도전과제2)
목표 : default VPC 대신 직접 VPC를 만들고, 해당 VPC 내에 EC2 1대를 배포!
# provider.tf
provider "aws" {
  region  = "ap-northeast-2"
  profile = "default"
}
# vpc.tf
# VPC 생성
resource "aws_vpc" "main" {
cidr_block = "10.0.0.0/16" # 예시 CIDR 블록
tags = {
Name = "somaz-vpc"
}
}
# Availability Zones 데이터 선언
data "aws_availability_zones" "available" {
state = "available"
}
# Primary 서브넷 생성
resource "aws_subnet" "primary" {
vpc_id = aws_vpc.main.id
cidr_block = "10.0.1.0/24" # 예시 CIDR 블록
availability_zone = data.aws_availability_zones.available.names[0]
map_public_ip_on_launch = true
tags = {
Name = "somaz-subnet1"
}
}
# Secondary 서브넷 생성
resource "aws_subnet" "secondary" {
vpc_id = aws_vpc.main.id
cidr_block = "10.0.2.0/24" # 예시 CIDR 블록
availability_zone = data.aws_availability_zones.available.names[1]
map_public_ip_on_launch = true
tags = {
Name = "somaz-subnet2"
}
}
# 인터넷 게이트웨이 생성
resource "aws_internet_gateway" "igw" {
vpc_id = aws_vpc.main.id
tags = {
Name = "somaz-igw"
}
}
# 라우팅 테이블 생성 후 연결
resource "aws_route_table" "rt" {
vpc_id = aws_vpc.main.id
tags = {
Name = "somaz-rt"
}
}
resource "aws_route_table_association" "rt_association1" {
subnet_id = aws_subnet.primary.id
route_table_id = aws_route_table.rt.id
}
resource "aws_route_table_association" "rt_association2" {
subnet_id = aws_subnet.secondary.id
route_table_id = aws_route_table.rt.id
}
resource "aws_route" "main_route" {
route_table_id = aws_route_table.rt.id
destination_cidr_block = "0.0.0.0/0"
gateway_id = aws_internet_gateway.igw.id
}
output "aws_vpc_id" {
value = aws_vpc.main.id
}
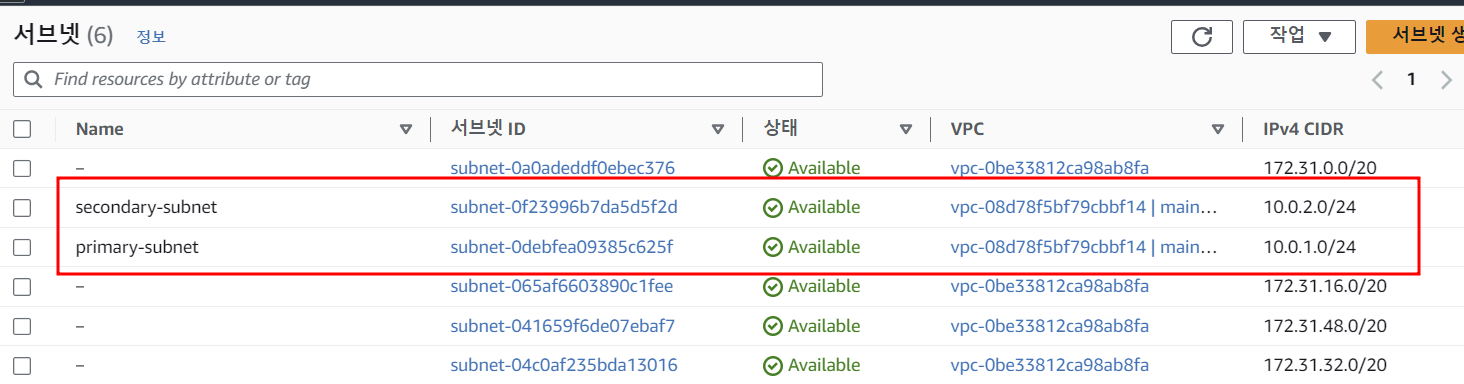
먼저 vpc.tf부터 배포해준다.
terraform init && terraform fmt && terraform validate

terraform apply -auto-approve
...
aws_vpc_id = "vpc-0eff1e562e4717c21"

terraform state list
data.aws_availability_zones.available
aws_internet_gateway.igw
aws_route.main_route
aws_route_table.rt
aws_route_table_association.rt_association1
aws_route_table_association.rt_association2
aws_subnet.primary
aws_subnet.secondary
aws_vpc.main
# 참고 : aws ec2 describe-subnets --filters "Name=vpc-id,Values=vpc-<자신의 VPC ID>"
VPCID=$(terraform output -raw aws_vpc_id)
aws ec2 describe-subnets --filters "Name=vpc-id,Values=$VPCID" | jq
aws ec2 describe-subnets --filters "Name=vpc-id,Values=$VPCID" --output table

terraform state show aws_route.main_route

# graph 확인 > graph.dot 파일 선택 후 오른쪽 상단 DOT 클릭
terraform graph > graph.dot
이제 보안그룹과 EC2를 배포해준다.
여기서 `protocol = "-1"` 의 의미는 `TCP,UDP,ICMP` 등 모든 트래픽 프로토콜을 허용하거나 거부하기 위한 설정이다.
그렇다면 이게 무슨소리일까?
먼저 `protocol = "-1"` 설정 자체는 트래픽 허용 여부를 결정하지 않는다. 대신 규칙이 적용되는 모든 프로토콜의 범위를 지정한다. 따라서 트래픽이 실제로 허용되거나 거부되는지 여부는 규칙 유형 및 기타 규칙 구성에 따른다.
AWS 보안 그룹은 상태 정자형이며 기본 "모두 거부" 로 시작된다. 즉 NACL처럼 AWS 보안 그룹에서 `"deny"` 규칙을 명시적으로 생성할 수 있는 방법을 없다.
결론적으로 sg_outbound 규칙은 보안 그룹에 연결된 리소스로부터 모든 IP로의 모든 프로토콜 및 포트를 통한 나가는 트래픽을 허용한다.
# sg.tf
resource "aws_security_group" "sg" {
  vpc_id      = aws_vpc.main.id
  name        = "somaz-sg"
  description = "Somaz SG"
}

resource "aws_security_group_rule" "sg_inbound" {
  type              = "ingress"
  from_port         = 80
  to_port           = 80
  protocol          = "tcp"
  cidr_blocks       = ["0.0.0.0/0"]
  security_group_id = aws_security_group.sg.id
}

resource "aws_security_group_rule" "sg_outbound" {
  type              = "egress"
  from_port         = 0
  to_port           = 0
  protocol          = "-1"
  cidr_blocks       = ["0.0.0.0/0"]
  security_group_id = aws_security_group.sg.id
}
`data "aws_ami" "amazon_linux2" : aws_ami` 유형의 데이터 소스를 선언하고 로컬이름 amazon_linux2를 할당한다.
most_recent = true : 여러 AMI가 지정된 필터와 일치하는 경우 Terraform이 가장 최근 필터를 사용하도록 보장한다.
즉 최신 버전을 사용한다는 뜻이다.
data "aws_ami" "amazon_linux2" {
  most_recent = true
  filter {
    name   = "owner-alias"
    values = ["amazon"]
  }

  filter {
    name   = "name"
    values = ["amzn2-ami-hvm-*-x86_64-ebs"]
  }

  owners = ["amazon"]
}

resource "aws_instance" "ec2" {

  depends_on = [
    aws_internet_gateway.igw
  ]

  ami                         = data.aws_ami.amazon_linux2.id
  associate_public_ip_address = true
  instance_type               = "t2.micro"
  vpc_security_group_ids      = ["${aws_security_group.sg.id}"]
  subnet_id                   = aws_subnet.primary.id

  user_data = <<-EOF
              #!/bin/bash
              wget https://busybox.net/downloads/binaries/1.31.0-defconfig-multiarch-musl/busybox-x86_64
              mv busybox-x86_64 busybox
              chmod +x busybox
              RZAZ=$(curl http://169.254.169.254/latest/meta-data/placement/availability-zone-id)
              IID=$(curl 169.254.169.254/latest/meta-data/instance-id)
              LIP=$(curl 169.254.169.254/latest/meta-data/local-ipv4)
              echo "<h1>RegionAz($RZAZ) : Instance ID($IID) : Private IP($LIP) : Web Server</h1>" > index.html
              nohup ./busybox httpd -f -p 80 &
              EOF

  user_data_replace_on_change = true

  tags = {
    Name = "somaz-ec2"
  }
}

output "ec2_public_ip" {
  value       = aws_instance.ec2.public_ip
  description = "The public IP of the Instance"
}
terraform init && terraform fmt && terraform validate

terraform apply -auto-approve
...
aws_vpc_id = "vpc-0eff1e562e4717c21"
ec2_public_ip = "3.34.189.239"

terraform state list
...
data.aws_ami.amazon_linux2
aws_instance.ec2

# 출력된 EC2 퍼블릭IP로 curl 접속 확인
terraform output -raw ec2_public_ip
3.34.189.239

MYIP=$(terraform output -raw ec2_public_ip)
while true; do curl --connect-timeout 1  http://$MYIP/ ; echo "------------------------------"; date; sleep 1; done
<h1>RegionAz(apne2-az1) : Instance ID(i-00417240bf7adfd26) : Private IP(10.0.1.144) : Web Server</h1>
------------------------------
Fri Sep  8 22:36:50 KST 2023
<h1>RegionAz(apne2-az1) : Instance ID(i-00417240bf7adfd26) : Private IP(10.0.1.144) : Web Server</h1>
------------------------------
Fri Sep  8 22:36:51 KST 2023
<h1>RegionAz(apne2-az1) : Instance ID(i-00417240bf7adfd26) : Private IP(10.0.1.144) : Web Server</h1>
마지막으로 삭제해준다. 지우는게 가장 중요!
terraform destroy -auto-approve

# 확인
terraform state list
3. local 지역 값
코드 내에서 사용자가 지정한 값 또는 속성 값을 가공해 참조 가능한 local (지역 값)은 외부에서 입력되지 않고, 코드 내에서만 가공되어 동작하는 값을 선언한다.
module은 github에 있는 gcp 공식 module을 사용했다.
https://github.com/terraform-google-modules/terraform-google-cloud-storage
GitHub - terraform-google-modules/terraform-google-cloud-storage: Creates one or more Cloud Storage buckets and assigns basic pe
Creates one or more Cloud Storage buckets and assigns basic permissions on them to arbitrary users - GitHub - terraform-google-modules/terraform-google-cloud-storage: Creates one or more Cloud Stor...
github.com
locals를 사용해 gcp 리소스를 생성하는 방법을 알아본다.
### provider.tf ###
provider "google" {
  credentials = file("../../../key/admin-somaz-service-project-dev.json")
  project     = var.project
  region      = var.region
}

provider "google-beta" {
  credentials = file("../../../key/admin-somaz-service-project-dev.json")
  project     = var.project
  region      = var.region
}

---------------------

### locals.tf ###

## common ##
locals {

  default_labels = {
    environment = var.environment
    terraform   = var.terraform
  }

  default_map_labels = {
    environment = {
      key1 = var.environment
    },
    terraform = {
      key2 = var.terraform
    }
  }

  buckets_versioning = {
    "${var.tf_state_bucket}" = true
    "${var.somaz_link}"
  }

}

---------------------

### variables.tf ###

## common ##
variable "project" {}
variable "host_project" {}
variable "region" {}
variable "environment" {}
variable "terraform" {}

## terraform tfstate backend ##
variable "tf_state_bucket" {}

## gcs_buckets ##
variable "somaz_link" {}

--------------------------

### somaz.tfvars ###

## common ##
project      = "somaz-service-project-dev"
host_project = "somaz-host-project"
region       = "asia-northeast3"
environment  = "dev"
terraform    = "true"

## terraform tfstate backend ##
tf_state_bucket = "somaz-service-project-terraform-remote-tfstate"

## gcs_buckets ##
somaz_link               = "dev.somaz.link"
이렇게 bucket을 생성해줄 수 있다.
## GCS Buckets(Cloud Storage=S3) ##
module "gcs_buckets" {
  source     = "../../../modules/gcs_buckets"
  names      = keys(local.buckets_versioning)
  project_id = var.project
  location   = var.region
  labels     = local.default_labels
  versioning = local.buckets_versioning

  depends_on = [google_dns_record_set.asset_record]
}
아래와 같이 응용도 가능하다.
## common ##
locals {

  default_labels = {
    environment = var.environment
    terraform   = var.terraform
  }

  default_map_labels = {
    environment = {
      key1 = var.environment
    },
    terraform = {
      key2 = var.terraform
    }
  }

  buckets_versioning = {
    "${var.tf_state_bucket}" = true
    "${var.somaz.link}"  = false
  }

  patch_cors_values = {
    origin          = ["*"],
    method          = ["GET", "POST"],
    response_header = ["*"],
    max_age_seconds = 3600
  }

  bucket_cors_settings = {
    "${var.tf_state_bucket}" = null
    "${var.somaz.link}"  = local.patch_cors_values
    # ... add other bucket names as keys and assign cors_values if you want to enable CORS for them, else set to null
  }

}

-----------------

## GCS Buckets(Cloud Storage=S3) ##
module "gcs_buckets" {
  source     = "../../../modules/gcs_buckets"
  names      = keys(local.buckets_versioning)
  project_id = var.project
  location   = var.region
  labels     = local.default_labels
  versioning = local.buckets_versioning
  cors       = local.bucket_cors_settings
}
아래는 compute engine 생성방법이다.
locals를 활용해 같은 환경의 리소스에 같은 태그값을 줄 수 있다.
## Compute Engine ##
resource "google_compute_address" "bastion_ip" {
  name = var.bastion_ip
}

resource "google_compute_instance" "bastion" {
  name                      = var.bastion
  machine_type              = "e2-small"
  labels                    = local.default_labels
  zone                      = "${var.region}-a"
  allow_stopping_for_update = true

  tags = [var.prod_nfs_client]

  boot_disk {
    initialize_params {
      image = "ubuntu-os-cloud/ubuntu-2004-lts"
    }
  }

  metadata = {
    ssh-keys = "nerdystar:${file("../../../key/somaz-bastion.pub")}"
  }

  metadata_startup_script = <<-EOF
      #!/bin/bash
      sudo apt-get update
      sudo apt-get install -y apt-transport-https ca-certificates curl nfs-common mysql-client
      curl -LO "https://dl.k8s.io/release/$(curl -L -s https://dl.k8s.io/release/stable.txt)/bin/linux/amd64/kubectl"
      sudo install -o root -g root -m 0755 kubectl /usr/local/bin/kubectl
      sudo mkdir -p /home/somaz/prod
      sudo mount -t nfs <prod-nfs-server-ip>:/nfs/prod /home/somaz/prod   # change <prod-nfs-server-ip>
      echo "<prod-nfs-server-ip>:/nfs/prod /home/somaz/prod nfs defaults 0 0" | sudo tee -a /etc/fstab
      EOF

  network_interface {
    network    = "projects/${var.host_project}/global/networks/${var.shared_vpc}"
    subnetwork = "projects/${var.host_project}/regions/${var.region}/subnetworks/${var.subnet_share}-prod-a"

    access_config {
      ## Include this section to give the VM an external ip ##
      nat_ip = google_compute_address.bastion_ip.address
    }
  }

  depends_on = [google_compute_address.bastion_ip]
}
4. 반복문
list 형태의 값 목록이나 Key-Value 형태의 문자열 집합인 데이터가 있는 경우 동일한 내용에 대해 테라폼 구성 정의를 반복적으로 하지 않고 관리할 수 있다.
- `count` : 반복문, 정수 값만큼 리소스나 모듈을 생성
- `for_each` : 반목문, 선언된 key 값 개수만큼 리소스를 생성
- `for` : 복합 형식 값의 형태를 변환하는데 사용 ← for_each와 다름
- `dynamic` : 리소스 내부 속성 블록을 동적인 블록으로 생성
4-1 count
# main.tf
resource "local_file" "abc" {
  count    = 5
  content  = "abc${count.index}"
  filename = "${path.module}/abc${count.index}.txt"
}

output "fileid" {
  value = local_file.abc.*.id
}

output "filename" {
  value = local_file.abc.*.filename
}

output "filecontent" {
  value = local_file.abc.*.content
}
확인해본다.
terraform init && terraform apply -auto-approve
...
filecontent = [
  "abc0",
  "abc1",
  "abc2",
  "abc3",
  "abc4",
]
fileid = [
  "062c648aaf68174757c50ab1aeebb61e059c1d1b",
  "9ee036287b4cfbcfa3b5bbfcf92d46eb5e75df96",
  "229d028063a11904f846c91224abaa99113f3a15",
  "99bdd81005eaa37fa71ff0787cd1d65f63d3d293",
  "5ac835798aa493440692c54c7ab76161f06c1b88",
]
filename = [
  "./abc0.txt",
  "./abc1.txt",
  "./abc2.txt",
  "./abc3.txt",
  "./abc4.txt",
]

terraform state list
local_file.abc[0]
local_file.abc[1]
local_file.abc[2]
local_file.abc[3]
local_file.abc[4]

echo "local_file.abc[0]" | terraform console

ls *.txt
4-2 for_each
리소스 또는 모듈 블록에서 `for_each` 에 입력된 데이터 형태가 `map` 또는 `set` 이면, 선언된 `key` 값 개수만큼 리소스를 생성하게 된다.
## Artifact Registry ##

resource "google_artifact_registry_repository" "repo" {
  for_each = toset(var.somaz_repo)

  location      = var.region
  repository_id = each.key
  format        = "DOCKER" # DOCKER is for Docker images. You can also specify "MAVEN" or "NPM" for Java and JavaScript packages, respectively.

  labels = local.default_labels
}

resource "google_artifact_registry_repository" "prod_repo" {
  for_each = toset(var.prod_somaz_repo)

  location      = var.prod_region
  repository_id = each.key
  format        = "DOCKER" # DOCKER is for Docker images. You can also specify "MAVEN" or "NPM" for Java and JavaScript packages, respectively.

  labels = local.default_labels
}
## Artifact Registry ##
variable "somaz_repo" {
description = "List of Artifact Registry dsp repository names"
type = list(string)
}
## Prod Artifact Registry ##
variable "prod_somaz_repo" {
description = "List of Artifact Registry prod dsp repository names"
type = list(string)
}## Artifact Registry ##
somaz_repo = ["somaz-web", "somaz-game", "somaz-was"]
prod_somaz_repo = ["somaz-web", "somaz-game", "somaz-was"]
4-3 for
- 예를 들어 list 값의 포맷을 변경하거나 특정 접두사 `prefix` 를 추가할 수도 있고, `output` 에 원하는 형태로 반복적인 결과를 표현할 수 도 있다.
- `list` 타입의 경우 값 또는 인덱스와 값을 반환
- `map` 타입의 경우 키 또는 키와 값에 대해 반환
- `set` 타입의 경우 키 값에 대해 반환
# main.tf
variable "names" {
  default = ["a", "b", "c"]
}

resource "local_file" "abc" {
  content  = jsonencode(var.names) # 결과 : ["a", "b", "c"]
  filename = "${path.module}/abc.txt"
}
terraform apply -auto-approve
terraform state list
ls *.txt
cat abc.txt ;echo
echo "local_file.abc" | terraform console
# 참고 jsonencode Function
echo 'jsonencode({"hello"="world"})' | terraform console
4-4 dynamic
- `count` 나 `for_each` 구문을 사용한 리소스 전체를 여러 개 생성하는 것 이외도 리소스 내에 선언되는 구성 블록을 다중으로 작성해야 하는 경우가 있다.
- 예를 들면 AWS Security Group 리소스 구성에 ingress, egress 요소가 리소스 선언 내부에서 블록 형태로 여러 번 정의되는 경우다.
resource "aws_security_group" "example" {
  name        = "example-security-group"
  description = "Example security group"
  vpc_id.     = aws_vpc.main.id

  ingress {
    from_port   = 22
    to_port     = 22
    protocol    = "tcp"
    cidr_blocks = ["0.0.0.0/0"]
  }

  ingress {
    from_port   = 443
    to_port     = 443
    protocol    = "tcp"
    ipv6_cidr_blocks = ["::/0"]
  }
}
(일반적인 블록)
resource "provider_resource" "name" {
  name = "some_resource"

  some_setting {
    key = a_value
  }

  some_setting {
    key = b_value
  }

  some_setting {
    key = c_value
  }

  some_setting {
    key = d_value
  }
}
(dynamic 블록 적용)
resource "provider_resource" "name" {
  name = "some_resource"

  dynamic "some_setting" {
    for_each = {
      a_key = a_value
      b_key = b_value
      c_key = c_value
      d_key = d_value
    }

    content {
      key = some_setting.value
    }
  }
}
[도전과제 5] count, for_each 반복문, for문, dynamic문 을 활용해서 리소스(어떤 리소스든지 상관없음)를 배포해보고, 해당 코드를 정리해주세요!
IAM 역할을 생성해보려고 한다.
Admin: 모든 AWS 서비스에 대한 전체 액세스 권한
User: 특정 AWS 서비스에 대한 제한된 액세스(예: EC2 읽기 전용 액세스).
Viewer: CloudWatch 로그를 볼 수 있는 권한만
for_each 사용
variable "roles" {
  description = "Roles and their respective policies"
  default = {
    admin   = "arn:aws:iam::aws:policy/AdministratorAccess"
    user    = "arn:aws:iam::aws:policy/AmazonEC2ReadOnlyAccess"
    viewer  = "arn:aws:iam::aws:policy/CloudWatchLogsReadOnlyAccess"
  }
}

resource "aws_iam_role" "example" {
  for_each = var.roles

  name = each.key
  assume_role_policy = jsonencode({
    Version = "2012-10-17",
    Statement = [
      {
        Effect    = "Allow",
        Principal = {
          Service = "ec2.amazonaws.com"
        },
        Action    = "sts:AssumeRole"
      }
    ]
  })
}

resource "aws_iam_role_policy_attachment" "example" {
  for_each = var.roles

  role       = aws_iam_role.example[each.key].name
  policy_arn = each.value
}
terraform init && terraform fmt && terraform validate
terraform apply -auto-approve

terraform state list
aws_iam_role.example["admin"]
aws_iam_role.example["user"]
aws_iam_role.example["viewer"]
aws_iam_role_policy_attachment.example["admin"]
aws_iam_role_policy_attachment.example["user"]
aws_iam_role_policy_attachment.example["viewer"]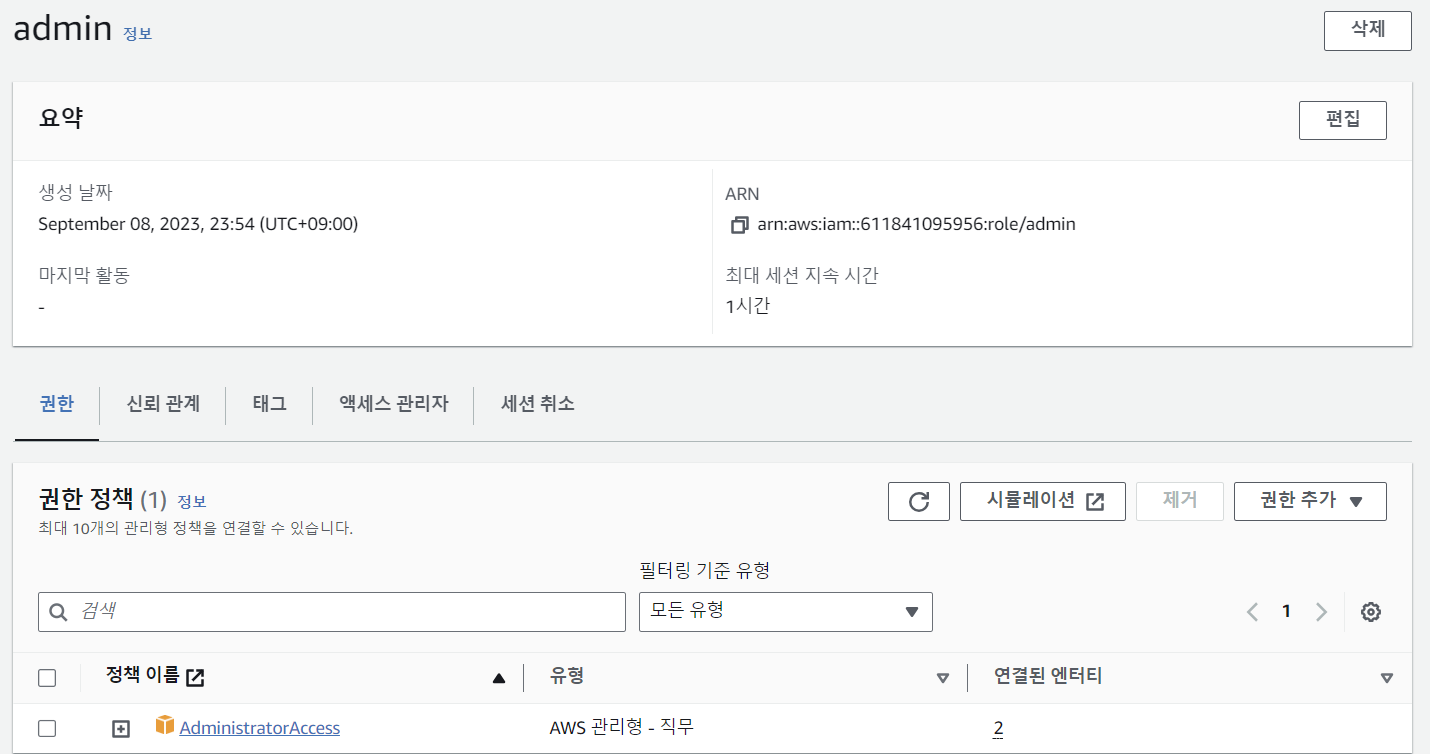

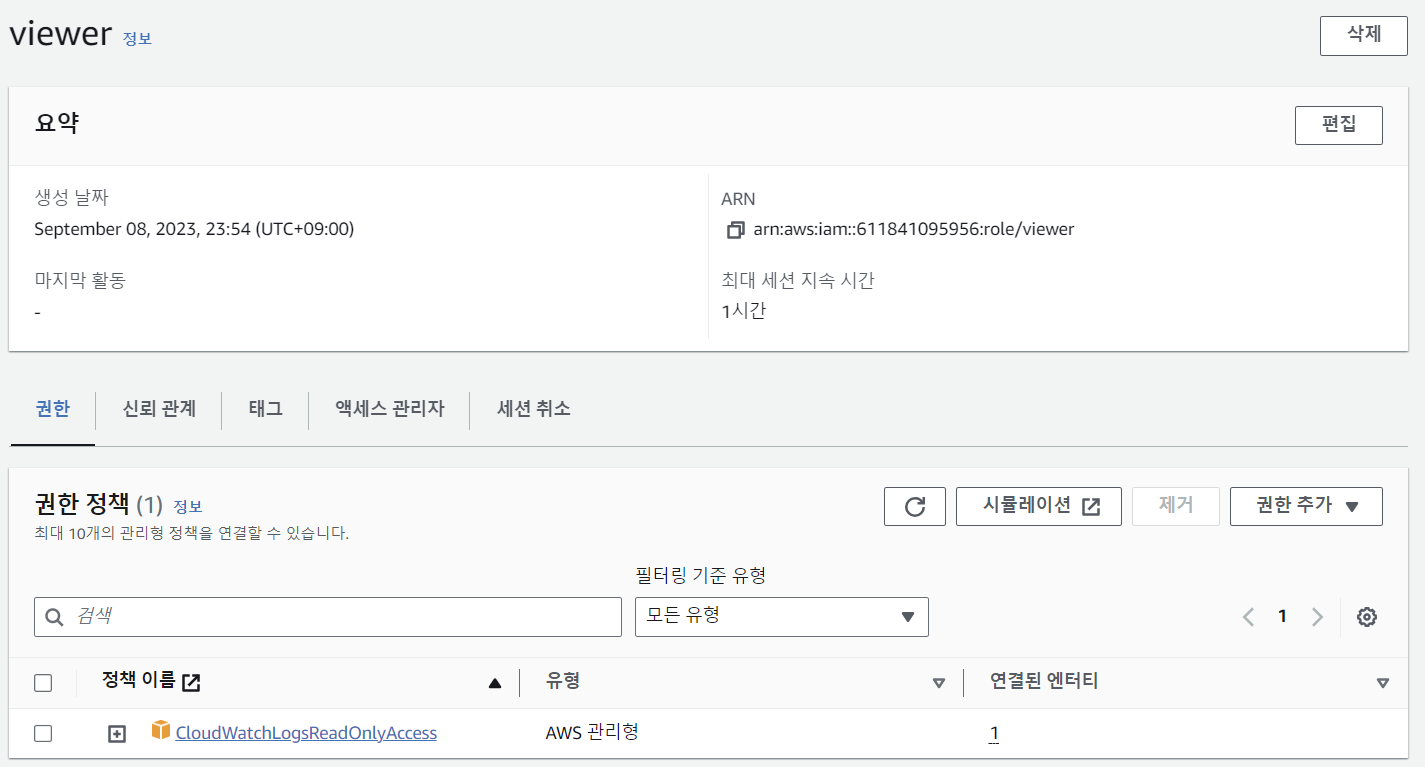
terraform destroy -auto-approve
Count 사용
locals {
  roles = [
    { name : "admin",  policy : "arn:aws:iam::aws:policy/AdministratorAccess" },
    { name : "user",   policy : "arn:aws:iam::aws:policy/AmazonEC2ReadOnlyAccess" },
    { name : "viewer", policy : "arn:aws:iam::aws:policy/CloudWatchLogsReadOnlyAccess" }
  ]
}

resource "aws_iam_role" "example" {
  count = length(local.roles)

  name = local.roles[count.index].name
  assume_role_policy = jsonencode({
    Version = "2012-10-17",
    Statement = [
      {
        Effect    = "Allow",
        Principal = {
          Service = "ec2.amazonaws.com"
        },
        Action    = "sts:AssumeRole"
      }
    ]
  })
}

resource "aws_iam_role_policy_attachment" "example" {
  count = length(local.roles)

  role       = aws_iam_role.example[count.index].name
  policy_arn = local.roles[count.index].policy
}
terraform init && terraform fmt && terraform validate
terraform apply -auto-approve

terraform state list
aws_iam_role.example[0]
aws_iam_role.example[1]
aws_iam_role.example[2]
aws_iam_role_policy_attachment.example[0]
aws_iam_role_policy_attachment.example[1]
aws_iam_role_policy_attachment.example[2]
terraform destroy -auto-approve
마무리
Terraform은 코드로 인프라를 선언하는 강력한 도구이며, 이번 2주차에서는 그 중에서도 데이터 참조와 변수 구성, 반복적인 리소스 정의 방식에 대해 깊이 있는 학습을 할 수 있었다.
특히 `count, for_each, for, dynamic` 은 코드량을 줄이면서도 유지보수성과 확장성을 높일 수 있는 매우 실용적인 기능이었다. 또한 data 블록을 통해 기존 리소스를 안전하게 참조하는 방법도 익혀, 실무 환경에서 여러 모듈 간의 연결과 의존성 설정 시 유용하게 사용할 수 있을 것이다.
앞으로의 학습에서는 모듈화, 워크스페이스 구성, 배포 전략 등에 대해 더 고도화된 실습이 이어질 예정이며, 점차 Terraform을 실무에 도입하거나 기존 IaC 구조를 개선할 수 있는 기반이 탄탄히 다져지고 있다.
Reference
https://github.com/somaz94
'교육, 커뮤니티 후기 > T101(Terraform 101 Study) 스터디' 카테고리의 다른 글
| T101(Terraform 101 Study) 6주차 (2) | 2023.10.14 |
|---|---|
| T101(Terraform 101 Study) 5주차 (0) | 2023.09.26 |
| T101(Terraform 101 Study) 4주차 (0) | 2023.09.22 |
| T101(Terraform 101 Study) 3주차 (0) | 2023.09.17 |
| T101(Terraform 101 Study) 1주차 (0) | 2023.08.28 |