Overview
이번 포스팅은 CloudNet@에서 진행하는 Terraform 101 Study(T101) 스터디 1주차 학습 내용을 정리한 글이다.
테라폼으로 시작하는 IaC 책을 기반으로 실제 AWS 환경에서 Terraform을 활용한 인프라 구성 및 관리 실습을 체험하였다.
학습 주요 내용은 다음과 같다.
- Terraform 실행 환경 구성 (WSL2, VSCode, AWS CLI)
- EC2 인스턴스 배포 실습 (user_data 포함, 웹 서버 설정)
- 변수 및 보안 그룹 사용 방법
- Terraform의 기본 명령어 및 실행 흐름 이해
- S3와 DynamoDB를 활용한 원격 백엔드 구성
- lifecycle 블록 실습 (precondition & postcondition)
- Terraform 버전 관리 및 HCL 문법 학습
- [도전과제]를 통한 실습 확장과 응용 능력 향상
이를 통해 IaC(Infrastructure as Code)의 철학과 Terraform의 주요 기능을 실무 시나리오로 연결하는 기초를 다질 수 있었다.
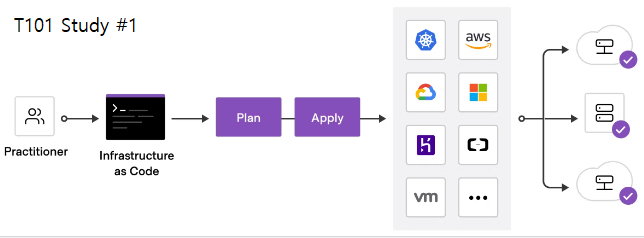
1. IaC와 Terraform
먼저 Terraform에 대한 설명은 블로그에 간단하게 정리한 적이 있어서 생략하도록 하겠다.
2023.04.04 - [IaC/Infrastructure Provisioning] - 1. Terraform 기초 : 설치 및 .tf 파일 설명
1. Terraform 기초 : 설치 및 .tf 파일 설명
Overview Terraform 기초부터 천천히 공부해볼 예정이다. 오늘은 Terraform 설치 및 기본 파일들의 역할 그리고 간단한 명령어에 대해 알아보려고 한다. Terraform이란? Terraform은 HashiCorp에서 개발한 오픈
somaz.tistory.com
2. 실행 환경 구성
2-1 테라폼 환경 구성 (WSL2 기준)
# 테라폼 설치
wget -O- https://apt.releases.hashicorp.com/gpg | sudo gpg --dearmor -o /usr/share/keyrings/hashicorp-archive-keyring.gpg
echo "deb [signed-by=/usr/share/keyrings/hashicorp-archive-keyring.gpg] https://apt.releases.hashicorp.com $(lsb_release -cs) main" | sudo tee /etc/apt/sources.list.d/hashicorp.list
sudo apt update && sudo apt install terraform

# 테라폼 버전 정보 확인
terraform version
Terraform v1.5.6
on linux_amd64

# 자동완성
terraform -install-autocomplete
already installed in /home/somaz/.bashrc

cat ~/.bashrc
...
complete -C /usr/bin/terraform terraform

# 페이저 사용 비활성화[참고: AWS CLI 페이지 매김]
vi ~/.bashrc
export AWS_PAGER=""
2-2 IDE 구성
실무에서도 VsCode를 사용하고 있어서 환경구성에 큰 어려움이 없었다.
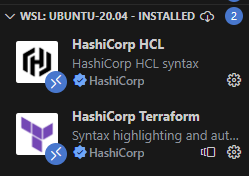
기본적으로 Extension은 WSL 과 HashiCorp Terraform , HashiCorp HCL을 받으면 된다.
2-3 AWS CLI 설치 및 자격증명
AWS CLI 설치 및 자격증명 설치는 아래의 블로그 내용을 참고하면 된다.
2023.03.31 - [AWS] - AWS CLI 정리
AWS CLI 정리
Overivew 오늘은 awscli에 대해서 정리해보려고 한다. awscli 설치 # Version 2 설치 방법 $ curl "https://awscli.amazonaws.com/awscli-exe-linux-x86_64.zip" -o "awscliv2.zip" $ unzip awscliv2.zip $ sudo ./aws/install $ ./aws/install -i /usr/
somaz.tistory.com
특히 default VPC 를 사용하므로, 삭제한 경우 VPC마법사로 미리 생성하는 것이 좋다.
# create default vpc
aws ec2 create-default-vpc

# 확인
aws ec2 describe-vpcs --filter 'Name=isDefault,Values=true' | jq
{
  "Vpcs": [
    {
      "CidrBlock": "172.31.0.0/16",
...
}

aws s3 ls
2023-01-08 20:53:24 somaz-k8s-s3
2-4 EC2 1대 배포
이전에 AWS EC2를 간단하게 생성해본적이 있다. 아래의 사이트를 참고하면 된다.
2023.04.05 - [IaC/Infrastructure Provisioning] - 2. Terraform 변수 사용법(use-variable) - AWS
배포 전 준비
(참고)이미지 타입 : /aws/service/ami-amazon-linux-latest/amzn2-ami-kernel-5.10-hvm-x86_64-gp2
# 디렉토리 생성
mkdir t101-1week-ec2

# Amazon Linux 2 최신 ami id 찾기
 aws ssm get-parameters-by-path --path /aws/service/ami-amazon-linux-latest --query "Parameters[].Name"
[
    "/aws/service/ami-amazon-linux-latest/al2023-ami-kernel-6.1-arm64",
    "/aws/service/ami-amazon-linux-latest/al2023-ami-kernel-6.1-x86_64",
...
    "/aws/service/ami-amazon-linux-latest/amzn2-ami-kernel-5.10-hvm-arm64-gp2",
    "/aws/service/ami-amazon-linux-latest/amzn2-ami-kernel-5.10-hvm-x86_64-gp2",
    "/aws/service/ami-amazon-linux-latest/amzn2-ami-minimal-hvm-arm64-ebs",
    "/aws/service/ami-amazon-linux-latest/amzn2-ami-minimal-hvm-x86_64-ebs"
]
EC2 생성 모니터링
export AWS_PAGER=""
while true; do aws ec2 describe-instances --query "Reservations[*].Instances[*].{PublicIPAdd:PublicIpAddress,InstanceName:Tags[?Key=='Name']|[0].Value,Status:State.Name}" --filters Name=instance-state-name,Values=running --output text ; echo "------------------------------" ; sleep 1; done
WSL2 창분할방법
- 창 세로 분할하기: `Alt + Shift + '+'`
- 창 가로 분할하기: `Alt + Shift + '-'`

EC2 1대 배포 실행
cat <<EOT > main.tf
provider "aws" {
  region = "ap-northeast-2"
}

resource "aws_instance" "example" {
  ami           = "ami-084e92d3e117f7692"
  instance_type = "t2.micro"
}
EOT
# 초기화
terraform init
ls -al
tree .terraform

# plan 확인
terraform plan

# apply 실행
terraform apply
 Enter a value: yes 입력

# ec2 생성 확인 : aws 웹 관리 콘솔에서도 확인 - 서울 리전 선택
export AWS_PAGER=""
aws ec2 describe-instances --output table
EC2 태그 정보 수정
cat <<EOT > main.tf
provider "aws" {
  region = "ap-northeast-2"
}

resource "aws_instance" "example" {
  ami           = "ami-084e92d3e117f7692"
  instance_type = "t2.micro"

  tags = {
    Name = "t101-study"
  }

}
EOT
배포 실행
terraform apply
EC2 삭제
terraform destroy
3. 기본 사용법
3-1 기본사용법
# help
terraform help

# init
terraform init

# fmt (인덴트 확인)
terraform fmt

# terraform 구조 확인 (프로바이더 플러그인)
tree .terraform
.terraform
└── providers
    └── registry.terraform.io
        └── hashicorp
            └── aws
                └── 5.14.0
                    └── linux_amd64
                        └── terraform-provider-aws_v5.14.0_x5

6 directories, 1 file

# validate (문법 검사)
terraform validate

# plan (리소스 적용 전에 확인)

# apply (리소스 생성)
terraform apply

# destroy (리소스 삭제)
terraform destroy
3-2 EC2 1대 배포 & 웹 서버 설정
EC2 1대 배포
- Ubuntu 22.04 LTS 사용 `(ami-0c9c942bd7bf113a2)`
# 디렉토리 생성
mkdir t101-1week-web
cd t101-1week-web
코드 파일 작성 : `user_data` 에 실행 명령어 작성
cat <<EOT > main.tf
provider "aws" {
  region = "ap-northeast-2"
}

resource "aws_instance" "example" {
  ami                    = "ami-0c9c942bd7bf113a2"
  instance_type          = "t2.micro"

  user_data = <<-EOF
              #!/bin/bash
              echo "Hello, T101 Study" > index.html
              nohup busybox httpd -f -p 8080 &
              EOF

  tags = {
    Name = "terraform-Study-101"
  }
}
EOT
코드 배포
# init
terraform init

# plan
terraform plan
+ user_data                            = "d91ca31904077f0b641b5dd5a783401396ffbf3f"

# apply 실행 -auto-approve를 사용해서 yes를 누르지 않아도 자동으로 생성된다.
terraform apply -auto-approve
웹 서버 접속 시도
# [터미널3] 변수 지정
PIP=<각자 자신의 EC2 Public IP>
PIP=52.78.64.146
while true; do curl --connect-timeout 1  http://$PIP:8080/ ; echo "------------------------------"; date; sleep 1; done
접속되지 않는다. SG(Security Group)이 없기 때문이다.
while true; do curl --connect-timeout 1 http://$PIP:8080/ ; echo "------------------------------"; date; sleep 1; done
문제해결
cat <<EOT > main.tf
provider "aws" {
  region = "ap-northeast-2"
}

resource "aws_instance" "example" {
  ami                    = "ami-0c9c942bd7bf113a2"
  instance_type          = "t2.micro"
  vpc_security_group_ids = [aws_security_group.instance.id]

  user_data = <<-EOF
              #!/bin/bash
              echo "Hello, T101 Study" > index.html
              nohup busybox httpd -f -p 8080 &
              EOF

  tags = {
    Name = "Single-WebSrv"
  }
}

resource "aws_security_group" "instance" {
  name = var.security_group_name

  ingress {
    from_port   = 8080
    to_port     = 8080
    protocol    = "tcp"
    cidr_blocks = ["0.0.0.0/0"]
  }
}

variable "security_group_name" {
  description = "The name of the security group"
  type        = string
  default     = "terraform-example-instance"
}

output "public_ip" {
  value       = aws_instance.example.public_ip
  description = "The public IP of the Instance"
}
EOT
코드 재배포
terraform apply -auto-approve

PIP=52.78.64.146
while true; do curl --connect-timeout 1  http://$PIP:8080/ ; echo "------------------------------"; date; sleep 1; done
Hello, T101 Study
------------------------------
리소스 삭제
terraform destroy -auto-approve
[도전과제1] EC2 웹 서버 배포
- 목표 : EC2 웹 서버 배포 : Ubuntu 에 apache(httpd) 를 설치하고 index.html 생성(닉네임 출력)하는 userdata 를 작성해서 설정 배포, 포트는 TCP 80 후 curl 접속 → 해당 테라폼 코드(파일)를 작성
cat <<EOT > main.tf
provider "aws" {
  region = "ap-northeast-2"
}

resource "aws_instance" "example" {
  ami                    = "ami-0c9c942bd7bf113a2"
  instance_type          = "t2.micro"
  vpc_security_group_ids = [aws_security_group.instance.id]

  user_data = <<-EOF
              #!/bin/bash
              echo "Hello, T101 Study My Name is Somaz" > index.html
              nohup busybox httpd -f -p 80 &
              EOF

  tags = {
    Name = "Single-WebSrv-Somaz"
  }
}

resource "aws_security_group" "instance" {
  name = var.security_group_name

  ingress {
    from_port   = 80
    to_port     = 80
    protocol    = "tcp"
    cidr_blocks = ["0.0.0.0/0"]
  }
}

variable "security_group_name" {
  description = "The name of the security group"
  type        = string
  default     = "terraform-example-instance"
}

output "public_ip" {
  value       = aws_instance.example.public_ip
  description = "The public IP of the Instance"
}
EOT
웹 서버 접속 확인
# [터미널3] 변수 지정
PIP=<각자 자신의 EC2 Public IP>
PIP=13.209.87.228
while true; do curl --connect-timeout 1  http://$PIP:80/ ; echo "------------------------------"; date; sleep 1; done

while true; do curl --connect-timeout 1  http://$PIP:80/ ; echo "------------------------------"; date; sleep 1; done
Hello, T101 Study My Name is Somaz
------------------------------
Sun Aug 27 21:57:26 KST 2023
Hello, T101 Study My Name is Somaz
------------------------------
리소스 삭제
terraform destroy -auto-approve
3-3. HCL
HCL HashiCorp Configuration Language은 하시코프사에서 IaC와 구성 정보를 명시하기 위해 개발된 오픈 소스 도구이다.
HCL 표현식은 아래와 같다.
// 한줄 주석 방법1
# 한줄 주석 방법2

/*
라인
주석
*/

locals {
  key1     = "value1"     # = 를 기준으로 키와 값이 구분되며
  myStr    = "TF ♡ UTF-8" # UTF-8 문자를 지원한다.
  multiStr = <<EOF
  Multi
  Line
  String
  with anytext
EOF

  boolean1    = true   # boolean true
  boolean2    = false  # boolean false를 지원한다.
  deciaml     = 123    # 기본적으로 숫자는 10진수,
  octal       = 0123   # 0으로 시작하는 숫자는 8진수,
  hexadecimal = "0xD5" # 0x 값을 포함하는 스트링은 16진수,
  scientific  = 1e10   # 과학표기 법도 지원한다.

  # funtion 호출 예
  myprojectname = format("%s is myproject name", var.project)

  # 3항 연산자 조건문을 지원한다.
  credentials = var.credentials == "" ? file(var.credentials_file) : var.credentials
}
3-4 테라폼 블록
테라폼 블록, 테라폼 버전:required_version, 프로바이더 버전, Cloud 블록, 백엔드 블록에 대해 설명한다.
테라폼 블록
테라폼 버전이나 프로바이더 버전과 같은 값들은 자동으로 설정되지만, 함께 작업할 때는 버전을 명시적으로 선언하고 필요한 조건을 입력하여 실행 오류를 최소화 할 것을 권장한다.
즉, 오늘 실행하던 3년후에 실행하던 동일한 결과 얻을 수 있어야 한다. (Desired State + Immutable)
terraform {
  required_version = "~> 1.3.0" # 테라폼 버전

  required_providers { # 프로바이더 버전을 나열
    random = {
      version = ">= 3.0.0, < 3.1.0"
    }
    aws = {
      version = "4.2.0"
    }
  }

  cloud { # Cloud/Enterprise 같은 원격 실행을 위한 정보 [참고: Docs]
    organization = "<MY_ORG_NAME>"
    workspaces {
      name = "my-first-workspace"
    }
  }

  backend "local" { # state를 보관하는 위치를 지정 [참고: Docs, local, remote, s3]
    path = "relative/path/to/terraform.tfstate"
  }
}
테라폼 버전(required_version)
테라폼 버전 관리로 비유된 선언 방식의 의미
Terraform은 required_version 지시문을 구성에 사용하여 해당 구성을 적용하는 데 사용할 수 있는 Terraform CLI 버전을 제한한다. 이는 특정 구성이 작동하는 것으로 적용된 Terraform 버전에만 적용되도록 하는 유용한 방법이다.
|
선언된 버전
|
의미
|
고려 사항
|
|
1.0.0
|
테라폼 v1.0.0만을 허용한다
|
테라폼을 업그레이드하기 위해서는 선언된 버전을 변경해야만 한다
|
|
>= 1.0.0
|
테라폼 v1.0.0 이상의 모든 버전을 허용한다
|
v1.0.0 버전을 포함해 그 이상의 모든 버전을 허용해 실행된다
|
|
~> 1.0.0.
|
테라폼 v1.0.0을 포함한 v1.0.x 버전을 허용하고 v1.x는 허용하지 않는다
|
부버전에 대한 업데이트는 무중단으로 이루어진다
|
|
>= 1.0, < 2.0.0
|
테라폼 v1.0.0 이상 v2.0.0 미만인 버전을 허용한다
|
주버전에 대한 업데이트를 방지한다
|
그리고 사용 중인 Terraform 버전이 required_version 제약 조건과 일치하지 않으면 Terraform은 구성 초기화 또는 적용을 거부하고 버전 불일치를 나타내는 오류 메시지를 출력된다.
mkdir 03.start

cd 03.start/

terraform version
Terraform v1.5.6
on linux_amd64

# terraform 블럭 추가
# Escape the$ : 쉘이 $문자를 ${path.module}대체하려고 시도하는 것을 방지하려면 문자를 이스케이프 해야한다.
cat <<EOT > main.tf
terraform {
  required_version = "< 1.0.0"
}

resource "local_file" "abc" {
  content  = "abc!"
  filename = "\${path.module}/abc.txt"
}
EOT

cat main.tf
terraform {
  required_version = "< 1.0.0"
}

resource "local_file" "abc" {
  content  = "abc!"
  filename = "${path.module}/abc.txt"
}

# error 발생
terraform init

Initializing the backend...
╷
│ Error: Unsupported Terraform Core version
│
│   on main.tf line 2, in terraform:
│    2:   required_version = "< 1.0.0"
│
│ This configuration does not support Terraform version 1.5.6. To proceed, either choose another supported Terraform version or update this version constraint. Version constraints are
│ normally set for good reason, so updating the constraint may lead to other errors or unexpected behavior.
╵

# terraform 블럭 수정
cat <<EOT > main.tf
terraform {
  required_version = ">= 1.0.0"
}

resource "local_file" "abc" {
  content  = "abc!"
  filename = "\${path.module}/abc.txt"
}
EOT

# 성공적으로 init
terraform init

Initializing the backend...

Initializing provider plugins...
- Finding latest version of hashicorp/local...
- Installing hashicorp/local v2.4.0...
- Installed hashicorp/local v2.4.0 (signed by HashiCorp)

Terraform has created a lock file .terraform.lock.hcl to record the provider
selections it made above. Include this file in your version control repository
so that Terraform can guarantee to make the same selections by default when
you run "terraform init" in the future.

Terraform has been successfully initialized!

You may now begin working with Terraform. Try running "terraform plan" to see
any changes that are required for your infrastructure. All Terraform commands
should now work.

If you ever set or change modules or backend configuration for Terraform,
rerun this command to reinitialize your working directory. If you forget, other
commands will detect it and remind you to do so if necessary.
프로바이더 버전
- 테라폼 0.13 버전 이전에는 provider 블록에 함께 버전을 명시했지만 해당 버전 이후 프로바이더 버전은 terraform 블록에서 required_providers에 정의한다.
# v0.13 이전
provider "aws" {
  version = "~> 4.2.0"
  region = "ap-northeast-2"
}

provider "azurerm" {
  version = ">= 2.99.0"
  features {}
}

# v0.13부터 적용
terraform {
  required_providers {
    aws = {
      source = "hashicorp/aws"
      version = "~> 4.2.0"
    }
    azurerm = {
      source = "hashicorp/azurerm"
      version = ">= 2.99.0"
    }
  }
}
Cloud 블록
Terraform Cloud, Terraform Enterprise는 CLI, VCS, API 기반의 실행 방식을 지원하고 cloud 블록으로 선언한다.
# v1.1 이전
terraform {
  backend "remote" {
    hostname = "app.terraform.io"
    organization = "my-org"
    workspades = {
      name = "my-app-prod"
    }
  }
}

# v1.1 이후
terraform {
  cloud {
    hostname = "app.terraform.io"
    organization = "my-org"
    workspades = {
       name = "my-app-prod"
    }
  }
}
백엔드 블록
백엔드 블록의 구성은 테라폼 실행 시 저장되는 State(상태 파일)의 저장 위치를 선언한다. (기본: local)
주의할 점은 하나의 백엔드만 허용한다는 점이다.
[도전과제2] AWS S3/DynamoDB 백엔드 설정
AWS S3 버킷을 생성
mkdir t101-1week-backend-s3-tfstate
cd t101-1week-backend-s3-tfstate/

cat <<EOT > main.tf
provider "aws" {
  region = "ap-northeast-2"
}

resource "aws_s3_bucket" "tf_state" {
  bucket = "somaz-terraform-state-bucket"
  acl    = "private"

  tags = {
    Name        = "Terraform State Bucket"
    Environment = "Somaz"
  }
}

resource "aws_s3_bucket_versioning" "tf_state_versioning" {
  bucket = aws_s3_bucket.tf_state.bucket

  versioning {
    enabled = true
  }
}
EOT
terraform init
terraform apply -auto-approve
s3 버킷과 tfstate 파일 확인
ls -l
total 8
-rw-r--r-- 1 somaz somaz 376 Aug 27 23:20 main.tf
-rw-r--r-- 1 somaz somaz 3662 Aug 27 23:20 terraform.tfstate
aws s3 ls
2023-01-08 20:53:24 somaz-k8s-s3
2023-08-27 23:20:50 somaz-terraform-state-bucket
cat terraform.tfstate
{
"version": 4,
"terraform_version": "1.5.6",
"serial": 3,
"lineage": "25bca365-909e-71b6-1600-2d38a32748fa",
DynamoDB를 사용한 상태 잠금
다수의 팀 구성원이 동일한 인프라 또는 CI/CD 파이프라인에서 작업하는 경우 상태 잠금을 사용하여 한 번에 하나의 작업만 발생하도록 한다.
잠금을 위한 DynamoDB 테이블 정의
- AWS DynamoDB에서 `billing_mode` 속성은 읽기 및 쓰기 처리량에 대한 요금 청구 방식과 용량 관리 방식을 지정한다.
- `billing_mode`를 `PAY_PER_REQUEST`로 설정하면 대신 DynamoDB 테이블에 대한 실제 요청 수를 기준으로 요금이 청구된다.
cat <<EOT > dynamodb.tf
resource "aws_dynamodb_table" "terraform_locks" {
name = "terraform-up-and-running-locks"
billing_mode = "PAY_PER_REQUEST"
hash_key = "LockID"
attribute {
name = "LockID"
type = "S"
}
}
EOTterraform apply -auto-approve
S3를 Terraform 백엔드로 설정한다. 백엔드 구성에 dynamo_table 매개변수도 추가해준다.
cat <<EOT > backend.tf
terraform {
backend "s3" {
bucket = "somaz-terraform-state-bucket"
key = "somaz/terraform/state"
region = "ap-northeast-2"
dynamodb_table = "terraform-up-and-running-locks"
}
}
EOT
terraform 다시 초기화 후 tfstate 파일 확인
terraform init
Initializing the backend...
Do you want to copy existing state to the new backend?
Pre-existing state was found while migrating the previous "local" backend to the
newly configured "s3" backend. No existing state was found in the newly
configured "s3" backend. Do you want to copy this state to the new "s3"
backend? Enter "yes" to copy and "no" to start with an empty state.
Enter a value: yes
Successfully configured the backend "s3"! Terraform will automatically
use this backend unless the backend configuration changes.
...
ls
backend.tf main.tf terraform.tfstate terraform.tfstate.backup
# tfstate 파일에 아무것도 없다.
cat terraform.tfstate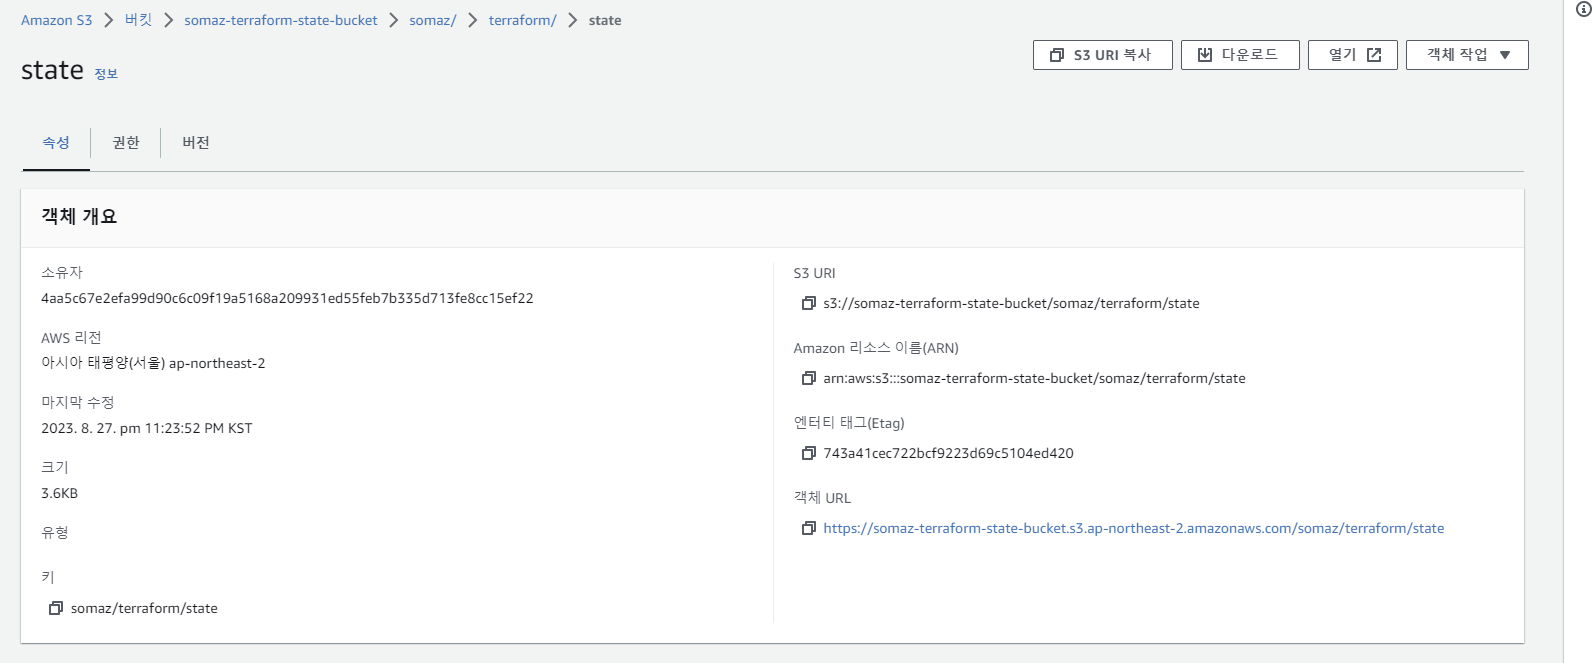
local로 tfstate 마이그레이션 후에 리소스 제거
mv dynamodb.tf dynamodb.tf.bak
mv backend.tf backend.tf.bak
terraform init -migrate-state
Initializing the backend...
Terraform has detected you're unconfiguring your previously set "s3" backend.
Do you want to copy existing state to the new backend?
Pre-existing state was found while migrating the previous "s3" backend to the
newly configured "local" backend. No existing state was found in the newly
configured "local" backend. Do you want to copy this state to the new "local"
backend? Enter "yes" to copy and "no" to start with an empty state.
Enter a value: yes
Successfully unset the backend "s3". Terraform will now operate locally.
cat terraform.tfstate
{
"version": 4,
"terraform_version": "1.5.6",
"serial": 2,
"lineage": "d4ae60df-6ce2-4149-e303-df9ddc703f74",
"outputs": {},
"resources": [
{
"mode": "managed",
"type": "aws_dynamodb_table",
"name": "terraform_locks",
"provider": "provider[\"registry.terraform.io/hashicorp/aws\"]",
"instances": [
{
"schema_version": 1,
"attributes": {
"arn": "arn:aws:dynamodb:ap-northeast-2:611841095956:table/terraform-up-and-running-locks",
...
terraform apply -auto-approve
provider "aws" {
region = "ap-northeast-2"
}
# resource "aws_s3_bucket" "tf_state" {
# bucket = "somaz-terraform-state-bucket"
# tags = {
# Name = "Terraform State Bucket"
# Environment = "Somaz"
# }
# }
# resource "aws_s3_bucket_versioning" "tf_state_versioning" {
# bucket = aws_s3_bucket.tf_state.bucket
# versioning_configuration {
# status = "Enabled"
# }
# }
# 버킷을 완전히 비운후에 실행
aws s3 rm s3://somaz-terraform-state-bucket --recursive
aws s3api list-object-versions --bucket somaz-terraform-state-bucket | jq '{Objects: [.Versions[]?, .DeleteMarkers[]? | {Key, VersionId}]}' > to_delete.json
aws s3api delete-objects --bucket somaz-terraform-state-bucket --delete file://to_delete.json
terraform apply -auto-approve
...
Apply complete! Resources: 0 added, 0 changed, 1 destroyed.
리소스 삭제 확인해준다.
aws s3 ls
2023-01-08 20:53:24 somaz-k8s-s3
aws dynamodb list-tables
{
"TableNames": []
}
3-5 리소스
리소스 구성
리소스 동작 보조 추가 메타인수를 정의 할 수 있다.
- depends_on : 종속성을 선언하며, 선언된 구성요소와의 생성 시점에 대해 정의
- count : 선언된 개수에 따라 여러 리소스를 생성
- for_each : map 또는 set 타입의 데이터 배열의 값을 기준으로 여러 리소스를 생성
- provider : 동일한 프로바이더가 다수 정의되어 있는 경우 지정
- lifecycle : 리소스의 수명주기 관리
- provisioner : 리소스 생성 후 추가 작업 정의
- timeouts : 프로바이더에서 정의한 일부 리소스 유형에서는 create, update, delete에 대한 허용 시간 정의 가능
많이 사용해본 건 `depens_on`이다. 다수의 리소스를 한꺼번에 생성해야 할 경우이거나, `dev1` 형상과 동일하지만 이름만 다른 `dev2` 형상을 한번에 생성할때 `depens_on` 설정을 잘하면 한번에 생성할 수 있다.
아래는 GCP Cloud CDN 생성 예시이다.
## CDN ##
resource "google_compute_managed_ssl_certificate" "cdn_lb_certificate" {
name = "dev-somaz-link-ssl-cert"
managed {
domains = [var.somaz_link]
}
}
resource "google_compute_backend_bucket" "somaz_link_bucket_backend" {
name = "dev-somaz-link-backend"
bucket_name = var.somaz_link # replace with your bucket name
enable_cdn = true
edge_security_policy = module.cloud_armor_ip_allow.policy_self_link
depends_on = [google_storage_bucket.somaz_link, module.cloud_armor_ip_allow]
}
resource "google_compute_url_map" "cdn_url_map" {
name = "dev-somaz-link-url-map"
default_service = google_compute_backend_bucket.somaz_link_bucket_backend.id
depends_on = [google_storage_bucket.somaz_link, google_compute_backend_bucket.somaz_link_bucket_backend]
}
resource "google_compute_global_forwarding_rule" "https_forwarding_rule" {
name = "dev-somaz-link-https-forwarding-rule"
target = google_compute_target_https_proxy.cdn_https_proxy.self_link
port_range = "443"
ip_address = google_compute_global_address.somaz_link_lb_ip.address
}
resource "google_compute_target_https_proxy" "cdn_https_proxy" {
name = "dev-somaz-link-https-proxy"
url_map = google_compute_url_map.cdn_url_map.self_link
ssl_certificates = [google_compute_managed_ssl_certificate.cdn_lb_certificate.self_link]
}
GCP 구축에 대한 Terraform Code를 보고 싶다면 아래의 Github에 들어가 확인하면 된다.
https://github.com/somaz94/terraform-infra-gcp
GitHub - somaz94/terraform-infra-gcp: This is an example of a Terraform GCP Infrastructure as Code
This is an example of a Terraform GCP Infrastructure as Code - GitHub - somaz94/terraform-infra-gcp: This is an example of a Terraform GCP Infrastructure as Code
github.com
수명 주기
lifecycle은 리소스의 기본 수명주기를 작업자가 의도적으로 변경하는 메타인수다.
- create_before_destroy (bool): 리소스 수정 시 신규 리소스를 우선 생성하고 기존 리소스를 삭제
- prevent_destroy (bool): 해당 리소스를 삭제 Destroy 하려 할 때 명시적으로 거부
- ignore_changes (list): 리소스 요소에 선언된 인수의 변경 사항을 테라폼 실행 시 무시
- precondition: 리소스 요소에 선언해 인수의 조건을 검증
- postcondition: Plan과 Apply 이후의 결과를 속성 값으로 검증
precondition과 postcondition
precondition과 poscondition 커스텀 조건문 중 하나이다. 둘의 가장 큰 차이점은 실행 시점이다!
precondition은 테라폼 코드 실행 전에 block을 조건 검사한다. 그러나 postcondition은 코드 실행 중에 동작한다.
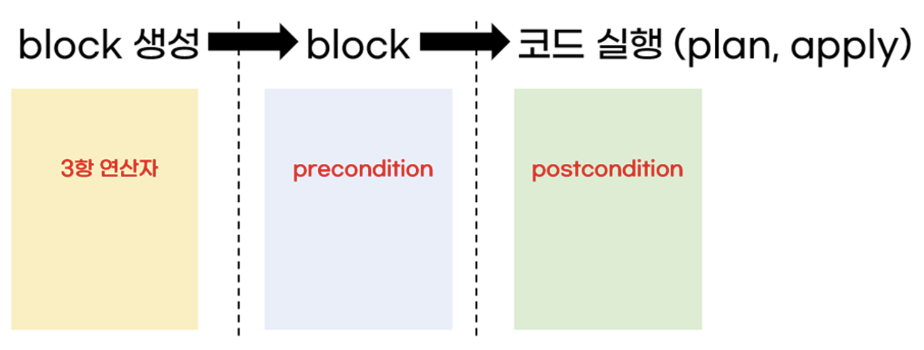
precondition 실습
mkdir t101-1week-precondition
cd t101-1week-precondition/
cat <<'EOT' > main.tf
variable "file_name" {
default = "step0.txt"
}
resource "local_file" "abc" {
content = "lifecycle - step 6"
filename = "${path.module}/${var.file_name}"
lifecycle {
precondition {
condition = var.file_name == "step6.txt"
error_message = "file name is not \"step6.txt\""
}
}
}
EOT
terraform init
terraform plan
Planning failed. Terraform encountered an error while generating this plan.
╷
│ Error: Resource precondition failed
│
│ on main.tf line 11, in resource "local_file" "abc":
│ 11: condition = var.file_name == "step6.txt"
│ ├────────────────
│ │ var.file_name is "step0.txt"
│
│ file name is not "step6.txt"- 왜 에러가 날까? 조건에 따라 변수는 file_name와 같아야 한다 그러나 오류 메시지에 따르면 변수의 step0.txt와 조건의 step6.txt가 일치하지 않아서 발생하는 것이다.
- 따라서 precondition은 프로비저닝 해야 하는 클라우드 인프라의 VM을 생성할 때 검증된 이미지 아이디를 사용하는지 등과 같은 구성을 미리 확인하고 사전에 잘못된 프로비저닝을 실행할 수 없도록 구성할 수 있다.
postcondition 실습
mkdir t101-1week-postcondition
cd t101-1week-postcondition/
cat <<'EOT' > main.tf
resource "local_file" "abc" {
content = ""
filename = "${path.module}/step7.txt"
lifecycle {
postcondition {
condition = self.content != ""
error_message = "content cannot empty"
}
}
}
output "step7_content" {
value = local_file.abc.id
}
EOT
terraform init
terraform apply -auto-approve
Terraform used the selected providers to generate the following execution plan. Resource actions are indicated with the
following symbols:
+ create
Terraform planned the following actions, but then encountered a problem:
# local_file.abc will be created
+ resource "local_file" "abc" {
+ content_base64sha256 = (known after apply)
+ content_base64sha512 = (known after apply)
+ content_md5 = (known after apply)
+ content_sha1 = (known after apply)
+ content_sha256 = (known after apply)
+ content_sha512 = (known after apply)
+ directory_permission = "0777"
+ file_permission = "0777"
+ filename = "./step7.txt"
+ id = (known after apply)
}
Plan: 1 to add, 0 to change, 0 to destroy.
╷
│ Error: Resource postcondition failed
│
│ on main.tf line 7, in resource "local_file" "abc":
│ 7: condition = self.content != ""
│ ├────────────────
│ │ self.content is ""
│
│ content cannot empty- `local_file` 블록에 `content`가 빈 문자열이기 때문에 에러가 난다.
- 아래와 같이 수정해주면 에러가 발생하지 않는다.
종속성을 갖는 여러 리소스를 구성하는 경우, 리소스의 데이터가 다른 리소스 생성 시 활용될 때 원하는 속성이 정의되어야 하는 경우를 확인할 수 있다.
cat <<'EOT' > main.tf
resource "local_file" "abc" {
  content  = "step7 file ok"
  filename = "${path.module}/step7.txt"

  lifecycle {
    postcondition {
      condition     = self.content != ""
      error_message = "content cannot empty"
    }
  }
}

output "step7_content" {
  value = local_file.abc.id
}
EOT

terraform apply -auto-approve

Terraform used the selected providers to generate the following execution plan. Resource actions are indicated with the
following symbols:
  + create

Terraform will perform the following actions:

  # local_file.abc will be created
  + resource "local_file" "abc" {
      + content              = "step7 file ok"
      + content_base64sha256 = (known after apply)
      + content_base64sha512 = (known after apply)
      + content_md5          = (known after apply)
      + content_sha1         = (known after apply)
      + content_sha256       = (known after apply)
      + content_sha512       = (known after apply)
      + directory_permission = "0777"
      + file_permission      = "0777"
      + filename             = "./step7.txt"
      + id                   = (known after apply)
    }

Plan: 1 to add, 0 to change, 0 to destroy.

Changes to Outputs:
  + step7_content = (known after apply)
local_file.abc: Creating...
local_file.abc: Creation complete after 0s [id=653353c86e0b78f26dfe85f8e86f4f9d07c0d505]

Apply complete! Resources: 1 added, 0 changed, 0 destroyed.

Outputs:

step7_content = "653353c86e0b78f26dfe85f8e86f4f9d07c0d505"

terraform state list
local_file.abc

cat step7.txt
step7 file ok
[도전과제3] lifecycle의 precondition
- lifecycle의 precondition 실습 내용에서 step0.txt ~ step6.txt 총 7개의 파일 이름 중 하나가 일치 시 검증 조건 만족으로 코드 작성
mkdir t101-1week-precondition-challenge

cd t101-1week-precondition-challenge/

cat <<'EOT' > main.tf
variable "file_name" {
  description = "Name of the file."
  type        = string
  default     = "step0.txt"
}

resource "local_file" "abc" {
  content  = "This is a lifecycle exercise in Terraform."
  filename = "${path.module}/${var.file_name}"

  lifecycle {
    precondition {
      condition     = can(regex("^step[0-6]\\.txt$", var.file_name))
      error_message = "File name should be between step0.txt to step6.txt"
    }

    postcondition {
      condition     = self.content != ""
      error_message = "Content cannot be empty"
    }
  }
}

output "file_content" {
  value = local_file.abc.content
}
EOT

terraform init
terraform apply -auto-approve

Terraform used the selected providers to generate the following execution plan. Resource actions are indicated with the
following symbols:
  + create

Terraform will perform the following actions:

  # local_file.abc will be created
  + resource "local_file" "abc" {
      + content              = "This is a lifecycle exercise in Terraform."
      + content_base64sha256 = (known after apply)
      + content_base64sha512 = (known after apply)
      + content_md5          = (known after apply)
      + content_sha1         = (known after apply)
      + content_sha256       = (known after apply)
      + content_sha512       = (known after apply)
      + directory_permission = "0777"
      + file_permission      = "0777"
      + filename             = "./step0.txt"
      + id                   = (known after apply)
    }

Plan: 1 to add, 0 to change, 0 to destroy.

Changes to Outputs:
  + file_content = "This is a lifecycle exercise in Terraform."
local_file.abc: Creating...
local_file.abc: Creation complete after 0s [id=a70ebcd5e1aed20833cf6b2b1c008736d1d559b4]

Apply complete! Resources: 1 added, 0 changed, 0 destroyed.

Outputs:

file_content = "This is a lifecycle exercise in Terraform."

terraform state list
local_file.abc

cat step0.txt
This is a lifecycle exercise in Terraform.
variables
- type은 이 변수가 문자열이어야 함을 지정한다.
- default는 변수에 기본값 `step0.txt` 를 할당한다.
- 따라서 구성을 적용할 때 다른 파일 이름을 제공하지 않으면 Terraform은 `step0.txt` 를 파일 이름으로 사용한다.
resource
- content는 파일에 기록될 텍스트를 지정합니다.
- filename은 파일의 이름과 경로를 결정한다. 현재 모듈 경로(${path.module})를 file_name 변수의 값이다.
- precondition: 파일 이름이 stepX.txt 패턴과 일치하는지 확인한다.
- 여기서 X는 0부터 6까지의 숫자이다.
- error_message: precondition이 실패할 경우 이 메시지가 표시된다.
- postcondition: 파일 내용이 비어 있지 않은지 확인한다.
- error_message: postcondition이 실패할 경우 이 메시지가 표시된다.
마지막으로 모든 실습 내용은 아래의 github에 업로드 하였다.
https://github.com/somaz94/t101-study
GitHub - somaz94/t101-study: t101-study
t101-study. Contribute to somaz94/t101-study development by creating an account on GitHub.
github.com
마무리
Terraform은 단순한 자동화 도구가 아니라, 인프라를 명세하고 관리하는 하나의 언어이자 문화임을 이번 스터디를 통해 다시금 느낄 수 있었다.
특히, 선언적 구성 방식과 상태 파일(tfstate)을 기반으로 한 실행 방식은 효율적이고 명확한 인프라 관리에 큰 장점을 제공한다.
이번 1주차에서는 Terraform을 처음 접하는 입장에서 꼭 알아야 할 개념과 명령어들을 실습 위주로 정리할 수 있었고,
단일 EC2 배포에서부터 백엔드 구성, lifecycle 검증 조건까지 다양한 기능을 경험하며 자신감을 얻을 수 있었다.
앞으로의 스터디에서는 모듈화, 다중 환경 구성, 협업 전략까지 Terraform을 더 깊게 이해할 수 있을 것으로 기대된다.
클라우드 인프라를 코드로 관리하고 싶은 분이라면, T101은 훌륭한 첫 걸음이 될 것이다.
Reference
https://github.com/somaz94/t101-study
hashicat-aws | hashicat-azure | hashicat-gcp | hashicat-ncp
https://github.com/somaz94/terraform-infra-gcp
https://malwareanalysis.tistory.com/627
'교육, 커뮤니티 후기 > T101(Terraform 101 Study) 스터디' 카테고리의 다른 글
| T101(Terraform 101 Study) 6주차 (2) | 2023.10.14 |
|---|---|
| T101(Terraform 101 Study) 5주차 (0) | 2023.09.26 |
| T101(Terraform 101 Study) 4주차 (0) | 2023.09.22 |
| T101(Terraform 101 Study) 3주차 (0) | 2023.09.17 |
| T101(Terraform 101 Study) 2주차 (0) | 2023.09.09 |
