
Overview
가시다님이 진행하시는 쿠버네티스 스터디 7주차가 되었다.
이번 주 주제는 바로 쿠버네티스 보안(K8s Security).
지금까지 배운 배포, 운영 중심의 내용에서 한 단계 더 나아가, 보안이라는 실전적이고 민감한 주제를 다뤄보았다.
실습은 『24단계 실습으로 정복하는 쿠버네티스』 책을 기반으로 구성되었으며,
파드에서의 IAM Role 사용, Kubescape 보안 분석, Polaris 기반 정책 점검, 그리고 RBAC 기반 인증/인가 실습까지
쿠버네티스를 실제 운영 환경에서 어떻게 안전하게 관리할 수 있을지를 집중적으로 다뤘다.
특히 boto3를 이용한 EC2 메타데이터 활용과 보안 취약점 도구들을 활용한 클러스터 스캐닝 실습은,
이론과 실습을 넘나드는 깊이 있는 경험이었다.

[과제1]
파드에서 EC2 메타데이터의 IAM Role 토큰 정보를 활용하여(boto3), 스터디에서 소개한 것 이외의 다른 AWS 서비스(혹은 Action)를 사용 후 코드나 스샷을 올려주세요
참고 사이트 : https://boto3.amazonaws.com/v1/documentation/api/latest/guide/ec2-example-regions-avail-zones.html
사전 작업(IAM 추가) 실시간 적용이 안됨

사전 작업(IAM 역할 추가) 실시간 적용 가능
역할 생성 방법
- AWS Management Console에서 IAM 콘솔을 엽니다.
- 왼쪽 메뉴에서 "Roles"을 선택합니다.
- "Create role"을 클릭합니다.
- "Select type of trusted entity"에서 "AWS service"를 선택하고 "EC2"를 선택합니다.
- "Permissions"에서 필요한 권한을 선택합니다.
- "Tags" 및 "Review"를 구성한 후, "Create role"을 클릭합니다.

역할을 할당하는 방법
- AWS Management Console에서 EC2 콘솔을 엽니다.
- EC2 인스턴스를 선택하고, "작업" > "보안" > "IAM 역할 수정"을 클릭합니다.
- "Attach IAM Role"을 선택하고, 이전 단계에서 생성한 역할을 선택합니다.
- "IAM 역할 업데이트"을 클릭합니다.

boto3 사용
# boto3 사용을 위한 파드 생성
(somaz:N/A) [root@kops-ec2 ~]# cat <<EOF | kubectl create -f -
apiVersion: apps/v1
kind: Deployment
metadata:
  name: boto3-pod
spec:
  replicas: 2
  selector:
    matchLabels:
      app: boto3
  template:
    metadata:
      labels:
        app: boto3
    spec:
      containers:
      - name: boto3
        image: jpbarto/boto3
        command: ["tail"]
        args: ["-f", "/dev/null"]
      terminationGracePeriodSeconds: 0
EOF

# 파드 이름 변수 지정
(somaz:N/A) [root@kops-ec2 ~]# PODNAME1=$(kubectl get pod -l app=boto3 -o jsonpath={.items[0].metadata.name})
(somaz:N/A) [root@kops-ec2 ~]# PODNAME2=$(kubectl get pod -l app=boto3 -o jsonpath={.items[1].metadata.name})


# 파드2에서 boto3 사용
kubectl exec -it $PODNAME2 -- sh
------------

cat <<EOF> ec2az.py
import boto3

region = 'ap-northeast-2'
ec2 = boto3.client('ec2', region_name=region)

# Retrieves all regions/endpoints that work with EC2
response = ec2.describe_regions()
print('Regions:', response['Regions'])

# Retrieves availability zones only for region of the ec2 object
response = ec2.describe_availability_zones()
print('Availability Zones:', response['AvailabilityZones'])
EOF
------------

(somaz:N/A) [root@kops-ec2 ~]# kubectl exec -it $PODNAME2 -- sh

~/dev # cat <<EOF> ec2az.py
> import boto3
>
> region = 'ap-northeast-2'
> ec2 = boto3.client('ec2', region_name=region)
>
> # Retrieves all regions/endpoints that work with EC2
> response = ec2.describe_regions()
> print('Regions:', response['Regions'])
>
> # Retrieves availability zones only for region of the ec2 object
> response = ec2.describe_availability_zones()
> print('Availability Zones:', response['AvailabilityZones'])
> EOF

~/dev # python ec2az.py
('Regions:', [{u'Endpoint': 'ec2.ap-south-1.amazonaws.com', u'RegionName': 'ap-south-1'}, {u'Endpoint': 'ec2.eu-north-1.amazonaws.com', u'RegionName': 'eu-north-1'}, {u'Endpoint': 'ec2.eu-west-3.amazonaws.com', u'RegionName': 'eu-west-3'}, {u'Endpoint': 'ec2.eu-west-2.amazonaws.com', u'RegionName': 'eu-west-2'}, {u'Endpoint': 'ec2.eu-west-1.amazonaws.com', u'RegionName': 'eu-west-1'}, {u'Endpoint': 'ec2.ap-northeast-3.amazonaws.com', u'RegionName': 'ap-northeast-3'}, {u'Endpoint': 'ec2.ap-northeast-2.amazonaws.com', u'RegionName': 'ap-northeast-2'}, {u'Endpoint': 'ec2.ap-northeast-1.amazonaws.com', u'RegionName': 'ap-northeast-1'}, {u'Endpoint': 'ec2.ca-central-1.amazonaws.com', u'RegionName': 'ca-central-1'}, {u'Endpoint': 'ec2.sa-east-1.amazonaws.com', u'RegionName': 'sa-east-1'}, {u'Endpoint': 'ec2.ap-southeast-1.amazonaws.com', u'RegionName': 'ap-southeast-1'}, {u'Endpoint': 'ec2.ap-southeast-2.amazonaws.com', u'RegionName': 'ap-southeast-2'}, {u'Endpoint': 'ec2.eu-central-1.amazonaws.com', u'RegionName': 'eu-central-1'}, {u'Endpoint': 'ec2.us-east-1.amazonaws.com', u'RegionName': 'us-east-1'}, {u'Endpoint': 'ec2.us-east-2.amazonaws.com', u'RegionName': 'us-east-2'}, {u'Endpoint': 'ec2.us-west-1.amazonaws.com', u'RegionName': 'us-west-1'}, {u'Endpoint': 'ec2.us-west-2.amazonaws.com', u'RegionName': 'us-west-2'}])
('Availability Zones:', [{u'State': 'available', u'RegionName': 'ap-northeast-2', u'Messages': [], u'ZoneName': 'ap-northeast-2a'}, {u'State': 'available', u'RegionName': 'ap-northeast-2', u'Messages': [], u'ZoneName': 'ap-northeast-2b'}, {u'State': 'available', u'RegionName': 'ap-northeast-2', u'Messages': [], u'ZoneName': 'ap-northeast-2c'}, {u'State': 'available', u'RegionName': 'ap-northeast-2', u'Messages': [], u'ZoneName': 'ap-northeast-2d'}])

# 실습 완료 후 삭제
kubectl delete deploy boto3-pod- 작업이 끝났다면 IAM 역할을 nodes.<도메인> 기존 역할로 변경해줍니다.
[과제2] 책 398~페이지
kubescape armo 웹 사용 후 관련 스샷을 올려주세요
설치
# 설치
curl -s https://raw.githubusercontent.com/kubescape/kubescape/master/install.sh | /bin/bash


(somaz:N/A) [root@kops-ec2 ~]# kubescape
Kubescape is a tool for testing Kubernetes security posture. Docs: https://hub.armosec.io/docs

Usage:
  kubescape [command]
...

(somaz:N/A) [root@kops-ec2 ~]# tree ~/.kubescape/
/root/.kubescape/
├── allcontrols.json
├── armobest.json
├── attack-tracks.json
├── cis-eks-t1.2.0.json
├── cis-v1.23-t1.0.1.json
├── controls-inputs.json
├── devopsbest.json
├── exceptions.json
├── mitre.json
└── nsa.json

0 directories, 10 files

# kubescape을 이용한 보안 취약점 확인
(somaz:N/A) [root@kops-ec2 ~]# kubescape scan framework nsa -e kube-sys-tem.kube-public
[info] Kubescape scanner starting
[info] Downloading/Loading policy definitions
[success] Downloaded/Loaded policy
[info] Accessing Kubernetes objects
[success] Accessed to Kubernetes objects
[info] Scanning. Cluster: somaz-link
Control C-0067 100% |████████████████████████████████████████████| (24/24, 31 it/s)
[success] Done scanning. Cluster: somaz-link

^^^^^^^^^^^^^^^^^^^^^^^^^^^^^^^^^^^^^^^^^^^^^^^^^^^^^^^^^^^^^^^^^^^^^^^^^^^^^^^^

Controls: 24 (Failed: 13, Passed: 8, Action Required: 3)
Failed Resources by Severity: Critical — 0, High — 15, Medium — 58, Low — 7

+----------+-------------------------------------------------+------------------+---------------+--------------------+
| SEVERITY |                  CONTROL NAME                   | FAILED RESOURCES | ALL RESOURCES |    % RISK-SCORE    |
+----------+-------------------------------------------------+------------------+---------------+--------------------+
| Critical | Disable anonymous access to Kubelet service     |        0         |       0       | Action Required *  |
| Critical | Enforce Kubelet client TLS authentication       |        0         |       0       | Action Required *  |
| High     | Resource limits                                 |        10        |      22       |        41%         |
| High     | Applications credentials in configuration files |        0         |      33       | Action Required ** |
| High     | HostNetwork access                              |        4         |      22       |        16%         |
| High     | Privileged container                            |        1         |      22       |         4%         |
| Medium   | Non-root containers                             |        6         |      22       |        25%         |
| Medium   | Allow privilege escalation                      |        6         |      22       |        25%         |
| Medium   | Ingress and Egress blocked                      |        10        |      22       |        41%         |
| Medium   | Automatic mapping of service account            |        21        |      72       |        28%         |
| Medium   | Container hostPort                              |        2         |      22       |         8%         |
| Medium   | Cluster internal networking                     |        1         |       5       |        20%         |
| Medium   | Linux hardening                                 |        10        |      22       |        41%         |
| Medium   | Secret/ETCD encryption enabled                  |        1         |       1       |        100%        |
| Medium   | Audit logs enabled                              |        1         |       1       |        100%        |
| Low      | Immutable container filesystem                  |        7         |      22       |        29%         |
+----------+-------------------------------------------------+------------------+---------------+--------------------+
|          |                RESOURCE SUMMARY                 |        23        |      111      |       17.11%       |
+----------+-------------------------------------------------+------------------+---------------+--------------------+
FRAMEWORK NSA
connect my kubernetes cluster
(somaz:N/A) [root@kops-ec2 ~]# helm repo add kubescape https://kubescape.github.io/helm-charts/
"kubescape" has been added to your repositories

(somaz:N/A) [root@kops-ec2 ~]# helm repo list
NAME                    URL
fairwinds-stable        https://charts.fairwinds.com/stable
kubescape               https://kubescape.github.io/helm-charts/

(somaz:N/A) [root@kops-ec2 ~]# helm upgrade --install kubescape kubescape/kubescape-cloud-operator -n kubescape --create-namespace --set clusterName=`kubectl config current-context` --set account=2f35147e-3831-4f47-8431-f89128850f0a
Release "kubescape" does not exist. Installing it now.
W0226 22:58:26.423418   11971 warnings.go:70] spec.template.spec.containers[0].env[4].name: duplicate name "WAIT_BEFORE_REPORT"
NAME: kubescape
LAST DEPLOYED: Sun Feb 26 22:58:25 2023
NAMESPACE: kubescape
STATUS: deployed
REVISION: 1
TEST SUITE: None
NOTES:
Thank you for installing kubescape-cloud-operator version 1.9.12.

In a few minutes your scan results will be available in the following link:
https://cloud.armosec.io/compliance/somaz-link

You can see and change the values of your's recurring configurations daily scan in the following link:
https://cloud.armosec.io/settings/assets/clusters/scheduled-scans?cluster=somaz-link
> kubectl -n kubescape get cj kubescape-scheduler -o=jsonpath='{.metadata.name}{"\t"}{.spec.schedule}{"\n"}'

You can see and change the values of your's recurring images daily scan in the following link:
https://cloud.armosec.io/settings/assets/images
> kubectl -n kubescape get cj kubevuln-scheduler -o=jsonpath='{.metadata.name}{"\t"}{.spec.schedule}{"\n"}'

See you!!!
연결이 성공되었으니 Repository Scan을 진행해본다.
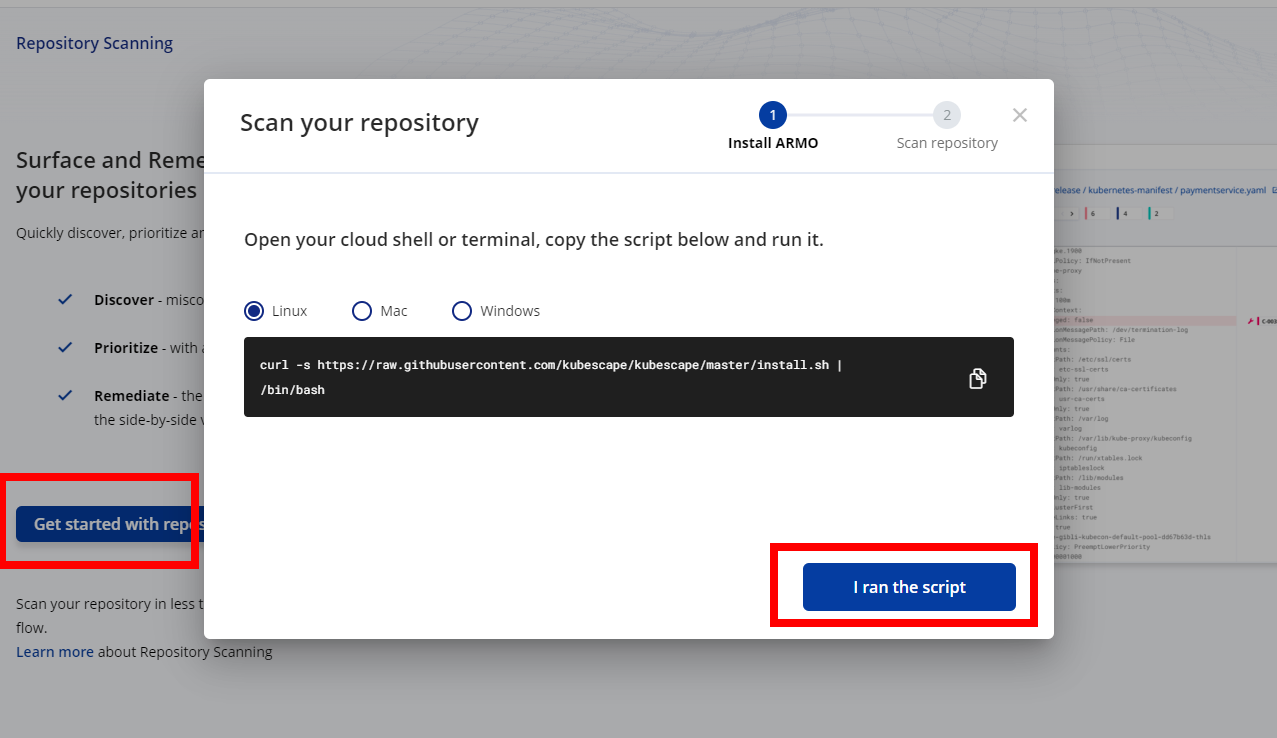

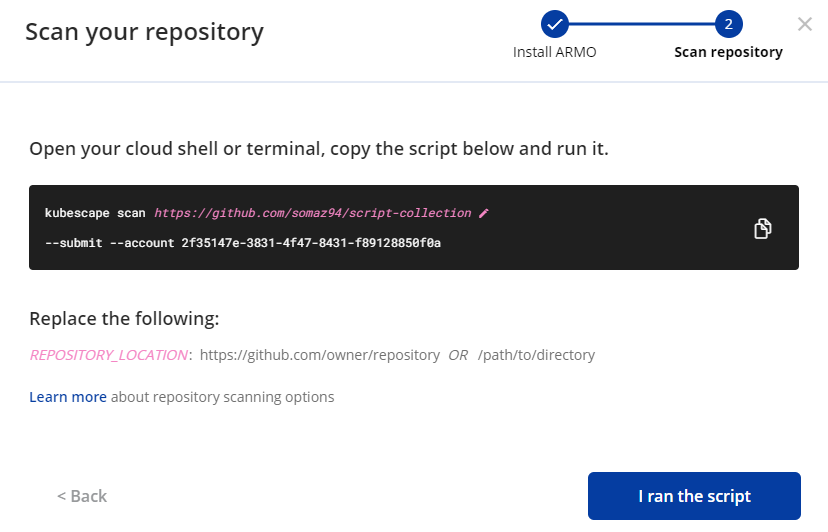

https://hub.armosec.io/docs/repository-scanning
잘 되지는 않는다. 무슨 문제일까? 방법을 아시는 분이 있다면 공유 부탁드립니다.
[과제3]
polaris 관련 실습(아무거나) 후 관련 스샷을 올려주세요
사전작업 Polaris(설치)
# 설치
(somaz:N/A) [root@kops-ec2 ~]# kubectl create ns polaris
namespace/polaris created

# yaml 파일 생성
(somaz:N/A) [root@kops-ec2 ~]# cat <<EOT > polaris-values.yaml
> dashboard:
>   replicas: 1
>   service:
>     type: LoadBalancer
> EOT

# 배포
helm repo add fairwinds-stable https://charts.fairwinds.com/stable
helm install polaris fairwinds-stable/polaris --namespace polaris --version 5.7.2 -f polaris-values.yaml

# CLB에 ExternanDNS 로 도메인 연결
kubectl annotate service polaris-dashboard "external-dns.alpha.kubernetes.io/hostname=polaris.$KOPS_CLUSTER_NAME" -n polaris

# 확인
(somaz:N/A) [root@kops-ec2 ~]# kubectl get po,svc,ep -n polaris
NAME                                     READY   STATUS    RESTARTS   AGE
pod/polaris-dashboard-7898b46649-7sjvx   1/1     Running   0          11m

NAME                        TYPE           CLUSTER-IP      EXTERNAL-IP
                                              PORT(S)        AGE
service/polaris-dashboard   LoadBalancer   100.70.98.168   adc29d4bde45b4b0686e6b0646054907-1408913128.ap-northeast-2.elb.amazonaws.com   80:30527/TCP   11m

NAME                          ENDPOINTS            AGE
endpoints/polaris-dashboard   172.30.76.148:8080   11m

# 웹 접속 주소 확인 및 접속
(somaz:N/A) [root@kops-ec2 ~]# echo -e "Polaris Web URL = http://polaris.$KOPS_CLUSTER_NAME"
Polaris Web URL = http://polaris.somaz.link
yaml 파일 생성
cat <<EOT > polaris-demo.yaml
apiVersion: v1
kind: Pod
metadata:
  name: polaris-demo
spec:
  containers:
    - name: nginx
      image: nginx:latest
      resources:
        requests:
          memory: "64Mi"
          cpu: "250m"
        limits:
          memory: "128Mi"
          cpu: "500m"
EOT

(somaz:N/A) [root@kops-ec2 ~]# kubectl apply -f polaris-demo.yaml
pod/polaris-demo created
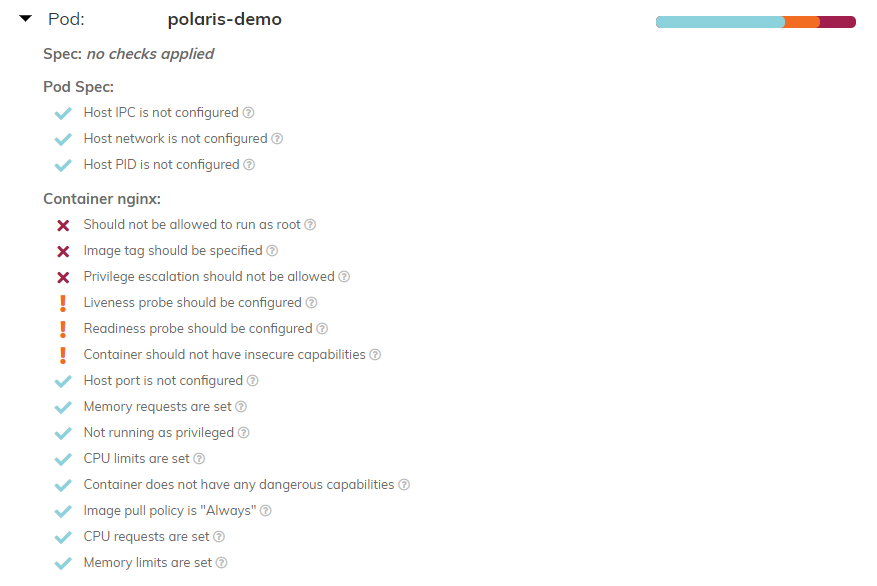
polaris 웹 접속 → 중간 Filter by Namespace 에서 default 네임스페이스 클릭 후 Apply → polaris-demo 확인
문제 해결을 위해 yaml 파일 재생성
(somaz:N/A) [root@kops-ec2 ~]# kubectl delete -f polaris-demo.yaml
pod "polaris-demo" deleted

cat <<EOT > polaris-demo.yaml
apiVersion: v1
kind: Pod
metadata:
  name: polaris-demo
spec:
  containers:
    - name: nginx
      image: nginx:1.23.3
      imagePullPolicy: Always
      resources:
        requests:
          memory: "64Mi"
          cpu: "250m"
        limits:
          memory: "128Mi"
          cpu: "500m"
      securityContext:
        runAsUser: 1000
        allowPrivilegeEscalation: false
        readOnlyRootFilesystem: true
        capabilities:
          drop:
            - ALL
EOT

(somaz:N/A) [root@kops-ec2 ~]# kubectl apply -f polaris-demo.yaml
pod/polaris-demo created
확인

대부분의 문제가 해결되었다!
[과제4]
신규 서비스 어카운트(SA) 생성 후 '클러스터 수준(모든 네임스페이스 포함)에서 읽기 전용'의 권한을 주고 테스트 후 코드나 스샷을 올려주세요
해당 내용은 어려워서 스터디원인 강재민님의 블로그를 참고하였다.
# read only 서비스 어카운트 생성
(somaz:N/A) [root@kops-ec2 ~]# kubectl create sa read-only-k8s -n default
serviceaccount/read-only-k8s created

(somaz:N/A) [root@kops-ec2 ~]# kubectl get sa -n default
NAME            SECRETS   AGE
default         0         125m
read-only-k8s   0         4s

# read-only 서비스 어카운트 확인
(somaz:N/A) [root@kops-ec2 ~]# kubectl get sa read-only-k8s -n default -o yaml | yh
apiVersion: v1
kind: ServiceAccount
metadata:
  creationTimestamp: "2023-02-28T10:01:38Z"
  name: read-only-k8s
  namespace: default
  resourceVersion: "30543"
  uid: 476a0acf-27fa-49c5-b73f-f084b7c4d71c

# pod 생성
(somaz:N/A) [root@kops-ec2 ~]# cat <<EOF | kubectl create -f -
ata:
  > apiVersion: v1
> kind: Pod
> metadata:
>   name: read-only-kubectl
>   namespace: default
> spec:
>   serviceAccountName: read-only-k8s
>   containers:
>   - name: kubectl-pod
>     image: bitnami/kubectl:1.24.10
>     command: ["tail"]
>     args: ["-f", "/dev/null"]
nGraceP>   terminationGracePeriodSeconds: 0
> EOF
pod/read-only-kubectl created

(somaz:N/A) [root@kops-ec2 ~]# kubectl get pod
NAME                READY   STATUS    RESTARTS   AGE
read-only-kubectl   1/1     Running   0          11s

# pod 의 서비스 어카운트 확인
(somaz:N/A) [root@kops-ec2 ~]# kubectl get pod -o read-only-kubectl -n default -o yaml | grep serviceAccount
    serviceAccount: read-only-k8s
    serviceAccountName: read-only-k8s
        - serviceAccountToken:
# 파드에 기본 적용되는 서비스 어카운트(토큰) 정보 확인
kubectl exec -it read-only-kubectl -n default -- ls /run/secrets/kubernetes.io/serviceaccount
kubectl exec -it read-only-kubectl -n default -- cat /run/secrets/kubernetes.io/serviceaccount/token
kubectl exec -it read-only-kubectl -n default -- cat /run/secrets/kubernetes.io/serviceaccount/namespace
kubectl exec -it read-only-kubectl -n default -- cat /run/secrets/kubernetes.io/serviceaccount/ca.crt

# 각각 파드로 Shell 접속하여 정보 확인
alias k3='kubectl exec -it read-only-kubectl -n default -- kubectl'

# 권한 테스트
(somaz:N/A) [root@kops-ec2 ~]# k3 get pods
Error from server (Forbidden): pods is forbidden: User "system:serviceaccount:default:read-only-k8s" cannot list resource "pods" in API group "" in the namespace "default"
command terminated with exit code 1

(somaz:N/A) [root@kops-ec2 ~]# k3 run nginx --image nginx:1.20-alpine
Error from server (Forbidden): pods is forbidden: User "system:serviceaccount:default:read-only-k8s" cannot create resource "pods" in API group "" in the namespace "default"
command terminated with exit code 1

(somaz:N/A) [root@kops-ec2 ~]# k3 get pods -n kube-system
Error from server (Forbidden): pods is forbidden: User "system:serviceaccount:default:read-only-k8s" cannot list resource "pods" in API group "" in the namespace "kube-system"
command terminated with exit code 1
# 각각 어카운트 read-only role 생성
cat <<EOF | kubectl create -f -
apiVersion: rbac.authorization.k8s.io/v1
kind: ClusterRole
metadata:
  name: role-read-only
rules:
- apiGroups: ["*"]
  resources: ["*"]
  verbs:
    - get
    - list
    - watch
EOF

# 롤 확인
(somaz:N/A) [root@kops-ec2 ~]# kubectl get roles -n default -o yaml
apiVersion: v1
items: []
kind: List
metadata:
  resourceVersion: ""

(somaz:N/A) [root@kops-ec2 ~]# kubectl describe clusterroles role-read-only -n default
Name:         role-read-only
Labels:       <none>
Annotations:  <none>
PolicyRule:
  Resources  Non-Resource URLs  Resource Names  Verbs
  ---------  -----------------  --------------  -----
  *.*        []                 []              [get list watch]

# 롤 바인딩 생성
(somaz:N/A) [root@kops-ec2 ~]# cat <<EOF | kubectl create -f -
> apiVersion: rbac.authorization.k8s.io/v1
> kind: ClusterRoleBinding
> metadata:
>   name: roleB-read-only
> roleRef:
>   apiGroup: rbac.authorization.k8s.io
>   kind: ClusterRole
>   name: role-read-only
> subjects:
> - kind: ServiceAccount
>   name: read-only-k8s
>   namespace: default
> EOF
clusterrolebinding.rbac.authorization.k8s.io/roleB-read-only created

# 다시 권한 테스트
(somaz:N/A) [root@kops-ec2 ~]# k3 get pod
NAME                READY   STATUS    RESTARTS   AGE
read-only-kubectl   1/1     Running   0          20m

(somaz:N/A) [root@kops-ec2 ~]# k3 get po -n kube-system
NAME                                            READY   STATUS    RESTARTS       AGE
aws-cloud-controller-manager-kdwm4              1/1     Running   0              147m
aws-load-balancer-controller-68c78954d9-gtpf5   1/1     Running   0              147m
aws-node-km5x4                                  1/1     Running   0              141m
aws-node-npdq8                                  1/1     Running   0              146m
aws-node-xx6pt                                  1/1     Running   0              147m
cert-manager-6b55fb8f96-kzp47                   1/1     Running   0              147m
cert-manager-cainjector-5cf5bd97fc-vwslk        1/1     Running   0              147m
cert-manager-webhook-66ccfc975d-fn5w8           1/1     Running   0              147m
coredns-6897c49dc4-5kr69                        1/1     Running   0              139m
coredns-6897c49dc4-h8n4n                        1/1     Running   0              140m
coredns-autoscaler-5685d4f67b-cqxb9             1/1     Running   0              140m
ebs-csi-controller-657d666f54-d4xbl             5/5     Running   0              147m
ebs-csi-node-rxw67                              3/3     Running   0              147m
ebs-csi-node-t6fl6                              3/3     Running   0              146m
ebs-csi-node-zn8gb                              3/3     Running   0              141m
etcd-manager-events-i-0ebc0d4bce7606064         1/1     Running   0              147m
etcd-manager-main-i-0ebc0d4bce7606064           1/1     Running   0              146m
external-dns-844d94fdd8-m2jbd                   1/1     Running   0              147m
kops-controller-jfnk2                           1/1     Running   0              147m
kube-apiserver-i-0ebc0d4bce7606064              2/2     Running   0              146m
kube-controller-manager-i-0ebc0d4bce7606064     1/1     Running   1 (148m ago)   147m
kube-proxy-i-021e29379a166d5f5                  1/1     Running   0              141m
kube-proxy-i-0be3685d1f9263240                  1/1     Running   0              146m
kube-proxy-i-0ebc0d4bce7606064                  1/1     Running   0              147m
kube-scheduler-i-0ebc0d4bce7606064              1/1     Running   0              147m
metrics-server-6d48674cf8-tz5d2                 1/1     Running   0              147m
metrics-server-6d48674cf8-wp4sk                 1/1     Running   0              140m

(somaz:N/A) [root@kops-ec2 ~]# k3 run nginx --image nginx:1.20-alpine
Error from server (Forbidden): pods is forbidden: User "system:serviceaccount:default:read-only-k8s" cannot create resource "pods" in API group "" in the namespace "default"
command terminated with exit code 1
마지막으로 클러스터 수준에서 서비스 어카운트를 읽기 전용으로 설정하면 일반적으로 해당 서비스 어카운트가 사용 가능한 명령어가 제한된다.
가능한 명령어
- `kubectl get secrets/serviceaccounts` 로 서비스 어카운트와 관련된 정보를 조회할 수 있다.
- `kubectl describe pod` 로 Pod의 상세 정보를 조회할 수 있다.
- `kubectl get pod -o wide` 로 Pod의 리스트와 상세 정보를 조회할 수 있다.
불가능한 명령어
- `kubectl create/update/delete secrets/serviceaccounts` 와 같은 명령어는 권한 부족으로 실행이 불가능하다.
- `kubectl apply` 명령어를 사용하여 서비스 어카운트나 Pod를 생성하는 것도 불가능하다.
스터디 주요내용
실습 환경 배포
실습 환경
kops 인스턴스 t3.small & 노드 t3.xlarge (vCPU 4, Memory 16GiB) 배포
# YAML 파일 다운로드
curl -O https://s3.ap-northeast-2.amazonaws.com/cloudformation.cloudneta.net/K8S/kops-oneclick2.yaml

# CloudFormation 스택 배포 : 노드 인스턴스 타입 변경 - MasterNodeInstanceType=t3.xlarge WorkerNodeInstanceType=t3.xlarge
aws cloudformation deploy --template-file kops-oneclick2.yaml --stack-name mykops --parameter-overrides KeyName=somazkey SgIngressSshCidr=$(curl -s ipinfo.io/ip)/32  MyIamUserAccessKeyID=AKIA5... MyIamUserSecretAccessKey='CVNa2...' ClusterBaseName='somaz.link' S3StateStore='somaz-k8s-s3' MasterNodeInstanceType=t3.xlarge WorkerNodeInstanceType=t3.xlarge --region ap-northeast-2

# CloudFormation 스택 배포 완료 후 kOps EC2 IP 출력
aws cloudformation describe-stacks --stack-name mykops --query 'Stacks[*].Outputs[0].OutputValue' --output text

# 13분 후 마스터노드 SSH 접속
ssh -i ~/.ssh/somazkey.pem ec2-user@$(aws cloudformation describe-stacks --stack-name mykops --query 'Stacks[*].Outputs[0].OutputValue' --output text)

# EC2 instance profiles 에 IAM Policy 추가(attach)
aws iam attach-role-policy --policy-arn arn:aws:iam::$ACCOUNT_ID:policy/AWSLoadBalancerControllerIAMPolicy --role-name masters.$KOPS_CLUSTER_NAME
aws iam attach-role-policy --policy-arn arn:aws:iam::$ACCOUNT_ID:policy/AWSLoadBalancerControllerIAMPolicy --role-name nodes.$KOPS_CLUSTER_NAME
aws iam attach-role-policy --policy-arn arn:aws:iam::$ACCOUNT_ID:policy/AllowExternalDNSUpdates --role-name masters.$KOPS_CLUSTER_NAME
aws iam attach-role-policy --policy-arn arn:aws:iam::$ACCOUNT_ID:policy/AllowExternalDNSUpdates --role-name nodes.$KOPS_CLUSTER_NAME

# 메트릭 서버 확인 : 메트릭은 15초 간격으로 cAdvisor를 통하여 가져옴
kubectl top node
kubectl top pod -A
EC2 IAM Role & 메타데이터
워커 노드 1대 EC2 메타데이터 보안 제거 ⇒ 적용 및 재생성 5분 시간 소요
#
kops edit ig nodes-ap-northeast-2a
---
# 아래 3줄 제거
spec:
  instanceMetadata:
    httpPutResponseHopLimit: 1
    httpTokens: required
---

# 업데이트 적용 : 노드1대 롤링업데이트
kops update cluster --yes && echo && sleep 3 && kops rolling-update cluster --yes
파드에서 EC2 메타데이터 사용 가능 확인
# netshoot-pod 2대 생성
cat <<EOF | kubectl create -f -
apiVersion: apps/v1
kind: Deployment
metadata:
  name: netshoot-pod
spec:
  replicas: 2
  selector:
    matchLabels:
      app: netshoot-pod
  template:
    metadata:
      labels:
        app: netshoot-pod
    spec:
      containers:
      - name: netshoot-pod
        image: nicolaka/netshoot
        command: ["tail"]
        args: ["-f", "/dev/null"]
      terminationGracePeriodSeconds: 0
EOF

# 파드 이름 변수 지정
PODNAME1=$(kubectl get pod -l app=netshoot-pod -o jsonpath={.items[0].metadata.name})
PODNAME2=$(kubectl get pod -l app=netshoot-pod -o jsonpath={.items[1].metadata.name})

# EC2 메타데이터 정보 확인
kubectl exec -it $PODNAME1 -- curl 169.254.169.254 ;echo
kubectl exec -it $PODNAME2 -- curl 169.254.169.254 ;echo

(somaz:N/A) [root@kops-ec2 ~]# kubectl exec -it $PODNAME1 -- curl 169.254.169.254 ;echo
1.0
2007-01-19
2007-03-01
2007-08-29
2007-10-10
2007-12-15
2008-02-01
2008-09-01
2009-04-04
2011-01-01
2011-05-01
2012-01-12
2014-02-25
2014-11-05
2015-10-20
2016-04-19
2016-06-30
2016-09-02
2018-03-28
2018-08-17
2018-09-24
2019-10-01
2020-10-27
2021-01-03
2021-03-23
2021-07-15
2022-09-24
latest

(somaz:N/A) [root@kops-ec2 ~]# kubectl exec -it $PODNAME2 -- curl 169.254.169.254 ;echo

# 파드1에서 EC2 메타데이터 정보 확인
kubectl exec -it $PODNAME1 -- curl 169.254.169.254/latest ;echo
kubectl exec -it $PODNAME1 -- curl 169.254.169.254/latest/meta-data/iam/security-credentials/ ;echo
kubectl exec -it $PODNAME1 -- curl 169.254.169.254/latest/meta-data/iam/security-credentials/nodes.$KOPS_CLUSTER_NAME | jq

(somaz:N/A) [root@kops-ec2 ~]# kubectl exec -it $PODNAME1 -- curl 169.254.169.254/latest/meta-data/iam/security-credentials/ ;echo
nodes.somaz.link

(somaz:N/A) [root@kops-ec2 ~]# kubectl exec -it $PODNAME1 -- curl 169.254.169.254/latest/meta-data/iam/security-credentials/nodes.$KOPS_CLUSTER_NAME | jq
{
  "Code": "Success",
  "LastUpdated": "2023-02-26T11:00:43Z",
  "Type": "AWS-HMAC",
  "AccessKeyId": "ASIAY45ESHEKPCEGCOL2",
  "SecretAccessKey": "beaNF/hZnm5Cg4AcX+GCuw6j5CWTgwWhvGY6Nh5d",
  "Token": "IQoJb3JpZ2luX2VjEJv//////////wEaDmFwLW5vcnRoZWFzdC0yIkYwRAIgBsHiEZkno5vHr3ysdFZvCbG2m6WQ/Y/m5Nps7eLfbmgCIAHH66X4/trVUQWZMh31yXtScBCSU2lPbwnRcbEpLhzRKswFCEQQABoMNjExODQxMDk1OTU2IgzEMPHgzzFPkIXetO0qqQXgH0KCpRXQtCUZTQO7J1wxeZpjPj5PiRwC4gOkbVgGdymeKj2z73pUEceado7c9yZ3gwfN8r7K6SFN1NK1aXS1YYbdzQESegLsSxDiCT/+dRHR5DCMcwStKSNSekptM2Xk2ePogA3N62oulITqlsWT3d4Dl2qUS2z6r1+ShfnNpgY1dGdBIn6ZpyhtS7/fLaYZifjkvZ1GBoLRaB75yDwfMNcpMxx8X9B+z/LCPX3wulxdzybO+o8eHyXDG+byIOufqIH2HqdmOScaKLLfZzLY9S+Gmr37liHjZE8r0/8Hmz8Oro6dcOB8i8CUJ02A/EM21Ddo10qjTzMZJq6fvqRY/tTKnMdUGBgbGTSpwRMxuAdvFWlW6re0/jTchtaSM9sJtcvuzzzFxCdJJ9810M2M/AcsetjTaqtQ/zIIyxLWKzfcpqbpBMhg7I6yDLGIu4RsCLGv87rUzcsUH0Nznn98pW81Jzb0sIXZ9+U45LaRc6ylp0pX6NAVX7/ZCjr1zyovYOyirxEDntVx3ihGfD4xZlFQ/7L8JblFsxlBaaKPozQW2OiE9uclY54NgQFuwDV0phVkFaYFtcBG1KQcwATMOwdQYPaD0n//sV3wO5iuORqtDXJNABFQogmUlmZnqNe5VquJjXQEzPpyBbYGwQ0qol92tUme7rSDofm1v+nJUpIZgOK9AOcWwj9ThldeWRxI/I6T8AMOc0XbA1foQ8oHcj0RewBLxyfn4BtjrfHkgivIkKHQa0fjzIozXQa0UUNaS0e0BlymtVHvvq2s0V3CiZUaq5vm8lywEDF9EufEddeYdL1L3OxlcauPjrgxWxG3x/zuSDGgv5oY/muxO9s00rdlhx6L5W5Eljoy0SMvCIPrbF4/3Sp4o0+16b/4bd/QDleWMg2KW00w3PfsnwY6sgEFCKOej+aCTZI+bVyU+XqqrXE1LTV3zOcgwxIBNYg/V2F/nObzUmcTAGI1xw7XVHkF2MTxDRvmJY4Fokbcq488qgQjsNBq8RcXalZV5eOlPRmUGFbpGqw8mSU8/mGImF0zDg5o8vb5y8PB0CdkGnfva5iWpbZKGpnDfS26RuZDFG7Q06zKbcogKFrPAU9NVrdYhU7tvys3KXEcp8JIKne6a7FgyqpI51Fz4NXxNpatg7yl",
  "Expiration": "2023-02-26T17:35:44Z"
}

# 파드2에서 EC2 메타데이터 정보 확인
kubectl exec -it $PODNAME2 -- curl 169.254.169.254/latest ;echo
kubectl exec -it $PODNAME2 -- curl 169.254.169.254/latest/meta-data/iam/security-credentials/ ;echo
kubectl exec -it $PODNAME2 -- curl 169.254.169.254/latest/meta-data/iam/security-credentials/nodes.$KOPS_CLUSTER_NAME | jq
파드(컨테이너) 탈취 후 EC2 메타데이터의 IAM Role 토큰 정보를 활용해 python boto3를 통해 SDK로 AWS 서비스 강제 사용
# boto3 사용을 위한 파드 생성
cat <<EOF | kubectl create -f -
apiVersion: apps/v1
kind: Deployment
metadata:
  name: boto3-pod
spec:
  replicas: 2
  selector:
    matchLabels:
      app: boto3
  template:
    metadata:
      labels:
        app: boto3
    spec:
      containers:
      - name: boto3
        image: jpbarto/boto3
        command: ["tail"]
        args: ["-f", "/dev/null"]
      terminationGracePeriodSeconds: 0
EOF

# 파드 이름 변수 지정
PODNAME1=$(kubectl get pod -l app=boto3 -o jsonpath={.items[0].metadata.name})
PODNAME2=$(kubectl get pod -l app=boto3 -o jsonpath={.items[1].metadata.name})

# 파드1에서 boto3 사용
kubectl exec -it $PODNAME1 -- sh
------------
cat <<EOF> ec2.py
import boto3

ec2 = boto3.client('ec2', region_name = 'ap-northeast-2')
response = ec2.describe_instances()
print(response)
EOF

python ec2.py  # aws ec2 describe-vpcs
exit
------------

(somaz:N/A) [root@kops-ec2 ~]# kubectl exec -it $PODNAME1 -- sh

~/dev # cat <<EOF> ec2.py
> import boto3
>
> ec2 = boto3.client('ec2', region_name = 'ap-northeast-2')
> response = ec2.describe_instances()
> print(response)
> EOF

~/dev # python ec2.py
{u'Reservations': [{u'OwnerId': '611841095956', u'ReservationId': 'r-06f19fdf9c4757ed8', u'Groups': [], u'RequesterId': '722737459838', u'Instances': [{u'Monitoring': {u'State': 'disabled'}, u'PublicDnsName': 'ec2-13-209-4-208.ap-northeast-2.compute.amazonaws.com', u'State': {u'Code': 16, u'Name': 'running'}, u'EbsOptimized': False, u'LaunchTime': datetime.datetime(2023, 2, 26, 10, 37, 41, tzinfo=tzlocal()), u'PublicIpAddress': '13.209.4.208', u'PrivateIpAddres
...

# 파드2에서 boto3 사용
kubectl exec -it $PODNAME2 -- sh
------------
cat <<EOF> ec2.py
import boto3

ec2 = boto3.client('ec2', region_name = 'ap-northeast-2')
response = ec2.describe_instances()
print(response)
EOF

python ec2.py  # aws ec2 describe-vpcs
exit
------------

(somaz:N/A) [root@kops-ec2 ~]# PODNAME2=$(kubectl get pod -l app=boto3 -o jsonpath={.items[1].metadata.name})

(somaz:N/A) [root@kops-ec2 ~]# kubectl exec -it $PODNAME2 -- sh

~/dev # cat <<EOF> ec2.py
> import boto3
>
> ec2 = boto3.client('ec2', region_name = 'ap-northeast-2')
> response = ec2.describe_instances()
> print(response)
> EOF

~/dev # python ec2.py
....
Traceback (most recent call last):
  File "ec2.py", line 4, in <module>
    response = ec2.describe_instances()
  File "/usr/local/lib/python2.7/site-packages/botocore/client.py", line 251, in _api_call

# 실습 완료 후 삭제
kubectl delete deploy boto3-pod- 대응 방안 : EC2 메타데이터 접속 제한 or AWS IRSA 사용
- 즉 Pod1은 정보 타털린 상황이고, Pod2는 정상적인 상황이다.
현재 ec2에 맵핑된 iam role 연동 정책(policy)를 사용할 수 있는 boto3 sdk를 사용해서 다른 서비스도 이용해보세요!
⇒ ELB 생성/삭제!

EKS에서 쿠버네티스 포드의 IAM 권한 제어하기: Pod Identity Webhook
EKS에서 포드의 IAM 권한을 개별적으로 부여할 수 있는 Pod Identity Webhook의 사용 방법과 동작 원리를 설명합니다.
tech.devsisters.com
kubescape
소개 및 사용 : 보안 권고 사항 기반 현재 쿠버네티스 클러스터(YAML, Helm chart)의 취약점을 점검
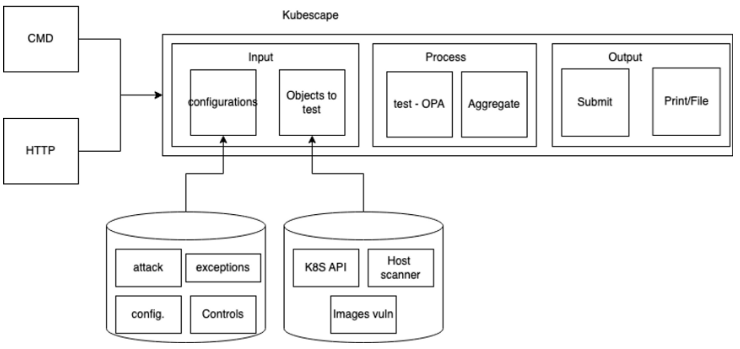
- Kubescape is an open-source Kubernetes security platform for your IDE, CI/CD pipelines, and clusters. It includes risk analysis, security, compliance, and misconfiguration scanning, saving Kubernetes users and administrators precious time, effort, and resources.
- Kubescape scans clusters, YAML files, and Helm charts. It detects misconfigurations according to multiple frameworks (including NSA-CISA, MITRE ATT&CK® and the CIS Benchmark).
- Kubescape was created by ARMO and is a Cloud Native Computing Foundation (CNCF) sandbox project.

# 설치
curl -s https://raw.githubusercontent.com/kubescape/kubescape/master/install.sh | /bin/bash

# Download all artifacts and save them in the default path (~/.kubescape)
kubescape download artifacts
tree ~/.kubescape/

(somaz:N/A) [root@kops-ec2 ~]# tree ~/.kubescape/
/root/.kubescape/
├── allcontrols.json
├── armobest.json
├── attack-tracks.json
├── cis-eks-t1.2.0.json
├── cis-v1.23-t1.0.1.json
├── controls-inputs.json
├── devopsbest.json
├── exceptions.json
├── mitre.json
└── nsa.json

0 directories, 10 files

cat ~/.kubescape/attack-tracks.json | jq

# 제공하는 보안 프레임워크 확인
(somaz:N/A) [root@kops-ec2 ~]# kubescape list frameworks --format json | jq '.[]'
"AllControls"
"ArmoBest"
"DevOpsBest"
"MITRE"
"NSA"
"cis-eks-t1.2.0"
"cis-v1.23-t1.0.1"

# 제공하는 통제 정책 확인
kubescape list controls

# 모니터링
watch kubectl get pod -A

# 클러스터 스캔
# Deploy Kubescape host-sensor daemonset in the scanned cluster. Deleting it right after we collecting the data.
# Required to collect valuable data from cluster nodes for certain controls.
# Yaml file: https://github.com/kubescape/kubescape/blob/master/core/pkg/hostsensorutils/hostsensor.yaml
kubescape scan --help
kubescape scan --enable-host-scan --verbose
+----------+-------------------------------------------------------+------------------+---------------+---------------------+
| SEVERITY |                     CONTROL NAME                      | FAILED RESOURCES | ALL RESOURCES |    % RISK-SCORE     |
+----------+-------------------------------------------------------+------------------+---------------+---------------------+
| Critical | Disable anonymous access to Kubelet service           |        0         |       0       |  Action Required *  |
| Critical | Enforce Kubelet client TLS authentication             |        0         |       0       |  Action Required *  |
| High     | Forbidden Container Registries                        |        0         |      21       | Action Required *** |
| High     | Resources memory limit and request                    |        0         |      21       | Action Required *** |
...
+----------+-------------------------------------------------------+------------------+---------------+---------------------+
|          |                   RESOURCE SUMMARY                    |        47        |      204      |        8.78%        |
+----------+-------------------------------------------------------+------------------+---------------+---------------------+
FRAMEWORKS: AllControls (risk: 9.17), NSA (risk: 11.82), MITRE (risk: 6.94)
polaris
소개 및 설치 : 오픈소스 보안 점검 도구, Polaris is an open source policy engine for Kubernetes that validates and remediates resource configuration
- It includes 30+ built in configuration policies, as well as the ability to build custom policies with JSON Schema.
- When run on the command line or as a mutating webhook, Polaris can automatically remediate issues based on policy criteria.
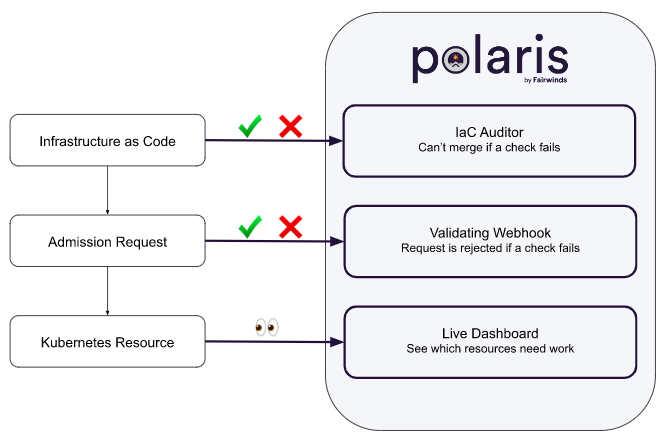
- As a dashboard - Validate Kubernetes resources against policy-as-code ⇒ 실습 범위
- As an admission controller - Automatically reject or modify workloads that don't adhere to your organization's policies.
- Validating Webhook : 새 워크로드 배포 시 체크 항목 만족 되지 않을 경우, 배포 차단 ⇒ helm 배포 때 webhook 활성화 필요
- As a command-line tool - Incorporate policy-as-code into the CI/CD process to test local YAML files.
# 설치
kubectl create ns polaris

#
cat <<EOT > polaris-values.yaml
dashboard:
  replicas: 1
  service:
    type: LoadBalancer
EOT

# 배포
helm repo add fairwinds-stable https://charts.fairwinds.com/stable
helm install polaris fairwinds-stable/polaris --namespace polaris --version 5.7.2 -f polaris-values.yaml

# CLB에 ExternanDNS 로 도메인 연결
kubectl annotate service polaris-dashboard "external-dns.alpha.kubernetes.io/hostname=polaris.$KOPS_CLUSTER_NAME" -n polaris

# 웹 접속 주소 확인 및 접속
echo -e "Polaris Web URL = http://polaris.$KOPS_CLUSTER_NAME"

(somaz:N/A) [root@kops-ec2 ~]# echo -e "Polaris Web URL = http://polaris.$KOPS_CLUSTER_NAME"
Polaris Web URL = http://polaris.somaz.link

# 파드, 서비스, 엔드포인트
(somaz:N/A) [root@kops-ec2 ~]# kubectl get po,svc,ep -n polaris
NAME                                     READY   STATUS    RESTARTS   AGE
pod/polaris-dashboard-7898b46649-dq7dl   1/1     Running   0          2m29s

NAME                        TYPE           CLUSTER-IP     EXTERNAL-IP
                                            PORT(S)        AGE
service/polaris-dashboard   LoadBalancer   100.67.44.88   afe481866bc7a48f09a29f3bb0cd20a4-1451650006.ap-northeast-2.elb.amazonaws.com   80:32634/TCP   2m29s

NAME                          ENDPOINTS           AGE
endpoints/polaris-dashboard 172.30.59.42:8080 2m29s- Score : 모범 사례 대비 전체 클러스터 구성 내역 점수, 권고 사항 만족이 많을 수록 점수 상승
- Passing/Warning/Dangerous Checks : 위험 등급 분류, 위험 단계 취약점은 조치를 권고
- 측정 범위 : Efficiency, Reliability, Security
- 검사 항목 상세 - 링크
보안 취약점 점검
- polaris 웹 접속 → 중간 Filter by Namespace 에서 default 네임스페이스 클릭 후 Apply

- Namespaces : default 아래 netshoot-pod 부분 ⇒ 아래 항목의 ? 클릭으로 상세 정보 확인
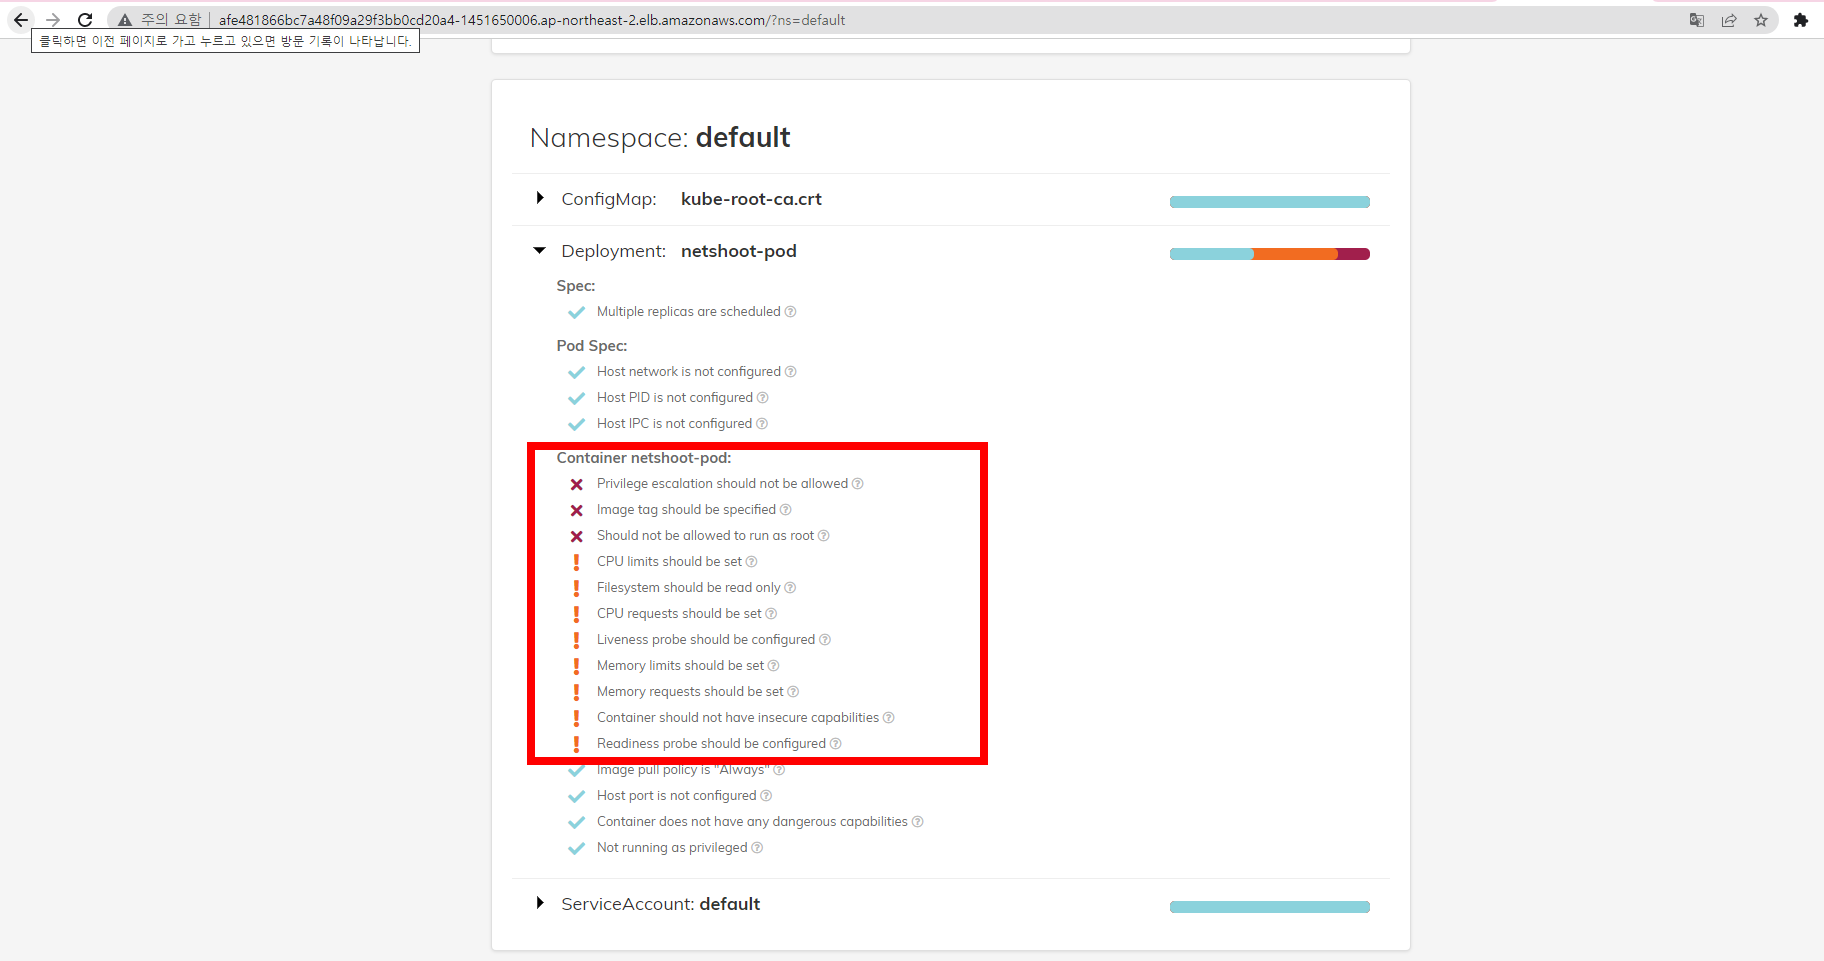
- Image tag 조치 - 링크
# 기존 netshoot-pod 삭제
kubectl delete deploy netshoot-pod

# netshoot-pod 1대 생성
cat <<EOF | kubectl create -f -
apiVersion: apps/v1
kind: Deployment
metadata:
  name: netshoot-pod
spec:
  replicas: 1
  selector:
    matchLabels:
      app: netshoot-pod
  template:
    metadata:
      labels:
        app: netshoot-pod
    spec:
      containers:
      - name: netshoot-pod
        image: nicolaka/netshoot:v0.9
        command: ["tail"]
        args: ["-f", "/dev/null"]
      terminationGracePeriodSeconds: 0
EOF
- 대시보드 새로고침 후 확인 : 해결됬지만, 상단에 replica 인데 1개라 Warning 확인
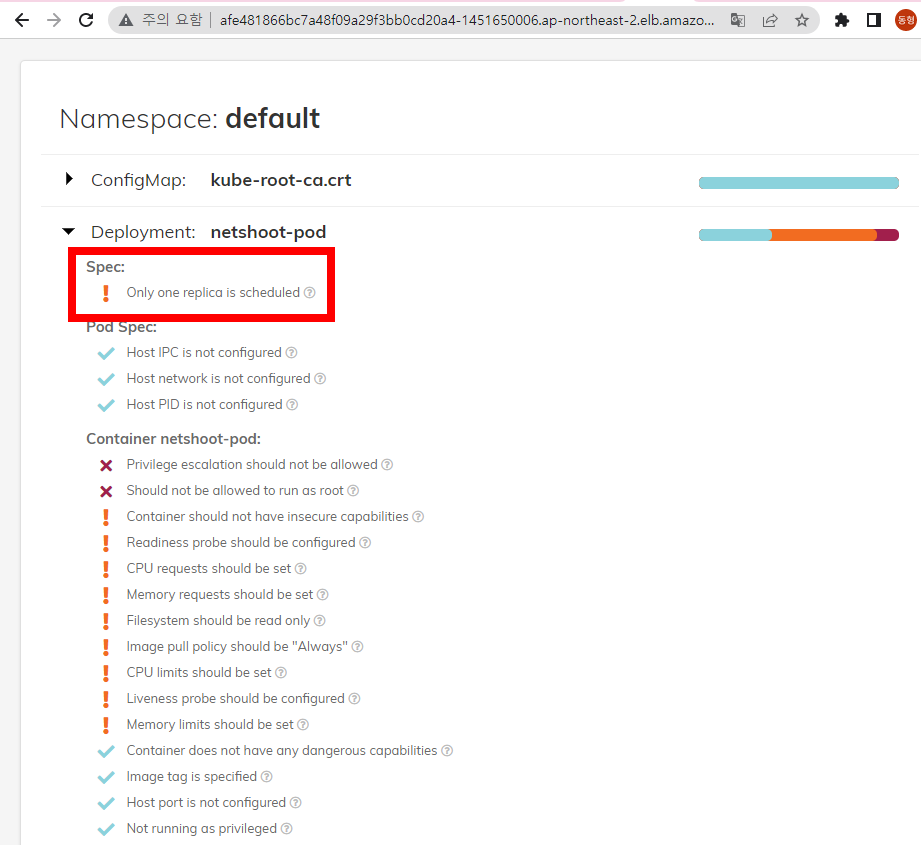
- deployment 의 replica 조치 후 확인
kubectl scale deployment netshoot-pod --replicas 2
- 대시보드 새로고침 후 확인 : 해결!

보안 모범 사례 적용 후 재점검
- 폴라리스 파드의 설정 참고
#
kubectl krew install neat
kubectl get deploy/polaris-dashboard -n polaris -o yaml | kubectl neat > polaris-pod.yaml
cat polaris-pod.yaml | yh
...
spec:
  template:
    spec:
      containers:
        imagePullPolicy: Always   # 이미지를 항상 리포지토리에서 가져오게 설정
        resources:                # 리소스 자원 사용 보장 및 제한
          limits:
            cpu: 150m
            memory: 512Mi
          requests:
            cpu: 100m
            memory: 128Mi
        securityContext:          # 컨테이너, 파드의 권한 및 접근 제어
          allowPrivilegeEscalation: false   # 컨테이너의 하위 프로세스가 상위 프로세스보다 많은 권한을 얻을 수 없게 설정
          capabilities:                     # 호스트 커널 레벨 수정이 필요 시 root 권한으로 전체 커널을 수정하지 않고 특정 커널 권한만 부여 후 사용
            drop:
            - ALL
          privileged: false                 # true인 경우 호스트의 모든 장치에 접근 권한 가짐, 컨테이너의 root권한이더라도 namespace/cgroup으로 격리되어 호스트의 다른 장치 접근 불가
          readOnlyRootFilesystem: true      # 컨테이너의 root 파일시스템에 읽기 전용
          runAsNonRoot: true                # root 권한으로 컨테이너를 실행하지 않음
...- imagePullPolicy: IfNotPresent
- 이미지가 로컬에 없는 경우에만 내려받는다.
- Always
- kubelet이 컨테이너를 기동할 때마다, kubelet이 컨테이너 이미지 레지스트리에 이름과 이미지의 다이제스트가 있는지 질의한다. 일치하는 다이제스트를 가진 컨테이너 이미지가 로컬에 있는 경우, kubelet은 캐시된 이미지를 사용한다. 이외의 경우, kubelet은 검색된 다이제스트를 가진 이미지를 내려받아서 컨테이너를 기동할 때 사용한다.
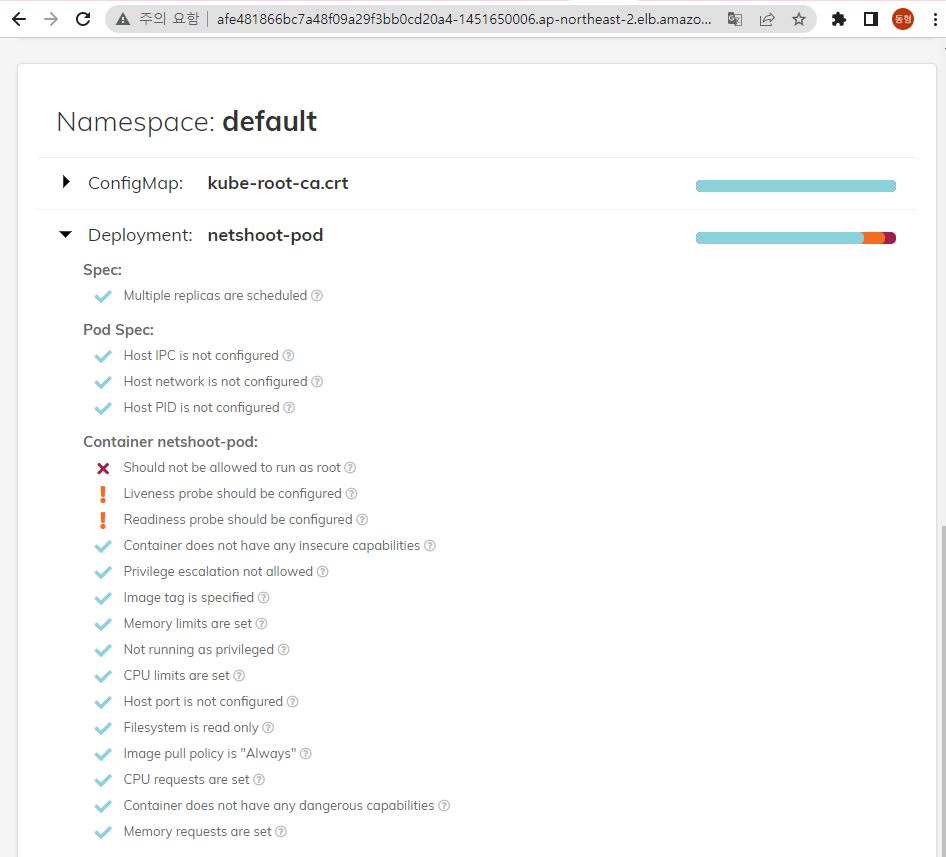
- netshoot-pod 에 보안 모범 사례 적용
# 삭제
kubectl delete deploy netshoot-pod

# netshoot-pod 생성
cat <<EOF | kubectl create -f -
apiVersion: apps/v1
kind: Deployment
metadata:
  name: netshoot-pod
spec:
  replicas: 2
  selector:
    matchLabels:
      app: netshoot-pod
  template:
    metadata:
      labels:
        app: netshoot-pod
    spec:
      containers:
      - name: netshoot-pod
        image: nicolaka/netshoot:v0.9
        command: ["tail"]
        args: ["-f", "/dev/null"]
        imagePullPolicy: Always
        resources:
          limits:
            cpu: 150m
            memory: 512Mi
          requests:
            cpu: 100m
            memory: 128Mi
        securityContext:
          allowPrivilegeEscalation: false
          capabilities:
            drop:
            - ALL
          privileged: false
          readOnlyRootFilesystem: true
          #runAsNonRoot: true
      terminationGracePeriodSeconds: 0
EOF
- 폴라리스 웹 확인! → 더 필요한 부분은 조치를 해보자
다음 실습을 위해 삭제
kubectl delete deploy netshoot-pod
webhook 활성화 후 테스트 - 링크
- webhook 활성화 적용
# webhook 활성화 적용
helm upgrade polaris fairwinds-stable/polaris --namespace polaris --version 5.7.2 --reuse-values --set webhook.enable=true

(somaz:N/A) [root@kops-ec2 ~]# helm upgrade polaris fairwinds-stable/polaris --namespace polaris --version 5.7.2 --reuse-values --set webhook.enable=true
Error: UPGRADE FAILED: [resource mapping not found for name: "polaris-cert" namespace: "" from "": no matches for kind "Certificate" in version "cert-manager.io/v1alpha1"
ensure CRDs are installed first, resource mapping not found for name: "polaris-selfsigned" namespace: "" from "": no matches for kind "Issuer" in version "cert-manager.io/v1alpha1"
ensure CRDs are installed first]

kubectl get pod,svc -n polaris

(somaz:N/A) [root@kops-ec2 ~]# kubectl get pod,svc -n polaris
NAME                                     READY   STATUS    RESTARTS   AGE
pod/polaris-dashboard-7898b46649-dq7dl   1/1     Running   0          30m

NAME                        TYPE           CLUSTER-IP     EXTERNAL-IP
                                             PORT(S)        AGE
service/polaris-dashboard   LoadBalancer   100.67.44.88   afe481866bc7a48f09a29f3bb0cd20a4-1451650006.ap-northeast-2.elb.amazonaws.com   80:32634/TCP   30m
- 취약한 파드 배포 시도
# netshoot-pod 1대 생성
cat <<EOF | kubectl create -f -
apiVersion: apps/v1
kind: Deployment
metadata:
  name: netshoot-pod
spec:
  replicas: 1
  selector:
    matchLabels:
      app: netshoot-pod
  template:
    metadata:
      labels:
        app: netshoot-pod
    spec:
      containers:
      - name: netshoot-pod
        image: nicolaka/netshoot
        command: ["tail"]
        args: ["-f", "/dev/null"]
      terminationGracePeriodSeconds: 0
EOF
IaC 활용 cli - 링크
# 다운로드
wget https://github.com/FairwindsOps/polaris/releases/download/7.3.2/polaris_linux_amd64.tar.gz
tar zxvf polaris_linux_amd64.tar.gz
mv polaris /usr/local/bin
polaris audit --help

# 마리오 파드 yaml 점검
polaris audit --audit-path ~/pkos/1/mario.yaml --format=pretty- (참고) Github Action 에 polaris actoin 수행 - 링크
- 다음 실습을 위해 polaris 삭제: **helm uninstall -n polaris polaris**
- 컨테이너 보안 컨텍스트 : 정리 예정 - 책 p590 - 링크
- 파드 보안 컨텍스트 : 정리 예정 - 책 p592 - 링크 링크2
K8S 인증/인가 & RBAC
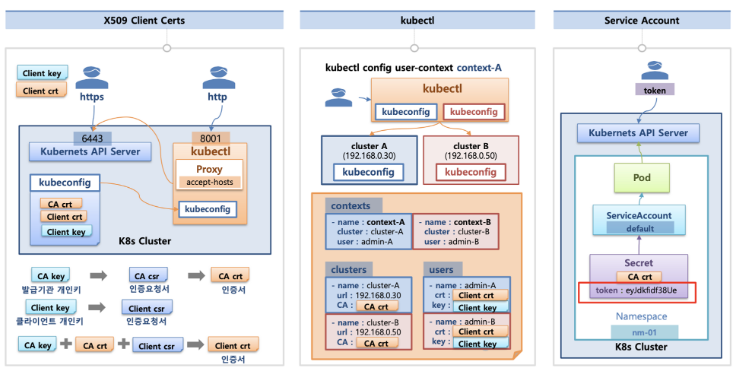
K8S(API 접근) 인증/인가 소개 : 출처 - 김태민 기술 블로그
- **서비스 어카운트(**Service Account)
- API 서버 사용 : kubectl(config, 다수 클러스터 관리 가능), 서비스 어카운트, https(x.509 Client Certs) ⇒ X.509 발음을 어떻게 하시나요? - 링크
- API 서버 접근 과정 : 인증 → 인가 → Admission Control(API 요청 검증, 필요 시 변형 - 예. ResourceQuota, LimitRange) - 참고

- 그림 중간 오타! Kubernets → Kubernetes
인증(Authentication)
- X.509 Client Certs : kubeconfig 에 CA crt(발급 기관 인증서) , Client crt(클라이언트 인증서) , Client key(클라이언트 개인키) 를 통해 인증
- kubectl : 여러 클러스터(kubeconfig)를 관리 가능 - contexts 에 클러스터와 유저 및 인증서/키 참고
- Service Account : 기본 서비스 어카운트(default) - 시크릿(CA crt 와 token)
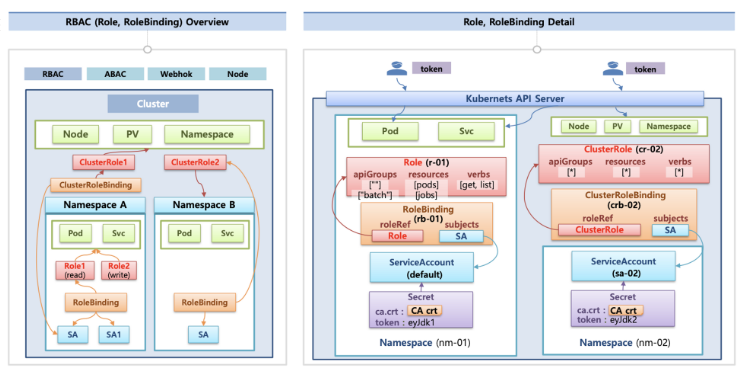
인가(Authorization)
- 인가 방식 : RBAC(Role, RoleBinding), ABAC, Webhook, Node Authorization⇒ RBAC 발음을 어떻게 하시나요?
- RBAC : 역할 기반의 권한 관리, 사용자와 역할을 별개로 선언 후 두가지를 조합(binding)해서 사용자에게 권한을 부여하여 kubectl or API로 관리 가능
- Namespace/Cluster - Role/ClusterRole, RoleBinding/ClusterRoleBinding, Service Account
- Role(롤) - (RoleBinding 롤 바인딩) - Service Account(서비스 어카운트) : 롤 바인딩은 롤과 서비스 어카운트를 연결
- Role(네임스페이스내 자원의 권한) vs ClusterRole(클러스터 수준의 자원의 권한)
`.kube/config` 파일 내용
- clusters : kubectl 이 사용할 쿠버네티스 API 서버의 접속 정보 목록. 원격의 쿠버네티스 API 서버의 주소를 추가해 사용 가능
- users : 쿠버네티스의 API 서버에 접속하기 위한 사용자 인증 정보 목록. (서비스 어카운트의 토큰, 혹은 인증서의 데이터 등)
- contexts : cluster 항목과 users 항목에 정의된 값을 조합해 최종적으로 사용할 쿠버네티스 클러스터의 정보(컨텍스트)를 설정.
- 예를 들어 clusters 항목에 클러스터 A,B 가 정의돼 있고, users 항목에 사용자 a,b 가 정의돼 있다면 cluster A + user a 를 조합해, 'cluster A 에 user a 로 인증해 쿠버네티스를 사용한다' 라는 새로운 컨텍스트를 정의할 수 있습니다.
- kubectl 을 사용하려면 여러 개의 컨텍스트 중 하나를 선택.
(somaz:N/A) [root@kops-ec2 ~]# cat ~/.kube/config
apiVersion: v1
clusters:
- cluster:
    certificate-authority-data: LS0tLS1CRUdJTiBDRVJUSUZJQ0FURS0tLS0tCk1JSUMrRENDQWVDZ0F3SUJBZ0lNRjBkW...
    server: https://api.somaz.link
  name: somaz.link
contexts:
- context:
    cluster: somaz.link
    user: somaz.link
  name: somaz.link
current-context: somaz.link
kind: Config
preferences: {}
users:
- name: somaz.link
  user:
    client-certificate-data: LS0tLS1CRUdJTiBDRVJUSUZJQ0FURS0tLS0tCk1JSURLRENDQWh....
    client-key-data: LS0tLS1CRUdJTiBSU0EgUFJJVkFURSBLRVktLS0tLQpNSUlFcEFJQkFBS0...

(somaz:N/A) [root@kops-ec2 ~]# kubectl ctx
somaz.link
실습환경

- 쿠버네티스에 사용자를 위한 서비스 어카운트(Service Account, SA)를 생성 : dev-k8s, infra-k8s
- 사용자는 각기 다른 권한(Role, 인가)을 가짐 : dev-k8s(dev-team 네임스페이스 내 모든 동작) , infra-k8s(dev-team 네임스페이스 내 모든 동작)
- 각각 별도의 kubectl 파드를 생성하고, 해당 파드에 SA 를 지정하여 권한에 대한 테스트를 진행
네임스페이스와 서비스 어카운트 생성 후 확인
- 파드 기동 시 서비스 어카운트 한 개가 할당되며, 서비스 어카운트 기반 인증/인가를 함, 미지정 시 기본 서비스 어카운트가 할당
- 서비스 어카운트에 자동 생성된 시크릿에 저장된 토큰으로 쿠버네티스 API에 대한 인증 정보로 사용 할 수 있다 ← 1.23 이전 버전의 경우에만 해당
# 네임스페이스(Namespace, NS) 생성 및 확인
kubectl create namespace dev-team
kubectl create ns infra-team

# 네임스페이스 확인
kubectl get ns

(somaz:N/A) [root@kops-ec2 ~]# kubectl get ns
NAME              STATUS   AGE
default           Active   108m
dev-team          Active   4s
infra-team        Active   4s
...

# 네임스페이스에 각각 서비스 어카운트 생성 : serviceaccounts 약자(=sa)
kubectl create sa dev-k8s -n dev-team
kubectl create sa infra-k8s -n infra-team

(somaz:N/A) [root@kops-ec2 ~]# kubectl create sa dev-k8s -n dev-team
serviceaccount/dev-k8s created
(somaz:N/A) [root@kops-ec2 ~]# kubectl create sa infra-k8s -n infra-team
serviceaccount/infra-k8s created

# 서비스 어카운트 정보 확인
kubectl get sa -n dev-team
kubectl get sa dev-k8s -n dev-team -o yaml | yh

(somaz:N/A) [root@kops-ec2 ~]# kubectl get sa -n dev-team
NAME      SECRETS   AGE
default   0         34s
dev-k8s   0         12s

kubectl get sa -n infra-team
kubectl get sa infra-k8s -n infra-team -o yaml | yh

(somaz:N/A) [root@kops-ec2 ~]# kubectl get sa -n infra-team
NAME        SECRETS   AGE
default     0         57s
infra-k8s   0         32s
(심화 참고) dev-k8s 서비스어카운트의 토큰 정보 확인 - https://jwt.io/ → Bearer type - JWT(JSON Web Token) - 링크

# dev-k8s 서비스어카운트의 토큰 정보 확인
DevTokenName=$(kubectl get sa dev-k8s -n dev-team -o jsonpath="{.secrets[0].name}")
DevToken=$(kubectl get secret -n dev-team $DevTokenName -o jsonpath="{.data.token}" | base64 -d)
echo $DevToken
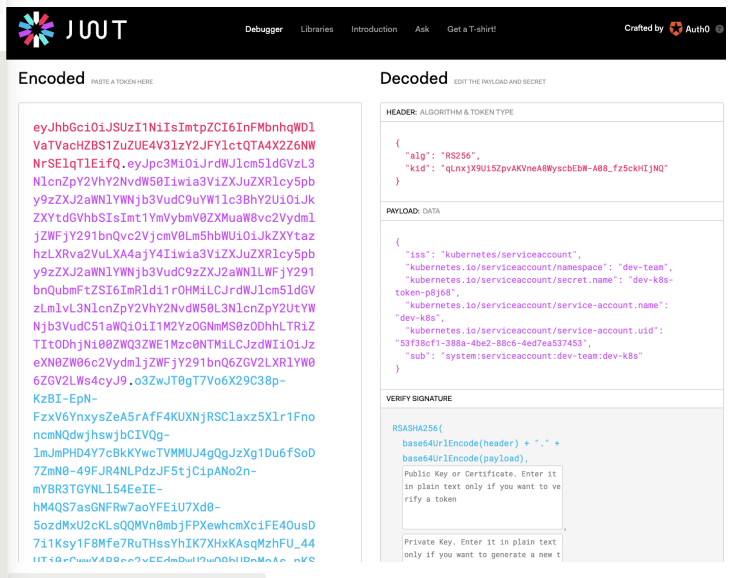
Bearer type - JWT(JSON Web Token)
- Bearer type 경우, 서버에서 지정한 어떠한 문자열도 입력할 수 있습니다. 하지만 굉장히 허술한 느낌을 받습니다.
- 이를 보완하고자 쿠버네티스에서 Bearer 토큰을 전송할 때 주로 JWT (JSON Web Token) 토큰을 사용합니다.
- JWT는 X.509 Certificate와 마찬가지로 private key를 이용하여 토큰을 서명하고 public key를 이용하여 서명된 메세지를 검증합니다.
- 이러한 메커니즘을 통해 해당 토큰이 쿠버네티스를 통해 생성된 valid한 토큰임을 인증할 수 있습니다.
- X.509 Certificate의 lightweight JSON 버전이라고 생각하면 편리합니다.
- jwt는 JSON 형태로 토큰 형식을 정의한 스펙입니다. jwt는 쿠버네티스에서 뿐만 아니라 다양한 웹 사이트에서 인증, 권한 허가, 세션관리 등의 목적으로 사용합니다.
- Header: 토큰 형식와 암호화 알고리즘을 선언합니다.
- Payload: 전송하려는 데이터를 JSON 형식으로 기입합니다.
- Signature: Header와 Payload의 변조 가능성을 검증합니다.
- 각 파트는 base64 URL 인코딩이 되어서 .으로 합쳐지게 됩니다.
서비스 어카운트를 지정하여 파드 생성 후 권한 테스트

# 각각 네임스피이스에 kubectl 파드 생성 - 컨테이너이미지
# docker run --rm --name kubectl -v /path/to/your/kube/config:/.kube/config bitnami/kubectl:latest
cat <<EOF | kubectl create -f -
apiVersion: v1
kind: Pod
metadata:
  name: dev-kubectl
  namespace: dev-team
spec:
  serviceAccountName: dev-k8s
  containers:
  - name: kubectl-pod
    image: bitnami/kubectl:1.24.10
    command: ["tail"]
    args: ["-f", "/dev/null"]
  terminationGracePeriodSeconds: 0
EOF

cat <<EOF | kubectl create -f -
apiVersion: v1
kind: Pod
metadata:
  name: infra-kubectl
  namespace: infra-team
spec:
  serviceAccountName: infra-k8s
  containers:
  - name: kubectl-pod
    image: bitnami/kubectl:1.24.10
    command: ["tail"]
    args: ["-f", "/dev/null"]
  terminationGracePeriodSeconds: 0
EOF

# 확인
kubectl get pod -A
kubectl get pod -o dev-kubectl -n dev-team -o yaml
 serviceAccount: dev-k8s
 ...
kubectl get pod -o infra-kubectl -n infra-team -o yaml
 serviceAccount: infra-k8s
...

# 파드에 기본 적용되는 서비스 어카운트(토큰) 정보 확인
kubectl exec -it dev-kubectl -n dev-team -- ls /run/secrets/kubernetes.io/serviceaccount
kubectl exec -it dev-kubectl -n dev-team -- cat /run/secrets/kubernetes.io/serviceaccount/token
kubectl exec -it dev-kubectl -n dev-team -- cat /run/secrets/kubernetes.io/serviceaccount/namespace
kubectl exec -it dev-kubectl -n dev-team -- cat /run/secrets/kubernetes.io/serviceaccount/ca.crt

# 각각 파드로 Shell 접속하여 정보 확인 : 단축 명령어(alias) 사용
alias k1='kubectl exec -it dev-kubectl -n dev-team -- kubectl'
alias k2='kubectl exec -it infra-kubectl -n infra-team -- kubectl'

# 권한 테스트
k1 get pods # kubectl exec -it dev-kubectl -n dev-team -- kubectl get pods 와 동일한 실행 명령이다!
k1 run nginx --image nginx:1.20-alpine
k1 get pods -n kube-system

(somaz:N/A) [root@kops-ec2 ~]# k1 get pods
Error from server (Forbidden): pods is forbidden: User "system:serviceaccount:dev-team:dev-k8s" cannot list resource "pods" in API group "" in the namespace "dev-team"
command terminated with exit code 1

k2 get pods # kubectl exec -it infra-kubectl -n infra-team -- kubectl get pods 와 동일한 실행 명령이다!
k2 run nginx --image nginx:1.20-alpine
k2 get pods -n kube-system

# (옵션) kubectl auth can-i 로 kubectl 실행 사용자가 특정 권한을 가졌는지 확인
k1 auth can-i get pods
no

(somaz:N/A) [root@kops-ec2 ~]# k1 auth can-i get pods
no
command terminated with exit code 1
각각 네임스페이스에 롤(Role)를 생성 후 서비스 어카운트 바인딩
- 롤(Role) : apiGroups 와 resources 로 지정된 리소스에 대해 verbs 권한을 인가
- 실행 가능한 조작(verbs) : *(모두 처리), create(생성), delete(삭제), get(조회), list(목록조회), patch(일부업데이트), update(업데이트), watch(변경감시)

# 각각 네임스페이스내의 모든 권한에 대한 롤 생성
cat <<EOF | kubectl create -f -
apiVersion: rbac.authorization.k8s.io/v1
kind: Role
metadata:
  name: role-dev-team
  namespace: dev-team
rules:
- apiGroups: ["*"]
  resources: ["*"]
  verbs: ["*"]
EOF

cat <<EOF | kubectl create -f -
apiVersion: rbac.authorization.k8s.io/v1
kind: Role
metadata:
  name: role-infra-team
  namespace: infra-team
rules:
- apiGroups: ["*"]
  resources: ["*"]
  verbs: ["*"]
EOF

# 롤 확인
kubectl get roles -n dev-team
kubectl get roles -n infra-team

(somaz:N/A) [root@kops-ec2 ~]# kubectl get roles -n dev-team
NAME            CREATED AT
role-dev-team   2023-02-26T12:34:27Z
(somaz:N/A) [root@kops-ec2 ~]# kubectl get roles -n infra-team
NAME              CREATED AT
role-infra-team   2023-02-26T12:34:33Z

kubectl get roles -n dev-team -o yaml
kubectl describe roles role-dev-team -n dev-team
...
PolicyRule:
  Resources  Non-Resource URLs  Resource Names  Verbs
  ---------  -----------------  --------------  -----
  *.*        []                 []              [*]

# 롤바인딩 생성 : '서비스어카운트 <-> 롤' 간 서로 연동
cat <<EOF | kubectl create -f -
apiVersion: rbac.authorization.k8s.io/v1
kind: RoleBinding
metadata:
  name: roleB-dev-team
  namespace: dev-team
roleRef:
  apiGroup: rbac.authorization.k8s.io
  kind: Role
  name: role-dev-team
subjects:
- kind: ServiceAccount
  name: dev-k8s
  namespace: dev-team
EOF

cat <<EOF | kubectl create -f -
apiVersion: rbac.authorization.k8s.io/v1
kind: RoleBinding
metadata:
  name: roleB-infra-team
  namespace: infra-team
roleRef:
  apiGroup: rbac.authorization.k8s.io
  kind: Role
  name: role-infra-team
subjects:
- kind: ServiceAccount
  name: infra-k8s
  namespace: infra-team
EOF

# 롤바인딩 확인
kubectl get rolebindings -n dev-team
kubectl get rolebindings -n infra-team

(somaz:N/A) [root@kops-ec2 ~]# kubectl get rolebindings -n dev-team
NAME             ROLE                 AGE
roleB-dev-team   Role/role-dev-team   5s

(somaz:N/A) [root@kops-ec2 ~]# kubectl get rolebindings -n infra-team
NAME               ROLE                   AGE
roleB-infra-team   Role/role-infra-team   20s

kubectl get rolebindings -n dev-team -o yaml
kubectl describe rolebindings roleB-dev-team -n dev-team
...
Role:
  Kind:  Role
  Name:  role-dev-team
Subjects:
  Kind            Name     Namespace
  ----            ----     ---------
  ServiceAccount  dev-k8s  dev-team
서비스 어카운트를 지정하여 생성한 파드에서 다시 권한 테스트
# 각각 파드로 Shell 접속하여 정보 확인 : 단축 명령어(alias) 사용
alias k1='kubectl exec -it dev-kubectl -n dev-team -- kubectl'
alias k2='kubectl exec -it infra-kubectl -n infra-team -- kubectl'

# 권한 테스트
k1 get pods

(somaz:N/A) [root@kops-ec2 ~]# k1 get pods
NAME          READY   STATUS    RESTARTS   AGE
dev-kubectl   1/1     Running   0          5m50s

k1 run nginx --image nginx:1.20-alpine
k1 get pods

(somaz:N/A) [root@kops-ec2 ~]# k1 get pods
NAME          READY   STATUS    RESTARTS   AGE
dev-kubectl   1/1     Running   0          6m13s
nginx         1/1     Running   0          10s

k1 delete pods nginx
k1 get pods -n kube-system

(somaz:N/A) [root@kops-ec2 ~]# k1 get pods -n kube-system
Error from server (Forbidden): pods is forbidden: User "system:serviceaccount:dev-team:dev-k8s" cannot list resource "pods" in API group "" in the namespace "kube-system"
command terminated with exit code 1

k1 get nodes

(somaz:N/A) [root@kops-ec2 ~]# k1 get nodes
Error from server (Forbidden): nodes is forbidden: User "system:serviceaccount:dev-team:dev-k8s" cannot list resource "nodes" in API group "" at the cluster scope
command terminated with exit code 1

k2 get pods
k2 run nginx --image nginx:1.20-alpine
k2 get pods
k2 delete pods nginx
k2 get pods -n kube-system
k2 get nodes

# (옵션) kubectl auth can-i 로 kubectl 실행 사용자가 특정 권한을 가졌는지 확인
k1 auth can-i get pods
yes

(somaz:N/A) [root@kops-ec2 ~]# k1 auth can-i get pods
yes- 리소스 삭제 : `kubectl delete ns dev-team infra-team`
스터디 7주차 후기
이번 7주차 스터디에서는 쿠버네티스의 보안 영역에 대해 집중적으로 학습했다.
사실 보안은 평소 실무에서 손대기 어려운 주제였는데, 이번 기회를 통해 구체적으로 배우게 되어 뜻깊었다.
실습을 진행하면서 IAM Role을 파드에서 활용하는 과정, Kubescape로 클러스터 취약점을 분석해보는 경험,
Polaris 대시보드를 통해 자원 설정을 점검하는 흐름 모두가 유익했고, 실제로 운영 환경에 바로 적용할 수 있을 것 같았다.
무엇보다도 RBAC(Role-Based Access Control) 기반의 인증/인가 설정은
Kubernetes 보안을 제대로 다루기 위한 핵심 개념이라는 점을 체감하게 되었다.
그리고 어느덧 스터디도 마지막 주차를 맞이하게 되었는데,
처음 시작할 때는 걱정도 많았지만, 지금은 '참여하길 정말 잘했다'는 생각뿐이다.
스터디를 정성껏 이끌어주신 가시다님, 함께 열심히 참여하신 스터디원분들 모두 고생 많으셨습니다.
혹시 다음에 테라폼 스터디가 열리게 된다면, 꼭 다시 함께하고 싶다.
'교육, 커뮤니티 후기 > PKOS 쿠버네티스 스터디' 카테고리의 다른 글
| PKOS 쿠버네티스 스터디 6주차 - 얼럿매니저 로깅시스템 (0) | 2023.02.19 |
|---|---|
| PKOS 쿠버네티스 스터디 5주차 - 프로메테우스 그라파나 (0) | 2023.02.14 |
| PKOS 쿠버네티스 스터디 4주차 - Harbor Gitlab Argocd (2) | 2023.02.06 |
| PKOS 쿠버네티스 스터디 3주차 - Ingress & Storage (4) | 2023.02.03 |
| PKOS 쿠버네티스 스터디 2주차 - 쿠버네티스 네트워크 (0) | 2023.01.16 |