Overview
가시다님이 진행하시는 쿠버네티스 스터디 4주차가 되었다.
이번 주는 온프레미스 환경에서의 지속적인 배포 인프라 구축을 주제로, Harbor, GitLab, ArgoCD에 대해 학습하고 실습하는 시간을 가졌다.
- Harbor를 이용한 프라이빗 이미지 저장소 구축 및 이미지 업로드/다운로드 실습
- GitLab을 통한 로컬 소스 저장소 구성 및 파일 업로드 실습
- ArgoCD를 활용한 GitOps 기반 애플리케이션 배포 실습
- Git 저장소의 변경 사항을 실시간으로 감지 및 동기화하는 방식에 대해 이해
- ArgoCD UI 및 CLI를 통한 애플리케이션 상태 관리와 재배포 실습까지 경험
실습은 교재 "24단계 실습으로 정복하는 쿠버네티스" 를 바탕으로 진행되었으며, 실제 동작 확인과 리소스 상태를 세세하게 확인하며 진행해보았다.
4주차 과제의 목표는 아래와 같다.
- 온프레미스 쿠버네티스 환경의 애플리케이션을 배포하는 데 필요한 인프라, 파이프라인 - 애플리케이션을 배포하는 지속적인 배포 시스템

- 참고 링크
4주차 과제 내용
[과제1]
Harbor 에 자신만의 아무 이미지나 태그해서 업로그하고 다운로드 해보고, 관련 스샷 올려주세요
# 이미지 다운로드
(somaz:default) [root@kops-ec2 ~]# sudo docker pull hello-world
Using default tag: latest
latest: Pulling from library/hello-world
2db29710123e: Pull complete
Digest: sha256:aa0cc8055b82dc2509bed2e19b275c8f463506616377219d9642221ab53cf9fe
Status: Downloaded newer image for hello-world:latest
docker.io/library/hello-world:latest

# 이미지 확인
(somaz:default) [root@kops-ec2 ~]# docker images |grep hello-world
hello-world                          latest    feb5d9fea6a5   16 months ago   13.3kB

# tagging
(somaz:default) [root@kops-ec2 ~]# docker tag hello-world harbor.$KOPS_CLUSTER_NAME/pkos/hello-world:somaz

# tagging 이미지 확인
(somaz:default) [root@kops-ec2 ~]# docker images |grep hello-world
hello-world                          latest    feb5d9fea6a5   16 months ago   13.3kB
harbor.somaz.link/pkos/hello-world   somaz     feb5d9fea6a5   16 months ago   13.3kB

# harbor 로그인
(somaz:default) [root@kops-ec2 ~]# docker login harbor.$KOPS_CLUSTER_NAME -u admin -p Harbor12345
WARNING! Using --password via the CLI is insecure. Use --password-stdin.
WARNING! Your password will be stored unencrypted in /root/.docker/config.json.
Configure a credential helper to remove this warning. See
https://docs.docker.com/engine/reference/commandline/login/#credentials-store

Login Succeeded

# harbor 업로드
(somaz:default) [root@kops-ec2 ~]# docker push harbor.$KOPS_CLUSTER_NAME/pkos/hello-world:so
maz
The push refers to repository [harbor.somaz.link/pkos/hello-world]
e07ee1baac5f: Pushed
somaz: digest: sha256:f54a58bc1aac5ea1a25d796ae155dc228b3f0e11d046ae276b39c4bf2f13d8c4 size: 525
[과제2]
자신만의 텍스트 파일을 로컬에서 Gitlab 에 올려보고, 관련 스샷 올려주세요
gitlab token `glpat-y1UZqMcZhxZrUu447yyy`
# 테스트 파일 생성 후 이동
(somaz:default) [root@kops-ec2 ~]# mkdir ~/gitlab-test2 && cd ~/gitlab-test2


# git 계정 정보 확인 및 global 계정 정보 입력
(somaz:default) [root@kops-ec2 gitlab-test2]# git config --global user.name "somaz"
(somaz:default) [root@kops-ec2 gitlab-test2]# git config --global user.email "genius5711@gmail.com"

(somaz:default) [root@kops-ec2 gitlab-test2]# git config --list
user.name=somaz
user.email=genius5711@gmail.com


(somaz:default) [root@kops-ec2 gitlab-test2]# git clone https://gitlab.$KOPS_CLUSTER_NAME/somaz/test-stg.git
Cloning into 'test-stg'...
Username for 'https://gitlab.somaz.link': somaz
Password for 'https://somaz@gitlab.somaz.link': <토큰 입력>
remote: Enumerating objects: 62, done.
remote: Counting objects: 100% (62/62), done.
remote: Compressing objects: 100% (58/58), done.
remote: Total 62 (delta 13), reused 0 (delta 0), pack-reused 0
Receiving objects: 100% (62/62), 67.43 KiB | 8.43 MiB/s, done.
Resolving deltas: 100% (13/13), done.

# 이동
(somaz:default) [root@kops-ec2 gitlab-test2]# ls -al test-stg && cd test-stg
total 12
drwxr-xr-x 4 root root   67 Feb  5 23:03 .
drwxr-xr-x 3 root root   22 Feb  5 23:02 ..
drwxr-xr-x 8 root root  163 Feb  5 23:03 .git
drwxr-xr-x 4 root root  176 Feb  5 23:03 rabbitmq
-rw-r--r-- 1 root root 6203 Feb  5 23:03 README.md
-rw-r--r-- 1 root root   17 Feb  5 23:03 test.txt
(somaz:default) [root@kops-ec2 test-stg]#

# 파일 생성 및 깃 업로드(push) : 웹에서 확인
(somaz:default) [root@kops-ec2 test-stg]# echo "gitlab test memo by somaz" >> test2.txt

(somaz:default) [root@kops-ec2 test-stg]# git add . && git commit -m "initial commit - add test2.txt"
[main 35e016d] initial commit - add test2.txt
 1 file changed, 1 insertion(+)
 create mode 100644 test2.txt

(somaz:default) [root@kops-ec2 test-stg]# git push
Username for 'https://gitlab.somaz.link': somaz
Password for 'https://somaz@gitlab.somaz.link': <토큰 입력>
Enumerating objects: 4, done.
Counting objects: 100% (4/4), done.
Delta compression using up to 2 threads
Compressing objects: 100% (2/2), done.
Writing objects: 100% (3/3), 303 bytes | 303.00 KiB/s, done.
Total 3 (delta 1), reused 0 (delta 0), pack-reused 0
To https://gitlab.somaz.link/somaz/test-stg.git
   1f91800..35e016d  main -> main
[과제3]
ArgoCD 챕터인, 책 273페이지의 ‘Gitops 실습: 클러스터 설정 내역 변경과 깃 저장소 자동 반영’을 직접 스스로 실습해보고, 관련 스샷 올려주세요.
argocd 암호 : `coKNPy2pSpjejHCJ`
1. 클러스터 설정 내역 변경
소스 가져와서 gitlab에 올리기
# 해당 교재의 소스 코드 git clone
(somaz:default) [root@kops-ec2 ~]# git clone https://github.com/wikibook/kubepractice.git

# 로걸 깃랩 리포지토리와 연동된 디렉토리로 이동
(somaz:default) [root@kops-ec2 ~]# cd ~/gitlab-test/test-stg/

# httpd 매니페스트 파일 관리를 위해 03.httpd 디렉토리를 생성 후 이동
(somaz:default) [root@kops-ec2 test-stg]# mkdir 03.httpd && cd 03.httpd/

# 파일 복사
(somaz:default) [root@kops-ec2 03.httpd]# cp ~/kubepractice/ch15/httpd-deploy.yml .
(somaz:default) [root@kops-ec2 03.httpd]# cp ~/kubepractice/ch15/httpd-nodeport-svc.yml .

# 깃 commit 후 push
(somaz:default) [root@kops-ec2 03.httpd]# git add . && git commit -m "add httpd manifest"
[main c19e154] add httpd manifest
 2 files changed, 35 insertions(+)
 create mode 100644 03.httpd/httpd-deploy.yml
 create mode 100644 03.httpd/httpd-nodeport-svc.yml

(somaz:default) [root@kops-ec2 03.httpd]# git push
Username for 'https://gitlab.somaz.link': somaz
Password for 'https://somaz@gitlab.somaz.link':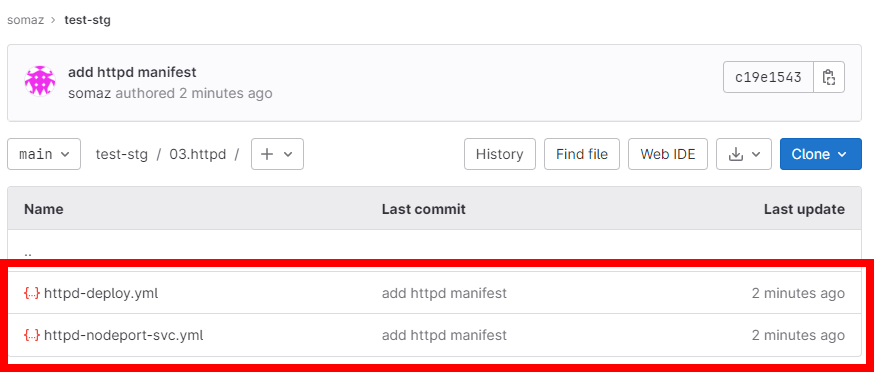
argocd login / repo 등록 / yaml 파일 배포 후 sync 확인
# Application crd  소스코드 복사
(somaz:default) [root@kops-ec2 03.httpd]# cd ~
(somaz:default) [root@kops-ec2 ~]# cp ~/kubepractice/ch15/httpd-directory-argo-application.yml .

(somaz:default) [root@kops-ec2 ~]# k apply -f httpd-directory-argo-application.yml
application.argoproj.io/httpd created

# argocd login
(somaz:default) [root@kops-ec2 ~]# argocd login $CLB --username admin --password $ARGOPW
WARNING: server certificate had error: x509: certificate is valid for localhost, argocd-server, argocd-server.argocd, argocd-server.argocd.svc, argocd-server.argocd.svc.cluster.local, not afa76b9f8887c4de9bfc333b2a984f53-699372018.ap-northeast-2.elb.amazonaws.com. Proceed insecurely (y/n)? y
'admin:login' logged in successfully
Context 'afa76b9f8887c4de9bfc333b2a984f53-699372018.ap-northeast-2.elb.amazonaws.com' updated

# arogcd 레포 등록
(somaz:default) [root@kops-ec2 ~]# argocd repo add https://gitlab.$KOPS_CLUSTER_NAME/somaz/test-stg.git --username somaz --password <비밀번호>
Repository 'https://gitlab.somaz.link/somaz/test-stg.git' added

# argocd 레포 확인
(somaz:default) [root@kops-ec2 ~]# argocd repo list
TYPE  NAME  REPO                                          INSECURE  OCI    LFS    CREDS  STATUS      MESSAGE  PROJECT
git         https://gitlab.somaz.link/somaz/test-stg.git  false     false  false  true   Successful

# argocd 클러스터 확인
(somaz:default) [root@kops-ec2 ~]# argocd cluster list
SERVER                          NAME        VERSION  STATUS      MESSAGE  PROJECT
https://kubernetes.default.svc  in-cluster  1.24     Successful

# 배포전 httpd-directory-argo-application.yml 파일 수정
(somaz:default) [root@kops-ec2 ~]# vi httpd-directory-argo-application.yml
...
  source:
    repoURL: https://gitlab.somaz.link/somaz/test-stg.git
    path: 03.httpd

 # 배포
(somaz:default) [root@kops-ec2 ~]# k apply -f httpd-directory-argo-application.yml
application.argoproj.io/httpd created

# sync 확인
(somaz:default) [root@kops-ec2 ~]# k get application -n argocd
NAME    SYNC STATUS   HEALTH STATUS
httpd   Synced        Healthy

# pod 확인
(somaz:default) [root@kops-ec2 ~]# k get po,svc -n httpd
NAME                         READY   STATUS    RESTARTS   AGE
pod/httpd-676d9bc46d-4kjgw   1/1     Running   0          42s
pod/httpd-676d9bc46d-mznbm   1/1     Running   0          42s
pod/httpd-676d9bc46d-tkw2k   1/1     Running   0          42s

NAME                TYPE       CLUSTER-IP       EXTERNAL-IP   PORT(S)        AGE
service/httpd-svc   NodePort   100.68.231.219   <none>        80:30180/TCP   42s
httpd 이미지 변경 후 argocd와 sync 확인
# 이미지 변경
(somaz:httpd) [root@kops-ec2 ~]# k edit deployments.apps httpd
...
    spec:
      containers:
      - image: httpd:alpine
        imagePullPolicy: Always
        name: httpd
...
deployment.apps/httpd edited

# pod 확인
(somaz:httpd) [root@kops-ec2 ~]# k get po
NAME                     READY   STATUS    RESTARTS   AGE
httpd-6bd6458855-m7f4t   1/1     Running   0          42s
httpd-6bd6458855-q69s8   1/1     Running   0          36s
httpd-6bd6458855-vxw6j   1/1     Running   0          49s


# Event 확인
(somaz:httpd) [root@kops-ec2 ~]# k describe po httpd-6bd6458855-m7f4t |grep Events -A6
Events:
  Type    Reason     Age   From               Message
  ----    ------     ----  ----               -------
  Normal  Scheduled  77s   default-scheduler  Successfully assigned httpd/httpd-6bd6458855-m7f4t to i-0f9a4cd6277fafffd
  Normal  Pulling    77s   kubelet            Pulling image "httpd:alpine"
  Normal  Pulled     72s   kubelet            Successfully pulled image "httpd:alpine" in 4.441302144s
  Normal  Created    72s   kubelet            Created container httpd
# argocd 상태 보기
(somaz:httpd) [root@kops-ec2 ~]# k get application -n argocd
NAME    SYNC STATUS   HEALTH STATUS
httpd   OutOfSync     Healthy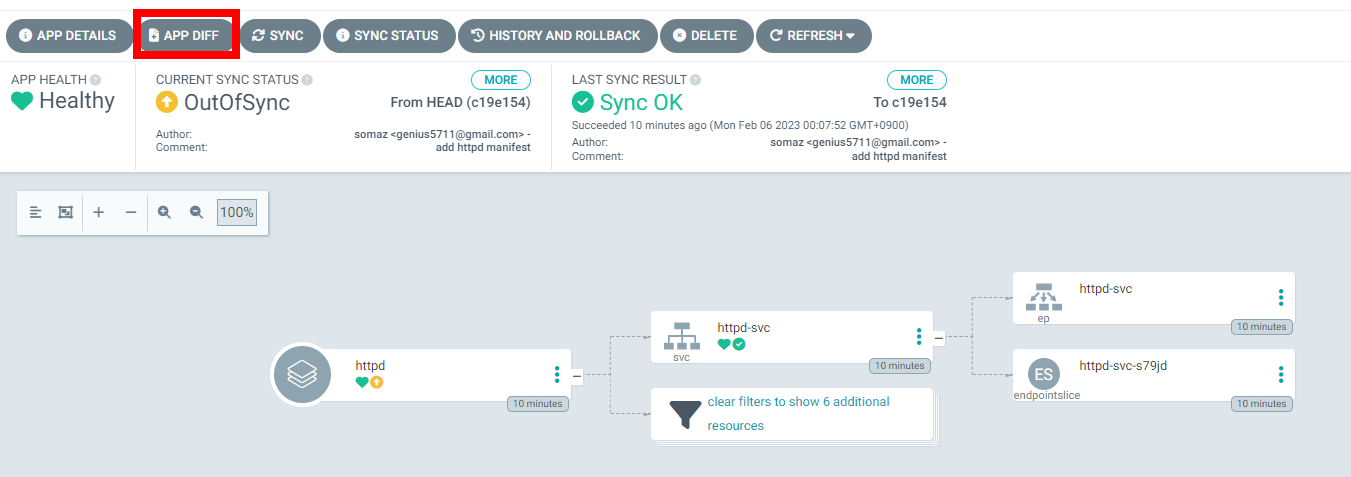

httpd-svc 서비스 삭제 후 argocd 확인
# httpd 서비스 삭제
(somaz:httpd) [root@kops-ec2 ~]# k get svc
NAME        TYPE       CLUSTER-IP       EXTERNAL-IP   PORT(S)        AGE
httpd-svc   NodePort   100.68.231.219   <none>        80:30180/TCP   11m

(somaz:httpd) [root@kops-ec2 ~]# k delete svc httpd-svc
service "httpd-svc" deleted
argocd 에서 sync 하여 gitlab 저장소 동기화

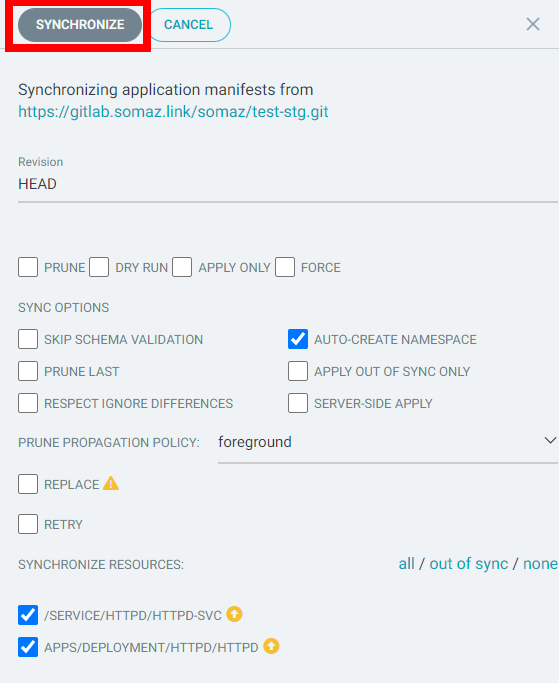

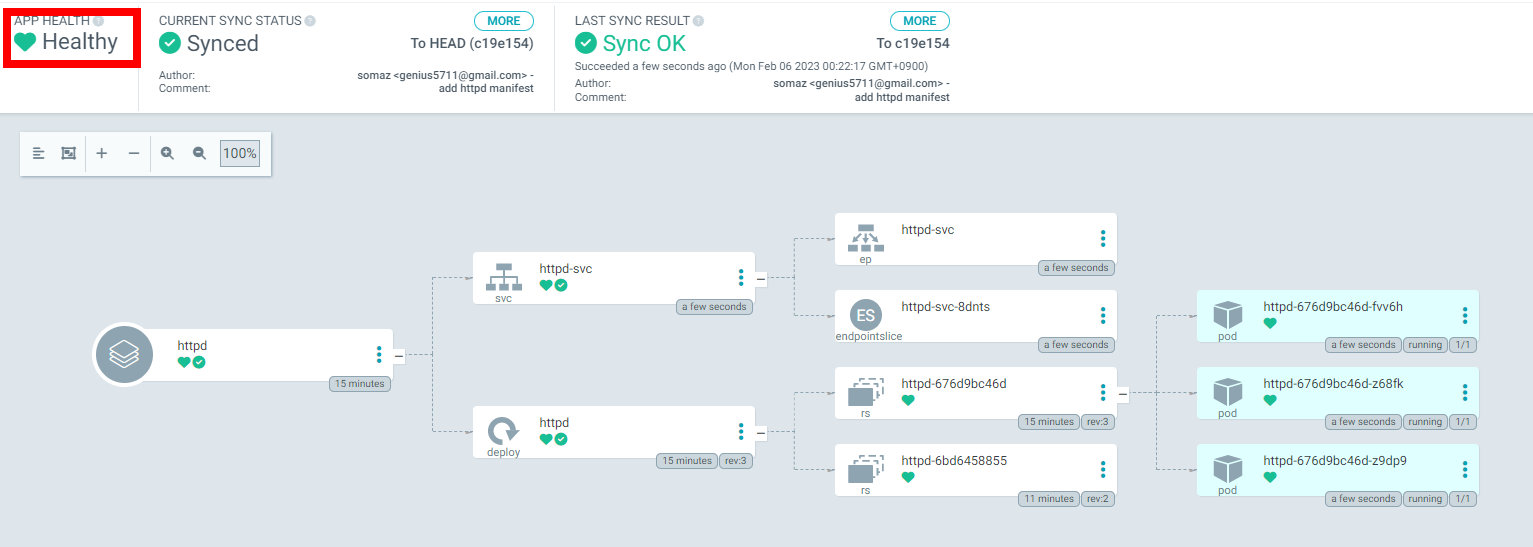
(somaz:httpd) [root@kops-ec2 ~]# k get svc
NAME        TYPE       CLUSTER-IP      EXTERNAL-IP   PORT(S)        AGE
httpd-svc NodePort 100.70.52.195 <none> 80:30180/TCP 65s- service pod가 다시 생성되었다!
2. 깃 저장소 라이브 반영
httpd 재배포
(somaz:httpd) [root@kops-ec2 ~]# k ns httpd
Context "somaz.link" modified.
Active namespace is "httpd".

(somaz:default) [root@kops-ec2 ~]# k delete -f httpd-directory-argo-application.yml

(somaz:argocd) [root@kops-ec2 ~]# k apply -f httpd-directory-argo-application.yml
application.argoproj.io/httpd created

(somaz:httpd) [root@kops-ec2 ~]# k get svc
NAME        TYPE       CLUSTER-IP      EXTERNAL-IP   PORT(S)        AGE
httpd-svc   NodePort   100.70.52.195   <none>        80:30180/TCP   4m37s

(somaz:httpd) [root@kops-ec2 ~]# cd ~/gitlab-test/test-stg/03.httpd/

(somaz:httpd) [root@kops-ec2 03.httpd]# ls
httpd-deploy.yml  httpd-nodeport-svc.yml

(somaz:httpd) [root@kops-ec2 03.httpd]# mv httpd-nodeport-svc.yml httpd-clusterip-svc.yaml

(somaz:httpd) [root@kops-ec2 03.httpd]# vi httpd-clusterip-svc.yaml
...
  selector:
    app: httpd
  type: ClusterIP
...

(somaz:httpd) [root@kops-ec2 03.httpd]# git add . && git commit -m "modify httpd-clusterip-s
vc service type to ClusterIP"
[main aad0e86] modify httpd-clusterip-svc service type to ClusterIP
 1 file changed, 1 insertion(+), 1 deletion(-)
 rename 03.httpd/{httpd-nodeport-svc.yml => httpd-clusterip-svc.yaml} (91%)

(somaz:httpd) [root@kops-ec2 03.httpd]# git push
Username for 'https://gitlab.somaz.link': somaz
Password for 'https://somaz@gitlab.somaz.link':


(somaz:httpd) [root@kops-ec2 03.httpd]# k get svc
NAME        TYPE        CLUSTER-IP      EXTERNAL-IP   PORT(S)   AGE
httpd-svc   ClusterIP   100.70.52.195   <none>        80/TCP    10m
스터디 주요내용
실습 환경 배포
실습 환경
kops 인스턴스 t3.small & 노드 c5.2xlarge (vCPU 8, Memory 16GiB) 배포
이번주 실습에서 성능을 요구하는 파드를 사용한다.
- Tip. 실행하는 PC에 aws cli 설치되어 있고, aws configure 자격증명 설정 상태.
# YAML 파일 다운로드
curl -O https://s3.ap-northeast-2.amazonaws.com/cloudformation.cloudneta.net/K8S/kops-oneclick.yaml

# CloudFormation 스택 배포 : 노드 인스턴스 타입 변경 - MasterNodeInstanceType=c5d.large WorkerNodeInstanceType=c5d.large
aws cloudformation deploy --template-file kops-oneclick.yaml --stack-name mykops --parameter-overrides KeyName=somazkey SgIngressSshCidr=$(curl -s ipinfo.io/ip)/32  MyIamUserAccessKeyID=AKIA5... MyIamUserSecretAccessKey='CVNa2...' ClusterBaseName='somaz.link' S3StateStore='somaz-k8s-s3' MasterNodeInstanceType=c5.2xlarge WorkerNodeInstanceType=c5.2xlarge --region ap-northeast-2

# CloudFormation 스택 배포 완료 후 kOps EC2 IP 출력
aws cloudformation describe-stacks --stack-name mykops --query 'Stacks[*].Outputs[0].OutputValue' --output text

# 마스터노드 SSH 접속
ssh -i ~/.ssh/somazkey.pem ec2-user@$(aws cloudformation describe-stacks --stack-name mykops --query 'Stacks[*].Outputs[0].OutputValue' --output text)
kops 인스턴스 t3.small : 도커 엔진 확인
# default NS 진입
(somaz:N/A) [root@kops-ec2 ~]# kubectl ns default
Context "somaz.link" modified.
Active namespace is "default".

# 설치된 패키지 확인 : 도커 엔진 확인
(somaz:default) [root@kops-ec2 ~]# rpm -qa |grep docker
docker-20.10.17-1.amzn2.0.2.x86_64

# 도커 정보 확인 : client - server, Docker Root Dir, Registry
(somaz:default) [root@kops-ec2 ~]# docker info

# 도커 정보 확인 : Docker Engine - Community
docker version

# 도커 서비스 상태 확인
systemctl status docker

# 모든 서비스의 상태 표시 - 링크
systemctl list-units --type=service

# 도커 루트 디렉터리 확인
tree -L 3 /var/lib/docker
EC2 instance profiles 설정 및 AWS LoadBalancer 배포 & ExternalDNS 설치 및 배포
# EC2 instance profiles 에 IAM Policy 추가(attach)
aws iam attach-role-policy --policy-arn arn:aws:iam::$ACCOUNT_ID:policy/AWSLoadBalancerControllerIAMPolicy --role-name masters.$KOPS_CLUSTER_NAME
aws iam attach-role-policy --policy-arn arn:aws:iam::$ACCOUNT_ID:policy/AWSLoadBalancerControllerIAMPolicy --role-name nodes.$KOPS_CLUSTER_NAME
aws iam attach-role-policy --policy-arn arn:aws:iam::$ACCOUNT_ID:policy/AllowExternalDNSUpdates --role-name masters.$KOPS_CLUSTER_NAME
aws iam attach-role-policy --policy-arn arn:aws:iam::$ACCOUNT_ID:policy/AllowExternalDNSUpdates --role-name nodes.$KOPS_CLUSTER_NAME

 kOps 클러스터 편집 : 아래 내용 추가
kops edit cluster
-----
spec:
  certManager:
    enabled: true
  awsLoadBalancerController:
    enabled: true
  externalDns:
    provider: external-dns
-----

# 업데이트 적용
kops update cluster --yes && echo && sleep 3 && kops rolling-update cluster
하버(Harbor)를 이용하여 로컬 컨테이너 이미지 저장소 구축하기
소개 : 온프레미스 환경에서 컨테이너 이미지 저장소, 최소 Spec(2CPU, 4Mem, Disk 40GB)
- Harbor is an open source registry that secures artifacts with policies and role-based access control, ensures images are scanned and free from vulnerabilities, and signs images as trusted
헬름 차트로 하버 설치 - HelmChart Docs
# 사용 리전의 인증서 ARN 확인
(somaz:default) [root@kops-ec2 ~]# aws acm list-certificates --query 'CertificateSummaryList[].CertificateArn[]' --output text
arn:aws:acm:ap-northeast-2:611...

(somaz:default) [root@kops-ec2 ~]# CERT_ARN=`aws acm list-certificates --query 'CertificateSummaryList[].CertificateArn[]' --output text`
(somaz:default) [root@kops-ec2 ~]# echo "alb.ingress.kubernetes.io/certificate-arn: $CERT_ARN"

# 하버 설치
(somaz:default) [root@kops-ec2 ~]# helm repo add harbor https://helm.goharbor.io
"harbor" has been added to your repositories

(somaz:default) [root@kops-ec2 ~]# helm fetch harbor/harbor --untar

(somaz:default) [root@kops-ec2 ~]# tree harbor/ -L 2
harbor/
├── cert
│   ├── tls.crt
│   └── tls.key
├── Chart.yaml
├── conf
│   ├── notary-server.json
│   └── notary-signer.json
├── LICENSE
├── README.md
├── templates
│   ├── chartmuseum
│   ├── core
│   ├── database
│   ├── exporter
│   ├── _helpers.tpl
│   ├── ingress
│   ├── internal
│   ├── jobservice
│   ├── metrics
│   ├── nginx
│   ├── notary
│   ├── NOTES.txt
│   ├── portal
│   ├── redis
│   ├── registry
│   └── trivy
└── values.yaml

17 directories, 10 files

(somaz:default) [root@kops-ec2 ~]# vi ~/harbor/values.yaml
----------------------
expose.tls.certSource=none  # 19줄
expose.ingress.hosts.core=harbor.<각자자신의도메인>    # 36줄
expose.ingress.hosts.notary=notary.<각자자신의도메인>  # 37줄
expose.ingress.hosts.core=harbor.somaz.link
expose.ingress.hosts.notary=notary.somaz.link
expose.ingress.controller=alb                      # 44줄
expose.ingress.className=alb                       # 46줄
expose.ingress.annotations=alb.ingress.kubernetes.io/scheme: internet-facing
expose.ingress.annotations=alb.ingress.kubernetes.io/target-type: ip
expose.ingress.annotations=alb.ingress.kubernetes.io/listen-ports: '[{"HTTPS":443}, {"HTTP":80}]'
expose.ingress.annotations=alb.ingress.kubernetes.io/certificate-arn: ${CERT_ARN}
externalURL=https://harbor.<각자자신의도메인>
externalURL=https://harbor.somaz.link             # 131줄
----------------------

# 모니터링
(somaz:default) [root@kops-ec2 ~]# kubectl create ns harbor
namespace/harbor created
(somaz:default) [root@kops-ec2 ~]# watch kubectl get pod,pvc,ingress -n harbor

# 설치
helm install harbor harbor/harbor -f ~/harbor/values.yaml --namespace harbor --version 1.11.0

# 확인
# registry : 컨테이너 이미지를 저장
# chartmuseum : 하버를 컨테이너 이미지뿐 아니라, 헬름 차트 리포지토리로도 사용
# notary : 서명이 완료된 컨테이너 이미지만 운영 환경에 사용하도록 설정. 서명이 완료된 이미지는 별도로 구분
# trivy : 컨테이너 이미지의 보안 취약점을 스캔, 스캔 기능은 별도 솔루션에서 제공하여 관리자는 보안 스캔용 도구를 선택 가능
(somaz:default) [root@kops-ec2 ~]# helm list -n harbor
NAME    NAMESPACE       REVISION        UPDATED                                 STATUS     CHART            APP VERSION
harbor  harbor          1               2023-02-05 20:20:36.253220894 +0900 KST deployed   harbor-1.11.0    2.7.0

kubectl get pod,pvc,ingress,deploy,sts -n harbor
kubectl get ingress -n harbor harbor-ingress -o json | jq
kubectl get-all -n harbor
kubectl krew install df-pv && kubectl df-pv
(참고) Harbor 삭제 시
helm uninstall -n harbor harbor
kubectl delete pvc --all -n harbor
kubectl delete ns harbor
하버 웹 접속 및 로컬 이미지 업로드: https://harbor.<각자 자신의 도메인>
- 로그인 : admin/Harbor12345
- NEW PROJECT → Name(pkos), Access Level(Public Check) ⇒ OK 클릭
- 신규 프로젝트 생성 : 프로젝트 단위로 컨테이너 이미지 저장소를 관리, 프로젝트 별로 사용자 권한(RBAC) 보안 설정이 가능
- kops-ec2 에서 로컬 이미지를 원격 하버 이미지 저장소로 업로드
# 컨테이너 이미지 가져오기
(somaz:default) [root@kops-ec2 ~]# docker pull nginx
Using default tag: latest
latest: Pulling from library/nginx
....

(somaz:default) [root@kops-ec2 ~]# docker pull busybox
Using default tag: latest
latest: Pulling from library/busybox
...

(somaz:default) [root@kops-ec2 ~]# docker images
REPOSITORY   TAG       IMAGE ID       CREATED        SIZE
nginx        latest    9eee96112def   26 hours ago   142MB
busybox      latest    66ba00ad3de8   4 weeks ago    4.87MB

# 태그 설정
docker tag busybox harbor.$KOPS_CLUSTER_NAME/pkos/busybox:0.1
docker image ls

# insecure 설정
cat <<EOT> /etc/docker/daemon.json
{
    "insecure-registries" : ["harbor.$KOPS_CLUSTER_NAME"]
}
EOT
cat /etc/docker/daemon.json
systemctl daemon-reload && systemctl restart docker

# 로그인
docker login harbor.$KOPS_CLUSTER_NAME -u admin -p Harbor12345
cat /root/.docker/config.json | jq

# 이미지 업로드
docker push harbor.$KOPS_CLUSTER_NAME/pkos/busybox:0.1
쿠버네티스 YAML 파일의 컨테이너 이미지 저장소 주소를 로컬 하버로 변경 : harbor 저장소 이미지를 사용하는 디플로이먼트 생성하기
# 파드 배포
(somaz:default) [root@kops-ec2 ~]# curl -s -O https://raw.githubusercontent.com/junghoon2/kube-books/main/ch13/busybox-deploy.yml
(somaz:default) [root@kops-ec2 ~]# sed -i "s|harbor.myweb.io/erp|harbor.$KOPS_CLUSTER_NAME/pkos|g" busybox-deploy.yml
(somaz:default) [root@kops-ec2 ~]# kubectl apply -f busybox-deploy.yml
deployment.apps/busybox created

(somaz:default) [root@kops-ec2 ~]# k get po
NAME                       READY   STATUS    RESTARTS   AGE
busybox-77db4f4767-zvbmd   1/1     Running   0          128m

(somaz:default) [root@kops-ec2 ~]# kubectl describe pod | grep Events: -A7
Events:
  Type    Reason     Age   From               Message
  ----    ------     ----  ----               -------
  Normal  Scheduled  15s   default-scheduler  Successfully assigned default/busybox-66bc477746-tj8pk to i-0595b2fca939517ca
  Normal  Pulling    14s   kubelet            Pulling image "harbor.somaz.link/pkos/busybox:0.1"
  Normal  Pulled     13s   kubelet            Successfully pulled image "harbor.somaz.link/pkos/busybox:0.1" in 707.851252ms
  Normal  Created    13s   kubelet            Created container busybox
  Normal  Started    13s   kubelet            Started container busybox
컨테이너 이미지 업로드 시 자동으로 이미지 보안 스캔 기능 사용
- Trivy 이미지 스캐닝 도구를 통해서 스캔해보자 - 링크
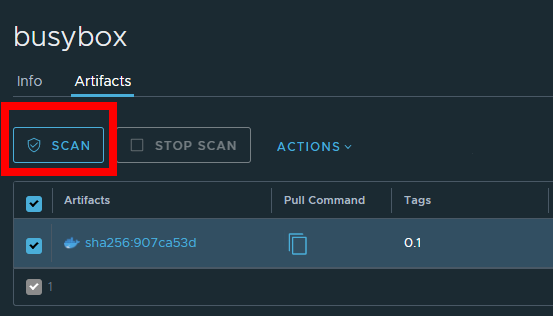

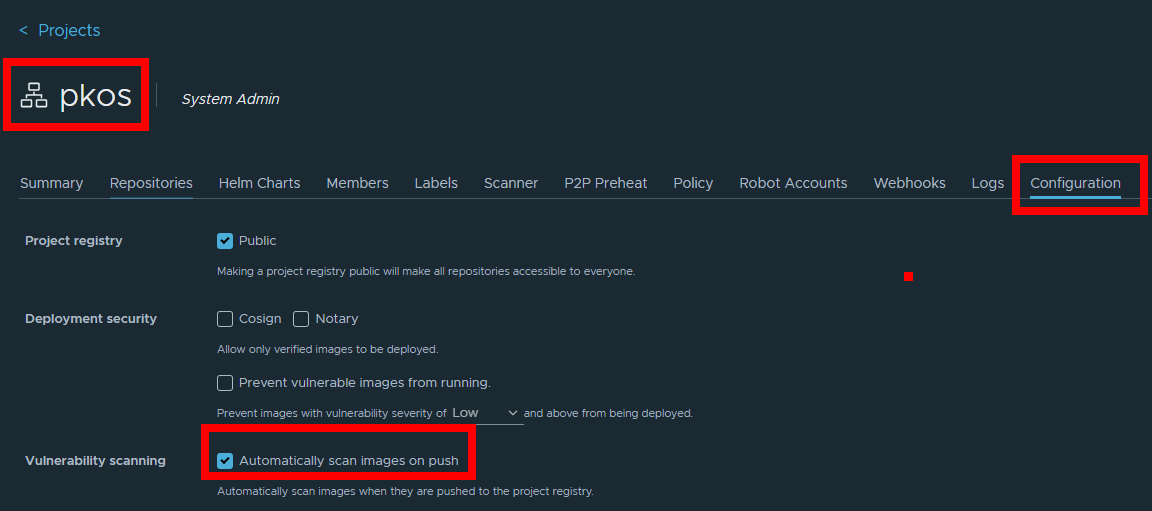
- 자동 보안 스캔 설정 및 확인
- 프로젝트에서 Configuration 클릭 후 아래 Automatically... 클릭 후 맨 하단에 Save 선택
# tagging
(somaz:default) [root@kops-ec2 ~]# docker tag nginx harbor.$KOPS_CLUSTER_NAME/pkos/nginx:0.1

# 이미지 업로드
(somaz:default) [root@kops-ec2 ~]# docker push harbor.$KOPS_CLUSTER_NAME/pkos/nginx:0.1
The push refers to repository [harbor.somaz.link/pkos/nginx]
...

# harbor 웹에서 확인 >> 아래 처럼 자동으로 스캔 수행됨
깃랩(GitLab)를 이용하여 로컬 깃(Git) 소스 저장소 구축
소개 : 무료 오픈소스로 사용 가능한 소스 코드 원격 저장소, 최소 Spec(4CPU, 4Mem, Disk 40GB)
헬름 차트로 깃랩 설치 후 웹 로그인 - HelmChart Docs
# 모니터링
kubectl create ns gitlab
watch kubectl get pod,pvc,ingress -n gitlab

# 설치
helm repo add gitlab https://charts.gitlab.io/
helm repo update
helm fetch gitlab/gitlab --untar

vim ~/gitlab/values.yaml
----------------------
global:
  hosts:
    domain: <각자자신의도메인>             # 52줄
    https: true

  ingress:                  # 66줄
    configureCertmanager: false
    provider: aws
    class: alb
    annotations:
      alb.ingress.kubernetes.io/scheme: internet-facing
      alb.ingress.kubernetes.io/target-type: ip
      alb.ingress.kubernetes.io/listen-ports: '[{"HTTPS":443}, {"HTTP":80}]'
      alb.ingress.kubernetes.io/certificate-arn: ${CERT_ARN}
      alb.ingress.kubernetes.io/success-codes: 200-399
    tls:
      enabled: false

certmanager:
  installCRDs: false
  install: false
  rbac:
    create: false

nginx-ingress:
  enabled: false

prometheus:
  install: false

gitlab-runner:
  install: false
----------------------

helm install gitlab gitlab/gitlab -f ~/gitlab/values.yaml --namespace gitlab --version 6.8.1

# 확인 - SubCharts
# gitlab-gitaly : 웹서비스 혹은 ssh 방식으로 진행되는 깃 제목, 브랜치, 태그 등의 깃 요청 등에 대한 작업을 담당
# gitlab-gitlab-shell : https 가 아닌 ssh 방식으로 깃 명령어 실행 시 해당 요청을 처리
# gitlab-kas : gitlab agent server
# gitlab-postgresql : 유저, 권한, 이슈 등 깃랩의 메타 데이터 정보가 저장
# gitlab-redis-master : 깃랩 작업 정보는 레디스 캐시 서버를 이용하여 처리
# gitlab-sidekiq-all-in-1-v2 : 레디스와 연동하여 작업 큐 처리 용도로 사용
# gitlab-webservice-default : 깃랩 웹 서비스를 처리
helm list -n gitlab
kubectl get pod,pvc,ingress,deploy,sts -n gitlab
kubectl get-all -n gitlab

```bash
# 모니터링
**kubectl create ns gitlab
watch kubectl get pod,pvc,ingress -n gitlab**

# 설치
helm repo add gitlab https://charts.gitlab.io/
helm repo update
****helm fetch gitlab/gitlab --untar
**vim ~/**gitlab**/values.yaml**
----------------------
**global**:
  **hosts**:
    domain: **<각자자신의도메인>             # 52줄**
    https: true

  **ingress**:                  # 66줄
    configureCertmanager: false
    provider: aws
    class: alb
    annotations:
      alb.ingress.kubernetes.io/scheme: internet-facing
      alb.ingress.kubernetes.io/target-type: ip
      alb.ingress.kubernetes.io/listen-ports: '[{"HTTPS":443}, {"HTTP":80}]'
      alb.ingress.kubernetes.io/certificate-arn: ${CERT_ARN}
      alb.ingress.kubernetes.io/success-codes: **200-399**
    tls:
      enabled: false

**certmanager**:
  installCRDs: false
  install: false
  rbac:
    create: false

**nginx-ingress**:
  enabled: false

**prometheus**:
  install: false

**gitlab-runner**:
  install: false
----------------------

**helm install gitlab** gitlab/gitlab **-f ~/**gitlab**/values.yaml --namespace** gitlab **--version** 6.8.1

# 확인 - [SubCharts](https://docs.gitlab.com/charts/charts/gitlab/)
# gitlab-gitaly : 웹서비스 혹은 ssh 방식으로 진행되는 깃 제목, 브랜치, 태그 등의 깃 요청 등에 대한 작업을 담당
# gitlab-gitlab-shell : https 가 아닌 ssh 방식으로 깃 명령어 실행 시 해당 요청을 처리
# gitlab-kas : gitlab agent server
# gitlab-postgresql : 유저, 권한, 이슈 등 깃랩의 메타 데이터 정보가 저장
# gitlab-redis-master : 깃랩 작업 정보는 레디스 캐시 서버를 이용하여 처리
# gitlab-sidekiq-all-in-1-v2 : 레디스와 연동하여 작업 큐 처리 용도로 사용
# gitlab-webservice-default : 깃랩 웹 서비스를 처리
helm list -n gitlab
kubectl get pod,pvc,ingress,deploy,sts -n gitlab
kubectl get-all -n gitlab

# 웹 root 계정 암호 확인
kubectl get secrets -n gitlab gitlab-gitlab-initial-root-password --template={{.data.password}} | base64 -d ;echo
ICORQWCe4zv2f6NpprgEz8SP0VfFM2DStHNTbsSTbmnKRgqVdiwJkCK9PpWKLnnr # 중요 root 계정 암호

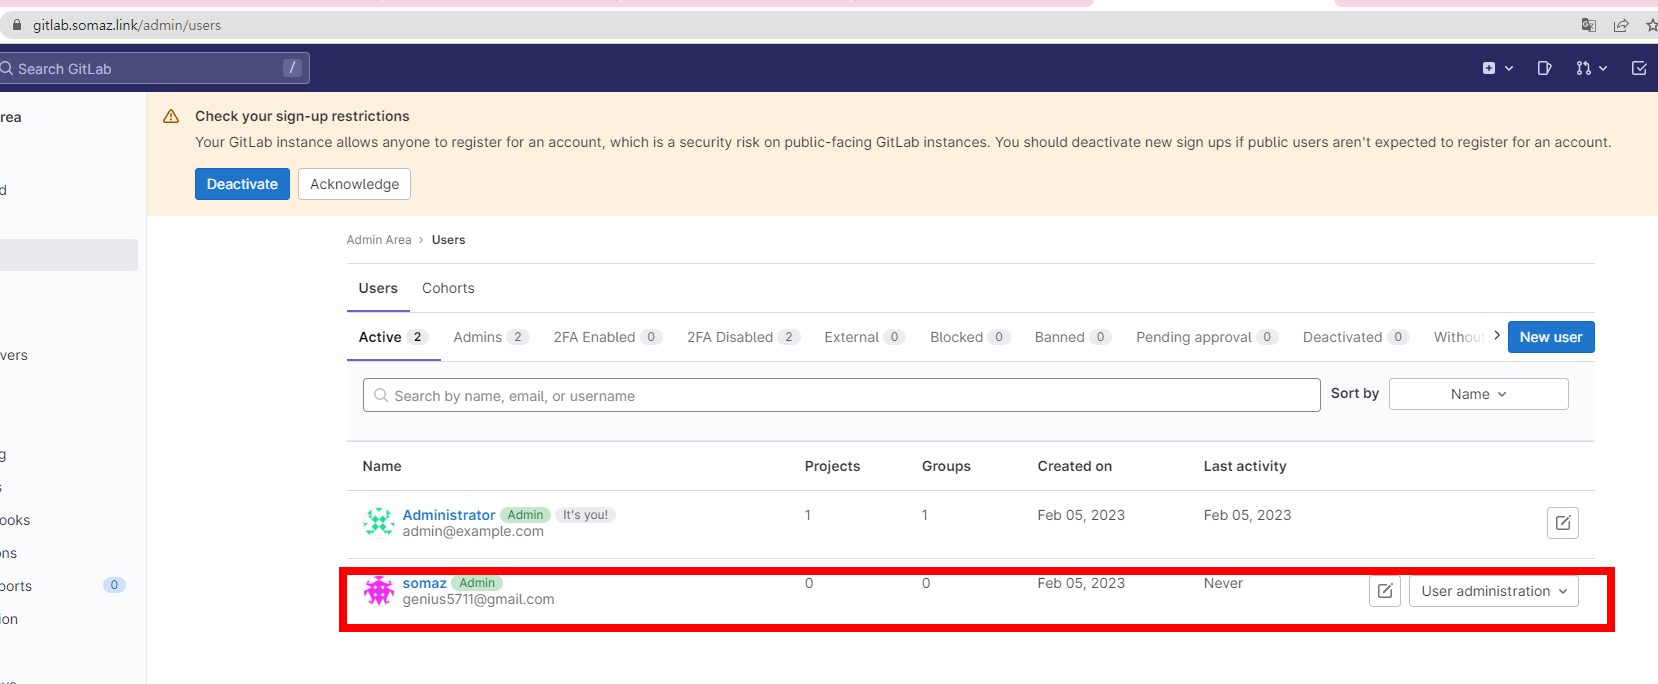
# 웹 접속 https://gitlab.<각자 자신의 도메인> (root / 웹 root 계정 암호)- 접속 후 별도의 사용자 생성 : Admins → Users : 각자 자신만의 편한 계정 (somaz , genius5711@gmail.com, Administrator 권한 부여) ⇒ 해당 계정으로 git 명령어 실행
- Impersonation Tokens : Name(test), Scopes(모두 Check) → Create impersonation token 클릭 ⇒ 토큰 값 확인 gitlab token glpat-y1UZqMcZhxZrUu447yyy
- Users : 유저 선택 후 암호 입력(Test1234), admin 권한 체크 ⇒ root 계정 로그아웃 ⇒ somaz 계정 로그인 ⇒ 암호 변경(P@ssw0rd)

(참고) gitlab 삭제 시
# helm uninstall -n gitlab gitlab
# kubectl delete pvc --all -n gitlab
# kubectl delete ns gitlab
깃랩 신규 프로젝트 작성 : Project name (test-stg) , Project URL(<각자계정>, /test-stg) , Visibility Level (Intenal) , Initialize repository with a README (체크)

생성한 깃랩 프로젝트에 쿠버네티스에서 사용하는 YAML 파일을 업로드
⇒ 토큰 값 확인 gitlab token `glpat-y1UZqMcZhxZrUu447yyy`
# 테스트 파일 생성 후 이동
mkdir ~/gitlab-test && cd ~/gitlab-test

# git 계정 초기화 : 토큰 및 로그인 실패 시 매번 실행해주자
git config --system --unset credential.helper
git config --global --unset credential.helper

# git 계정 정보 확인 및 global 계정 정보 입력
git config --list
git config --global user.name "<각자 자신의 Gialba 계정>"
git config --global user.email "<각자 자신의 Gialba 계정의 이메일>"
git config --global user.name "somaz"
git config --global user.email "somaz@gmail.com"

(somaz:default) [root@kops-ec2 ~]# git config --list
user.name=somaz
user.email=genius5711@gmail.com

# git clone
git clone https://gitlab.$KOPS_CLUSTER_NAME/<각자 자신의 Gialba 계정>/test-stg.git
git clone https://gitlab.$KOPS_CLUSTER_NAME/somaz/test-stg.git
Cloning into 'test-stg'...
Username for 'https://gitlab.somaz.link': somaz
Password for 'https://gasida@gitlab.somaz.link': <토큰 입력>

# 이동
ls -al test-stg && cd test-stg

# 파일 생성 및 깃 업로드(push) : 웹에서 확인
echo "gitlab test memo" >> test.txt
git add . && git commit -m "initial commit - add test.txt"
git push
Username for 'https://gitlab.somaz.link': somaz
Password for 'https://gasida@gitlab.somaz.link': <토큰 입력>
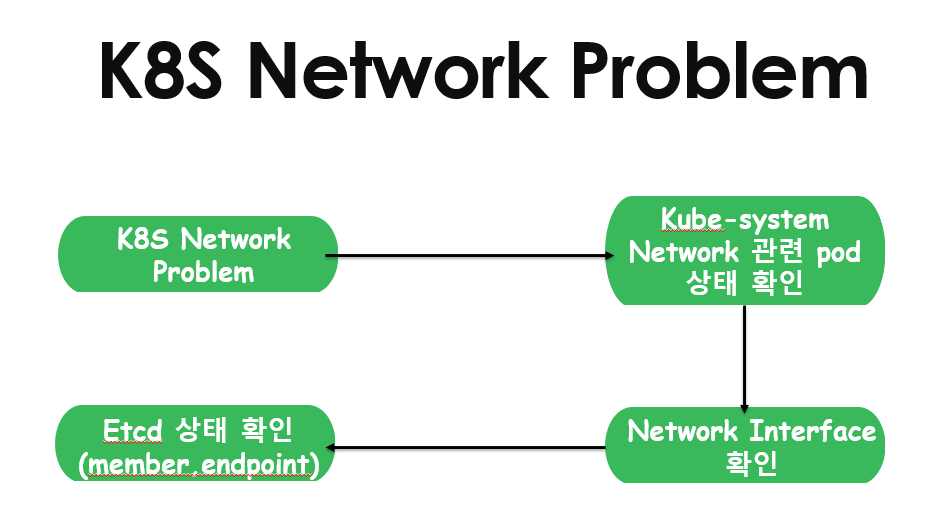
[발표] Onpremise 쿠버네티스 장애처리 경험에 대해 발표(이동형)
오늘은 쿠버네티스 장애처리 경험에 대해 발표를 하였다.
오랜만에 PPT도 만들어보고 좋은 경험이었다.




아르고시디(ArgoCD)를 활용한 깃옵스(GitOps) 시스템 구축
소개 : Argo CD is a declarative, GitOps continuous delivery tool for Kubernetes.
- 지속적인 배포란(Continuous Delivery, CD) 개발자가 소스코드를 변경해서 깃 저장소에 푸시하면 해당 변경 사항이 고객이 사용하는 실제 운영환경의 시스템까지 자동으로 반영함
- 개발자의 코드가 원격 저장소에 업로드됐을 때 아르고시디가 자동으로 해당 코드를 클러스터 운영환경에 배포한다.
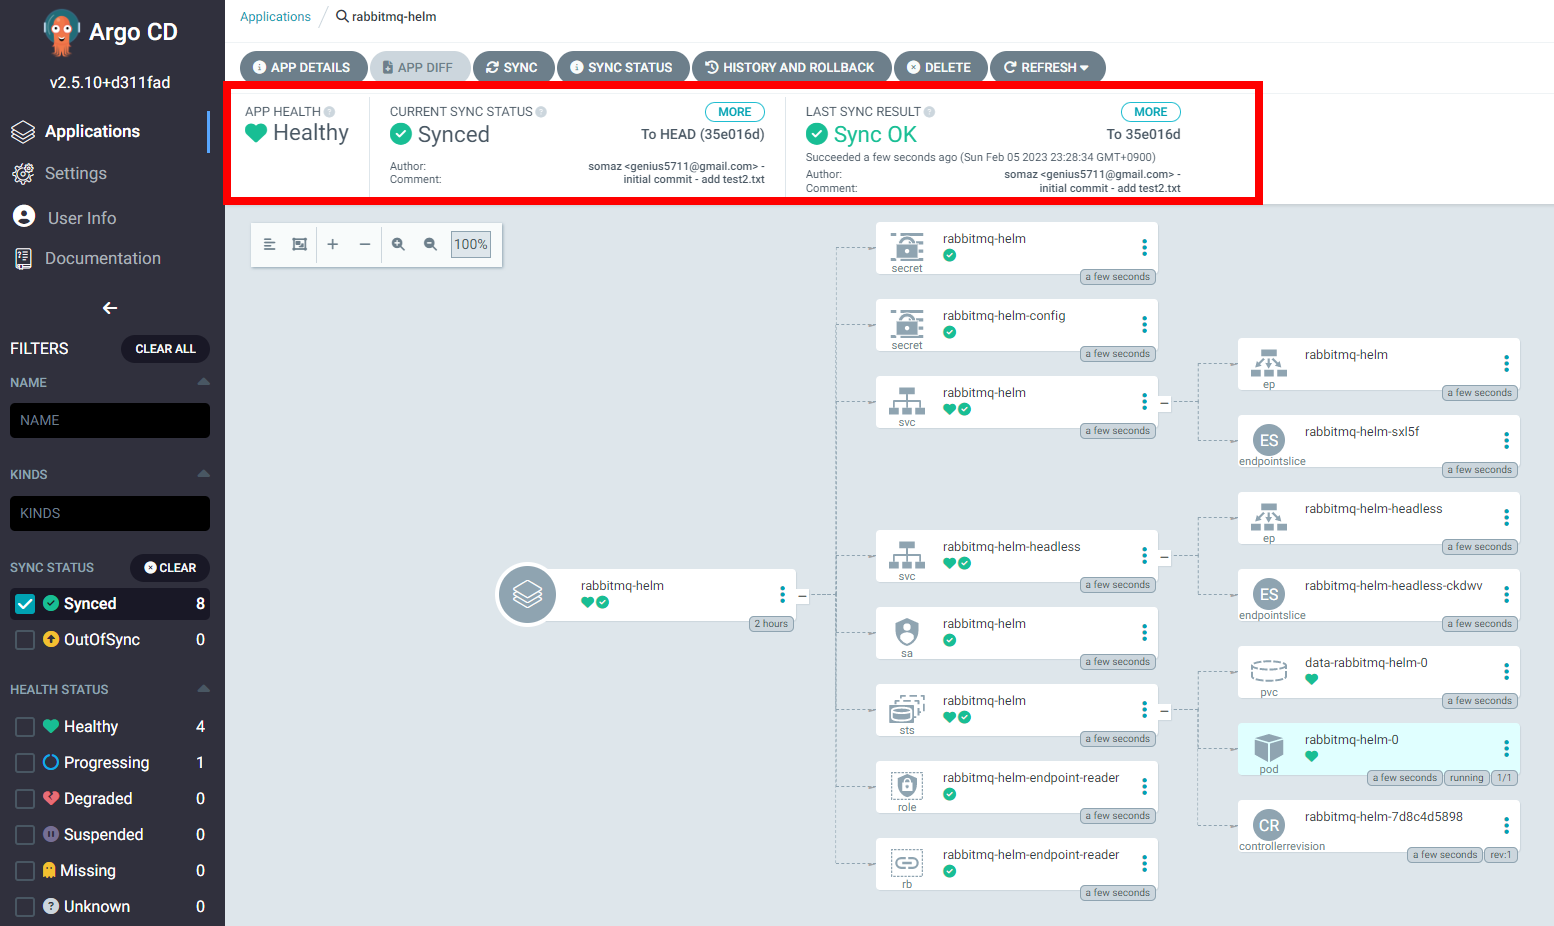
- 아르고시티로 배포한 헬름 애플리케이션의 리소스 목록, 각 리소스 간 관계 및 에러 유무를 UI로 보여준다.
- 단일 진실 원천(SSOT, Single Source Of Truth)이란 어떠한 진실(결과)의 원인이 하나의 이유(원천)에서 비롯되는 것을 의미합니다.
- 쿠버네티스 환경에서 깃옵스의 의미는 실제 운영 중인 클러스터의 상태를 개발자의 로컬 PC혹은 아무런 기록을 남기지 않고 클러스터에서 임의로 수정하게 하지 않고 공용으로 관리하는 깃 저장소에서만 유일하게 변경을 허용함으로써 단일 진실 원천(SSOT)를 구현합니다.
- 아르고시디를 사용하면 쿠버네티스 매니페스트 소스 파일을 여러 개발자의 개인 PC에 보관하지 않고 중앙의 통합된 깃 저장소에 반드시 업로드하고 동기화하도록 정책 관리 가능함

헬름 차트로 설치 후 웹 로그인 - HelmChart
argocd는 CLB로 배포한다
# 모니터링
kubectl create ns argocd
watch kubectl get pod,pvc,svc -n argocd

# 설치
cd
helm repo add argo https://argoproj.github.io/argo-helm
helm repo update
helm install argocd argo/argo-cd --set server.service.type=LoadBalancer --namespace argocd --version 5.19.14

# 확인
# argocd-application-controller : 실행 중인 k8s 애플리케이션의 설정과 깃 저장소의 소스 파일에 선언된 상태를 서로 비교하는 컨트롤러. 상태와 다르면 ‘OutOfSync’ 에러를 출력.
# argocd-dex-server : 외부 사용자의 LDAP 인증에 Dex 서버를 사용할 수 있음
# argocd-repo-server : 원격 깃 저장소의 소스 코드를 아르고시디 내부 캐시 서버에 저장합니다. 디렉토리 경로, 소스, 헬름 차트 등이 저장.
helm list -n argocd
kubectl get pod,pvc,svc,deploy,sts -n argocd
kubectl get-all -n argocd

# admin 계정의 암호 확인
(somaz:default) [root@kops-ec2 test-stg]# echo $ARGOPW
coKNPy2pSpjejHCJ

# 웹 접속 로그인 (admin) CLB의 DNS 주소로 접속 http, https
(참고) 삭제 시
helm uninstall -n argocd argocd
kubectl delete ns argocd
아르고시디로 애플리케이션 배포에 사용할 깃 저장소와 쿠버네티스 클러스터 정보를 등록을 위해, argocd CLI 도구 설치
# 최신버전 설치
curl -sSL -o argocd-linux-amd64 https://github.com/argoproj/argo-cd/releases/latest/download/argocd-linux-amd64
install -m 555 argocd-linux-amd64 /usr/local/bin/argocd
chmod +x /usr/local/bin/argocd

# 버전 확인
(somaz:default) [root@kops-ec2 test-stg]# argocd version --short
argocd: v2.5.10+d311fad
argocd-server: v2.5.10+d311fad

# Help
# argocd app : 쿠버네티스 애플리케이션 동기화 상태 확인
# argocd context : 복수의 쿠버네티스 클러스터 등록 및 선택
# argocd login : 아르고시디 서버에 로그인
# argocd repo : 원격 깃 저장소를 등록하고 현황 파악
argocd

# CLB 도메인 변수 지정
CLB=<각자 자신의 argocd 서비스의 CLB 도메인 주소>
(somaz:default) [root@kops-ec2 test-stg]# CLB=afa76b9f8887c4de9bfc333b2a984f53-699372018.ap-northeast-2.elb.amazonaws.com

# argocd 서버 로그인
argocd login $CLB --username admin --password $ARGOPW

# 기 설치한 깃랩의 프로젝트 URL 을 argocd 깃 리포지토리(argocd repo)로 등록. 깃랩은 프로젝트 단위로 소스 코드를 보관.
argocd repo add https://gitlab.$KOPS_CLUSTER_NAME/<깃랩 계정명>/test-stg.git --username <깃랩 계정명> --password <깃랩 계정 암호>
argocd repo add https://gitlab.$KOPS_CLUSTER_NAME/somaz/test-stg.git --username somaz --password <gitlab 비밀번호>

# 등록 확인 : 기본적으로 아르고시디가 설치된 쿠버네티스 클러스터는 타깃 클러스터로 등록됨
(somaz:default) [root@kops-ec2 ~]# argocd repo list
TYPE  NAME  REPO                                          INSECURE  OCI    LFS    CREDS  STATUS      MESSAGE  PROJECT
git         https://gitlab.somaz.link/somaz/test-stg.git  false     false  false  true   Successful

# 기본적으로 아르고시디가 설치된 쿠버네티스 클러스터는 타깃 클러스터로 등록됨
(somaz:default) [root@kops-ec2 ~]# argocd cluster list
SERVER                          NAME        VERSION  STATUS      MESSAGE  PROJECT
https://kubernetes.default.svc  in-cluster  1.24     Successful
ArgoCD를 이용하여 RabbitMQ 헬름 애플리케이션 배포하기 : RabbitMQ Helm 깃랩 업로드
# test-stg 깃 디렉터리에서 아래 실행
cd ~/gitlab-test/test-stg

# 깃 원격 오리진 주소 확인

(somaz:default) [root@kops-ec2 test-stg]# git config -l | grep remote.origin.url
remote.origin.url=https://gitlab.somaz.link/somaz/test-stg.git

# RabbitMQ 헬름 차트 설치
helm repo add bitnami https://charts.bitnami.com/bitnami
helm repo update
helm fetch bitnami/rabbitmq --untar
cd rabbitmq/
cp values.yaml my-values.yaml

# 헬름 차트를 깃랩 저장소에 업로드
git add . && git commit -m "add rabbitmq helm"
git push

(somaz:default) [root@kops-ec2 test-stg]# kubectl get crd | grep argo
applications.argoproj.io              2023-02-05T12:31:45Z
applicationsets.argoproj.io           2023-02-05T12:31:45Z
appprojects.argoproj.io               2023-02-05T12:31:45Z

# yaml 파일 다운로드 후 rabbitmq 파일 수정
cd ~/
curl -s -O https://raw.githubusercontent.com/wikibook/kubepractice/main/ch15/rabbitmq-helm-argo-application.yml
vim rabbitmq-helm-argo-application.yml
--------------------------------------
apiVersion: argoproj.io/v1alpha1
kind: Application
metadata:
  name: rabbitmq-helm
  namespace: argocd
  finalizers:
  - resources-finalizer.argocd.argoproj.io
spec:
  destination:
    namespace: rabbitmq
    server: https://kubernetes.default.svc
  project: default
  source:
    repoURL: https://gitlab.gasida.link/gasida/test-stg.git
    path: rabbitmq
    targetRevision: HEAD
    helm:
      valueFiles:
      - my-values.yaml
  syncPolicy:
    syncOptions:
    - CreateNamespace=true
--------------------------------------

# 모니터링 : argocd 웹 화면 보고 있기!
# 배포
kubectl apply -f rabbitmq-helm-argo-application.yml

# YAML 파일을 적용(apply)하여 아르고시디 ‘Application’ CRD를 생성
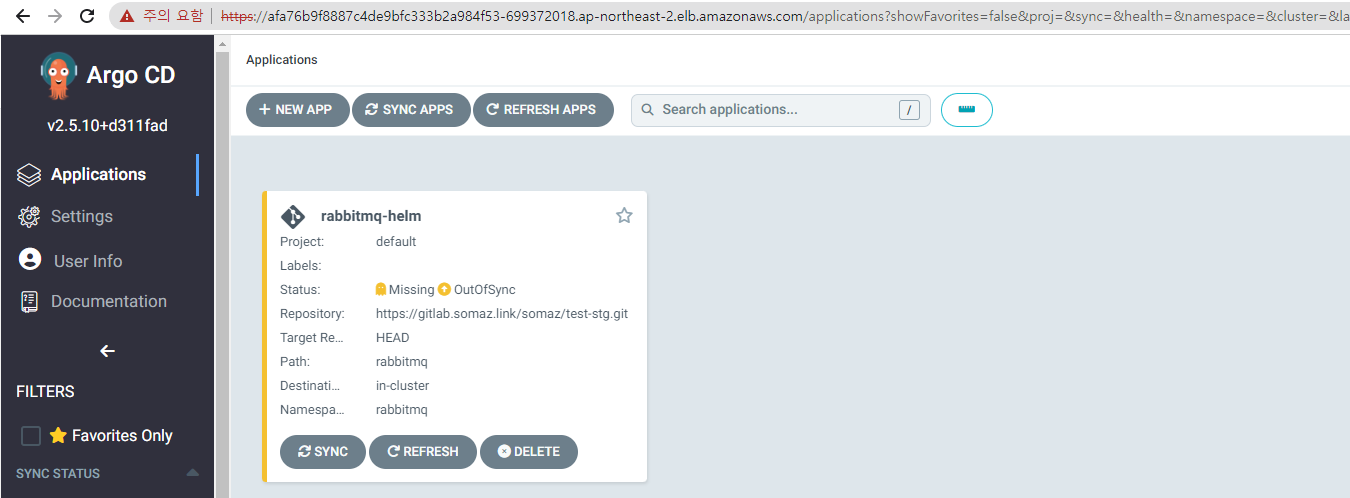
(somaz:default) [root@kops-ec2 test-stg]# kubectl get applications.argoproj.io -n argocd
NAME            SYNC STATUS   HEALTH STATUS
rabbitmq-helm OutOfSync Missing- argocd 웹 화면 rabbitmq 클릭 → 헬름 차트 상세 내역 확인 ⇒ 화면 상단 SYNC 클릭해 동기화 실행 : helm install 을 실행하지 않아도 됨!

# 배포 확인
(somaz:default) [root@kops-ec2 ~]# kubectl get all,svc,cm -n rabbitmq
NAME                  READY   STATUS    RESTARTS   AGE
pod/rabbitmq-helm-0   1/1     Running   0          2m21s

NAME                             TYPE        CLUSTER-IP       EXTERNAL-IP   PORT(S)
                        AGE
service/rabbitmq-helm            ClusterIP   100.67.140.114   <none>        5672/TCP,4369/TCP,25672/TCP,15672/TCP   2m21s
service/rabbitmq-helm-headless   ClusterIP   None             <none>        4369/TCP,5672/TCP,25672/TCP,15672/TCP   2m21s

NAME                             READY   AGE
statefulset.apps/rabbitmq-helm   1/1     2m21s

NAME                         DATA   AGE
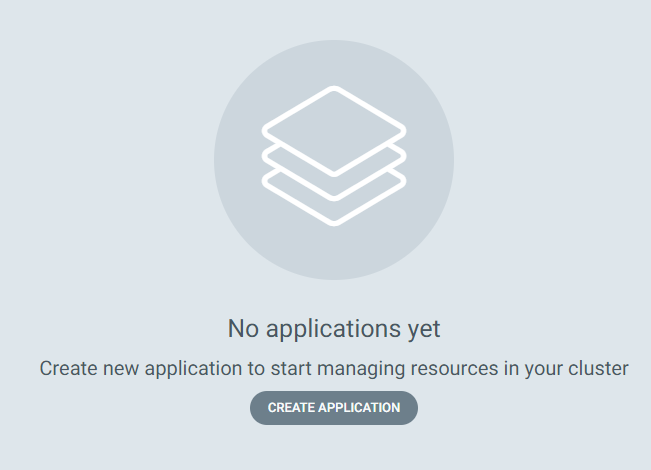
configmap/kube-root-ca.crt 1 2m23s- 삭제 : argocd 웹 화면에서 DELETE 클릭


스터디 4주차 후기
이번 4주차에서는 GitOps라는 개념을 실습으로 직접 경험해볼 수 있었다.
Harbor와 GitLab은 익숙한 도구였기에 어렵지 않게 진행할 수 있었지만, ArgoCD는 처음 접한 툴이라 신기하고 흥미로웠다.
특히 수동으로 배포하지 않고 깃 저장소의 변경만으로 애플리케이션이 클러스터에 자동 반영되는 프로세스를 보며 “이것이 바로 GitOps!” 라는 감탄이 절로 나왔다.
Jenkins나 기타 CI/CD 도구와는 다른 방향에서의 자동화 방식이라 새로운 시야를 열 수 있었던 것 같다.
또한 이번 주에는 발표도 진행했는데, 스스로 부족한 점도 느끼며 좋은 경험이 되었다. 앞으로 더 나은 발표와 정리 실력을 키워야겠다는 자극도 함께 받았다.
벌써 5주차가 다가오고 있다. 조금씩 쌓여가는 이 경험들이 나중에는 큰 자산이 될 거라 믿으며,
이번 주도 모두 화이팅
'교육, 커뮤니티 후기 > PKOS 쿠버네티스 스터디' 카테고리의 다른 글
| PKOS 쿠버네티스 스터디 6주차 - 얼럿매니저 로깅시스템 (0) | 2023.02.19 |
|---|---|
| PKOS 쿠버네티스 스터디 5주차 - 프로메테우스 그라파나 (0) | 2023.02.14 |
| PKOS 쿠버네티스 스터디 3주차 - Ingress & Storage (4) | 2023.02.03 |
| PKOS 쿠버네티스 스터디 2주차 - 쿠버네티스 네트워크 (0) | 2023.01.16 |
| PKOS 쿠버네티스 스터디 1주차 - kOps 클러스터 배포 (2) | 2023.01.08 |
