
Overview
이번 글에서는 쿠버네티스 클러스터 내에서 특정 Pod가 과도한 CPU 및 메모리를 사용해 워커 노드에 영향을 주는 문제를 해결하기 위해, 특정 노드에만 Pod를 배치하는 방법에 대해 알아본다.
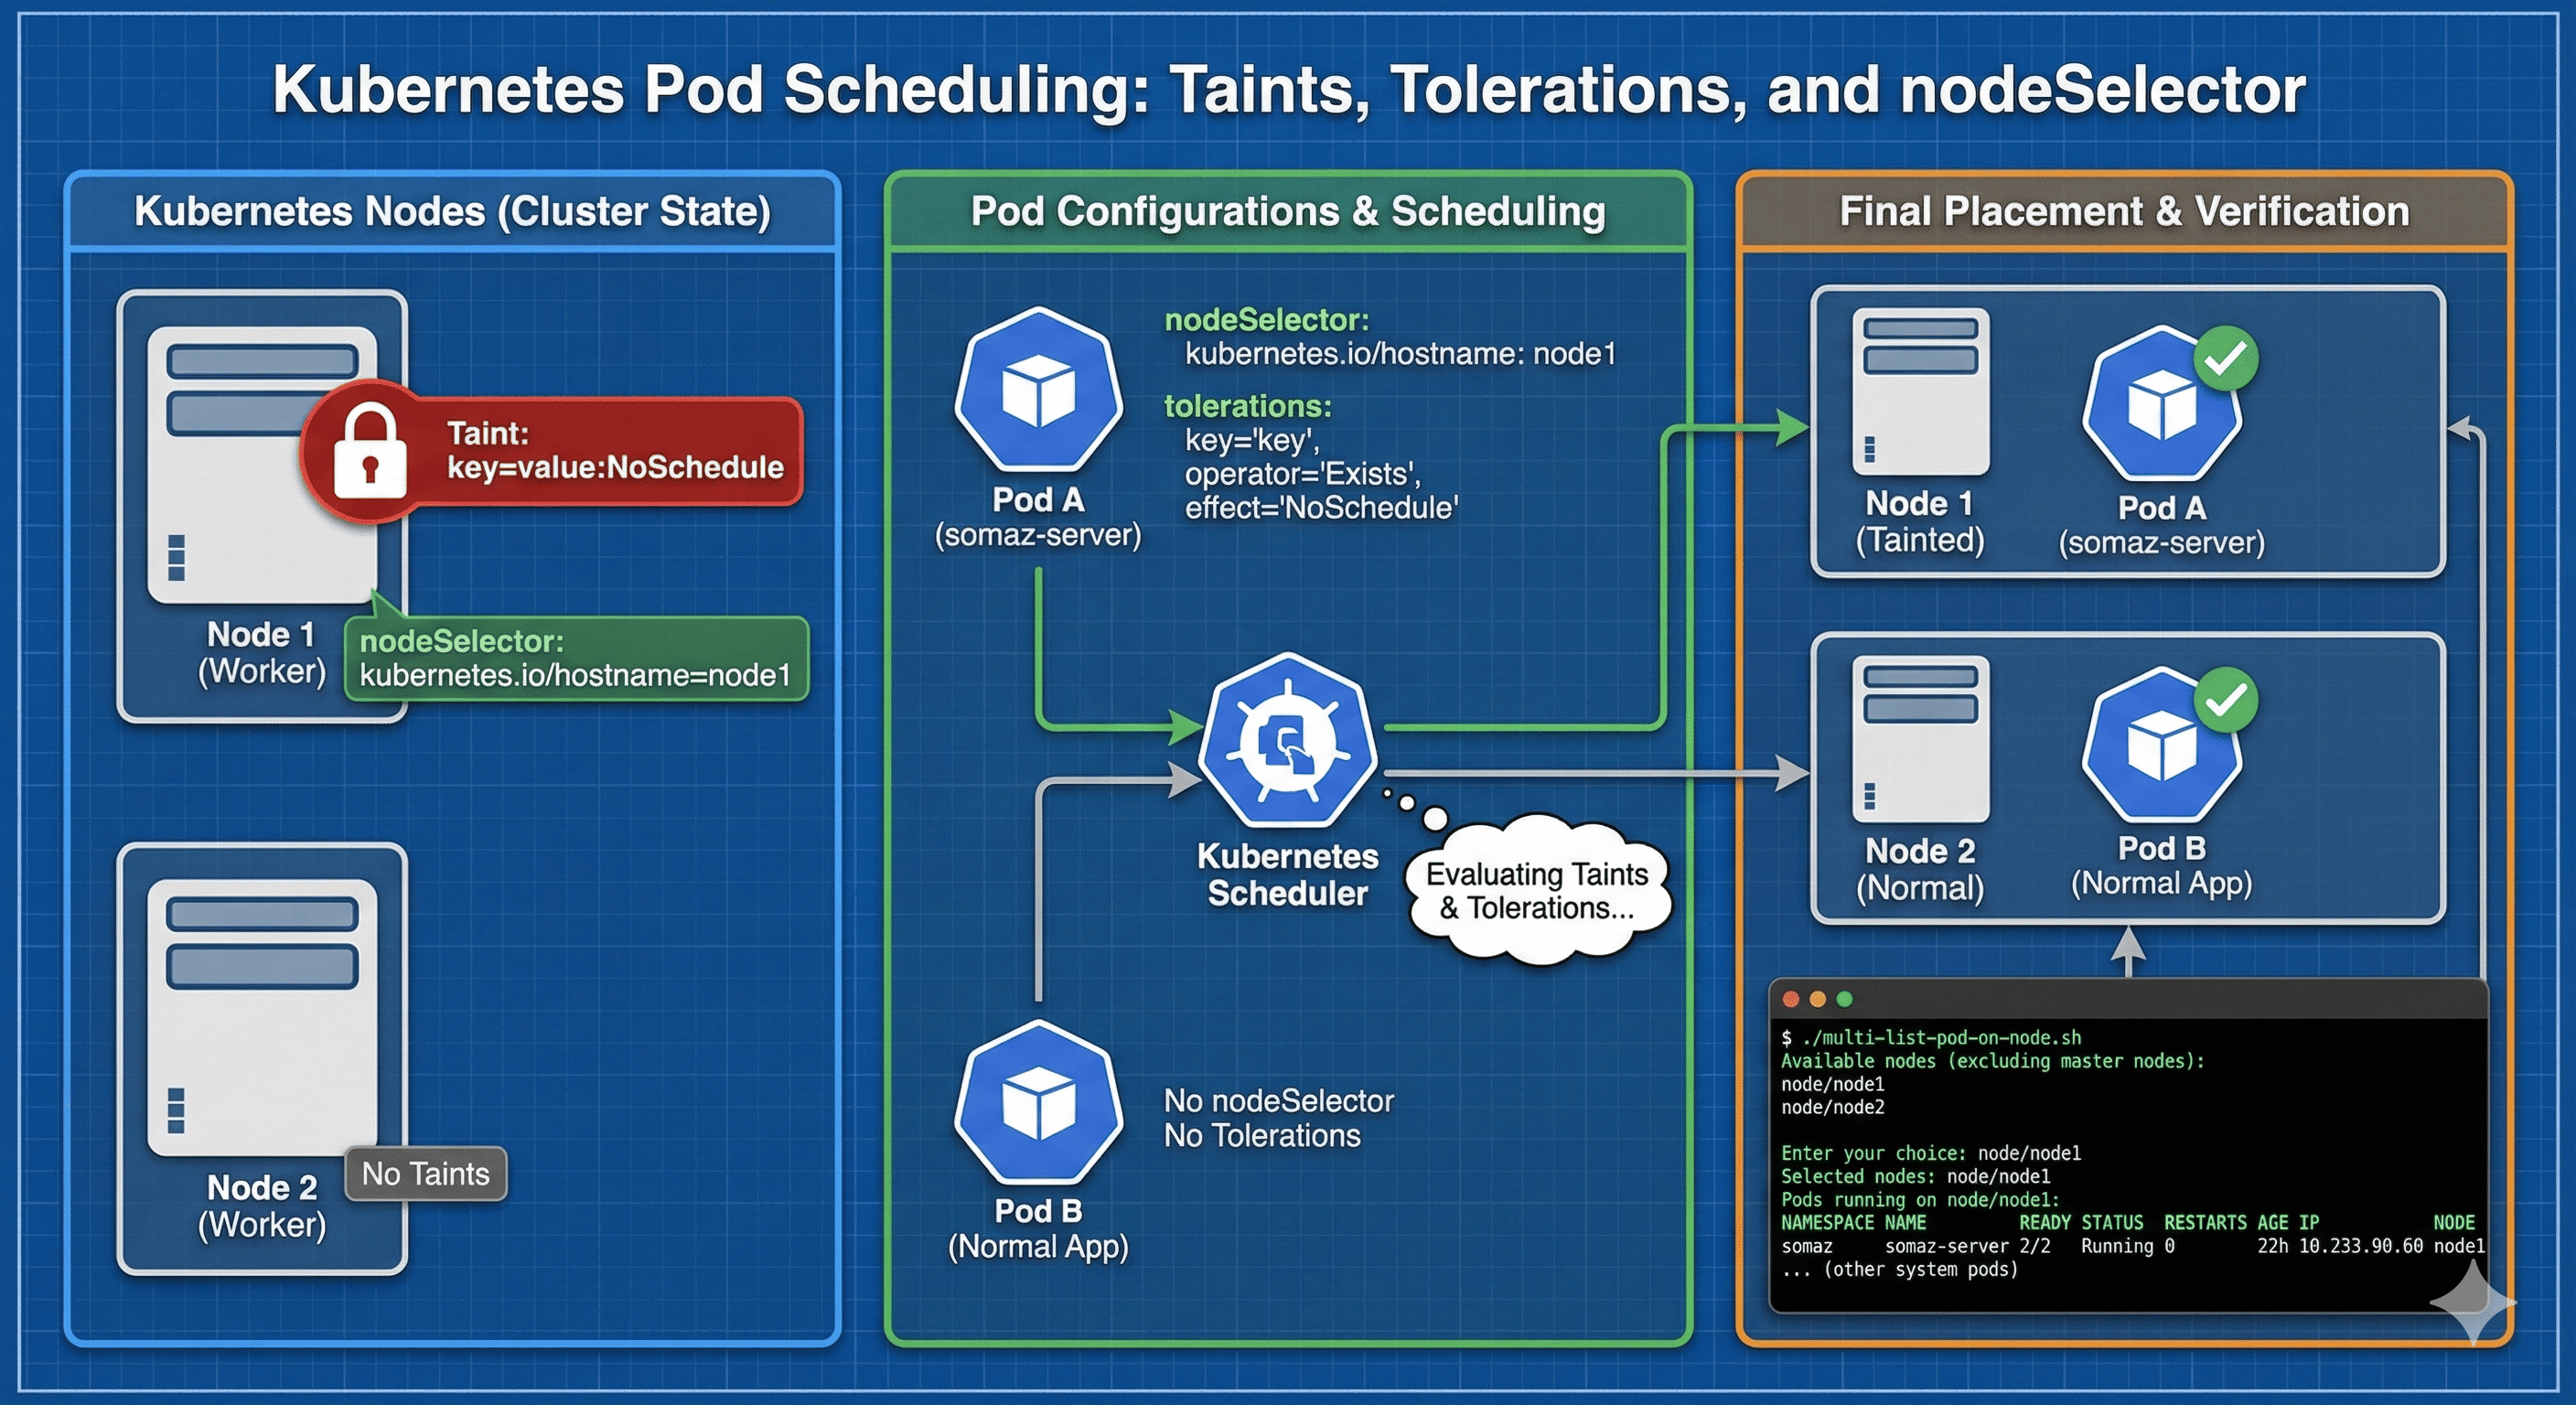
Kubernetes의 Taints와 Tolerations, nodeSelector를 활용하면 특정 노드에만 Pod가 배치되도록 제한할 수 있다. 이 방식은 자원 사용량이 큰 애플리케이션을 격리하거나, 특수 하드웨어가 장착된 노드에 특정 워크로드를 배치하고자 할 때 매우 유용하다.
실습에서는 Taint가 적용된 노드에 Toleration이 있는 Pod만 배치하고, Helm Chart 내에서 nodeSelector와 tolerations를 정의하여 안정적으로 노드 배치를 제어해본다.
또한, 실제 클러스터 내 노드별 Taint 확인 및 Pod 배포 현황을 확인할 수 있는 스크립트 자동화 예제도 함께 소개한다.

Worker Node에 지정한 Pod 배치하기
간단하게 Taint와 Tolerations를 활용해서, 특정 Worker Node에 지정한 Pod를 배치할 수 있다.
Taint는 특정 노드에 적용되어 Tolerations을 갖지 않는 파드를 거부한다.
Tolerations은 Taint 가 적용된 노드에 스케줄링될 수 있도록 파드에 설정한다.
node1 노드에 `key=value:NoSchedule` taint를 추가한다.
kubectl taint nodes node1 key=value:NoSchedule
간단하게 스크립트를 작성한다.
## check-node-taint.sh

#!/bin/bash

# List all nodes
nodes=$(kubectl get nodes -o jsonpath='{.items[*].metadata.name}')

for node in $nodes; do
  # Get the taints on each node
  taints=$(kubectl get node $node -o jsonpath='{.spec.taints}')

  if [ -n "$taints" ]; then
    # If taints are present, print them
    echo "Node $node has taints: $taints"
  else
    # If no taints are present
    echo "Node $node has no taints"
  fi
done
taint 결과를 확인해본다.
./check-node-taint.sh
Node master0 has taints: [{"effect":"NoSchedule","key":"node-role.kubernetes.io/master"}]
Node node1 has taints: [{"effect":"NoSchedule","key":"key","value":"value"}]
Node node2 has no taints
Node node3 has no taints
Node node4 has no taints
Node node5 has no taints
그리고 helm chart에 아래와 같이 정의해준다.
nodeSelector:
  kubernetes.io/hostname: node1

tolerations:
  - key: "key"
    operator: "Exists"
    effect: "NoSchedule"
deployment를 활용하면 다음과 같이 적용이 잘되어있다.
k get deployments.apps -n somaz -o yaml | k neat |grep tolerations -A6
        tolerations:
        - effect: NoSchedule
          key: key
          operator: Exists
        volumes:
        - name: somaz-local
          persistentVolumeClaim:

  k get deployments.apps -n somaz -o yaml | k neat |grep nodeSelector -A6
        nodeSelector:
          kubernetes.io/hostname: node1
        restartPolicy: Always
        schedulerName: default-scheduler
        serviceAccount: somaz-server
        serviceAccountName: somaz-server
        terminationGracePeriodSeconds: 30
간단하게 node에 배포된 pod를 확인하는 script를 작성한다.
## multi-list-pod-on-node.sh

#!/bin/bash

# Function to list all nodes and prompt the user to select one or more, excluding master by default
select_node() {
  echo "Available nodes (excluding master nodes):"
  # Exclude master nodes unless they are explicitly requested
  kubectl get nodes --selector='!node-role.kubernetes.io/master' -o name
  echo ""
  echo "Enter the name of the node(s) separated by commas (e.g., node/node1,node/node2) or type 'all' to select all non-master nodes."
  read -p "Enter your choice: " INPUT

  if [ -z "$INPUT" ]; then
    echo "No input provided. Exiting."
    exit 1
  elif [ "$INPUT" == "all" ]; then
    NODES=$(kubectl get nodes --selector='!node-role.kubernetes.io/master' -o jsonpath='{.items[*].metadata.name}')
  else
    NODES=$(echo $INPUT | tr ',' '\n')
  fi
  echo "Selected nodes: $NODES"
}

# Function to list pods on the selected node(s)
list_pods_on_node() {
  for NODE in $NODES; do
    echo "Pods running on $NODE:"
    # Ensuring we're querying correctly by logging the field selector
    echo "Running command: kubectl get pods --all-namespaces -o wide --field-selector spec.nodeName=$(echo $NODE | cut -d'/' -f2)"
    kubectl get pods --all-namespaces -o wide --field-selector spec.nodeName=$(echo $NODE | cut -d'/' -f2)
    echo ""
  done
}

# Main script execution
select_node
list_pods_on_node
그리고 node를 확인하면 아래와 같이 배포되어있다. 기존 배포되었던 pod는 전부 재시작 해주었고 다른 node로 이동하였다.
./multi-list-pod-on-node.sh
Available nodes (excluding master nodes):
node/node1
node/node2
node/node3
node/node4
node/node5

Enter the name of the node(s) separated by commas (e.g., node/node1,node/node2) or type 'all' to select all non-master nodes.
Enter your choice: node/node1
Selected nodes: node/node1
Pods running on node/node1:
Running command: kubectl get pods --all-namespaces -o wide --field-selector spec.nodeName=node1
NAMESPACE            NAME                                  READY   STATUS    RESTARTS        AGE     IP              NODE    NOMINATED NODE   READINESS GATES
somaz                somaz-server                          2/2     Running   0               22h     10.233.90.60    node1   <none>           <none>
kube-system          calico-node-qc2d6                     1/1     Running   16 (59d ago)    2y22d   10.10.100.21    node1   <none>           <none>
kube-system          kube-proxy-b8vc7                      1/1     Running   7 (147d ago)    2y22d   10.10.100.21    node1   <none>           <none>
kube-system          metrics-server-dcb8c9c5b-mxrwv        1/1     Running   11 (2d6h ago)   21d     10.233.90.201   node1   <none>           <none>
kube-system          nginx-proxy-node1                     1/1     Running   22 (3d6h ago)   2y22d   10.10.100.21    node1   <none>           <none>
kube-system          nodelocaldns-27682                    1/1     Running   0               127d    10.10.100.21    node1   <none>           <none>
metallb-system       speaker-zt72w                         1/1     Running   6 (147d ago)    2y22d   10.10.100.21    node1   <none>           <none>
마무리
Kubernetes는 기본적으로 Pod를 클러스터의 모든 워커 노드에 고르게 분산시키지만, 특정 워크로드의 자원 요구 사항이나 장애 이슈에 따라 의도적으로 특정 노드에만 Pod를 배치해야 할 때가 있다.
이러한 상황에서 Taint/Toleration + nodeSelector 조합은 매우 강력한 도구가 된다.
불필요한 리소스 경쟁을 줄이고, 안정적인 서비스 운영을 위한 노드 격리 전략으로 활용할 수 있다.
또한, 간단한 Bash 스크립트를 활용하여 Taint 설정 확인 및 노드별 Pod 현황을 자동으로 확인하는 방식은 실 운영 환경에서도 유용하게 활용될 수 있다.
무작정 Pod를 배포하는 시대는 끝났다. 이제는 목적에 맞는 배치를 설계하자.
Reference
none.
'Container Orchestration > Kubernetes' 카테고리의 다른 글
| Kubernetes Pod를 안전하게 종료하는 방법(cordon, uncordon, drain, scale) (0) | 2024.07.09 |
|---|---|
| Ingress Nginx란? (0) | 2024.07.04 |
| Kubernetes Volumes 및 StorageClass: CSI 드라이버 사용 가이드 (0) | 2024.04.28 |
| Kubernetes Affinity 및 Scheduling 설정 가이드 (0) | 2024.04.19 |
| Kubernetes Network (0) | 2024.02.17 |