
Overview
이번 포스팅에서는 Kubernetes 기반의 경량 CI/CD 워크플로우 오케스트레이터인 Argo Workflow에 대해 소개하고, 실습을 통해 직접 구성해보는 과정을 다뤘다.
Argo Workflow는 복잡한 배포 프로세스나 데이터 파이프라인을 YAML 기반 선언형 워크플로로 설계할 수 있으며, 각 단계를 Kubernetes Job/POD로 실행하여 완전한 컨테이너 기반 파이프라인을 구성할 수 있는 것이 가장 큰 특징이다.
해당 실습에서는 다음과 같은 내용을 직접 다뤄보았다.
- Kind 클러스터 위에 Argo Workflow 설치 및 포트 포워딩 구성
- 서버 인증 모드 설정 및 UI 접근 테스트
- Argo CLI 설치 및 기본 워크플로 실행
- 다양한 Workflow 실행 방식 실습 (Parameters, Steps, DAG, ServiceAccount)
- NGINX 로그를 파라미터 기반으로 수집하는 예제 구성
Argo Workflow는 복잡한 플로우도 간결하게 표현할 수 있도록 DAG 및 Steps 구문을 제공하며, 반복 실행, 조건 분기, 외부 이벤트 연동(Argo Events) 등 다양한 기능도 지원한다.
📅 관련 글
2023.05.16 - [IaC/CI CD Tool] - ArgoCD란?
2023.08.09 - [IaC/CI CD Tool] - ArgoCD 설치 AWS & GCP
2023.10.02 - [IaC/CI CD Tool] - ArgoCD ApplicationSet이란? (작성 방법)
2023.10.08 - [Container Orchestration/Kubernetes] - 2. Kustomize + ArgoCD ApplicationSet
2024.02.02 - [IaC/CI CD Tool] - Argo Workflow란?
2024.04.09 - [IaC/CI CD Tool] - ArgoCD SSO 구성 가이드(GCP Oauth)
2025.02.19 - [IaC/CI CD Tool] - ArgoCD SSO 구성 가이드(Gitlab)
Argo Workflow란?
Argo Workflow는 아티팩트 처리, 재시도, 루프, 조건부 실행, 일시 중지 및 재개 등과 같은 다양한 기능을 지원한다. 작업의 방향성 비순환 그래프(DAG)를 정의하면 Argo가 Kubernetes에서 실행한다.
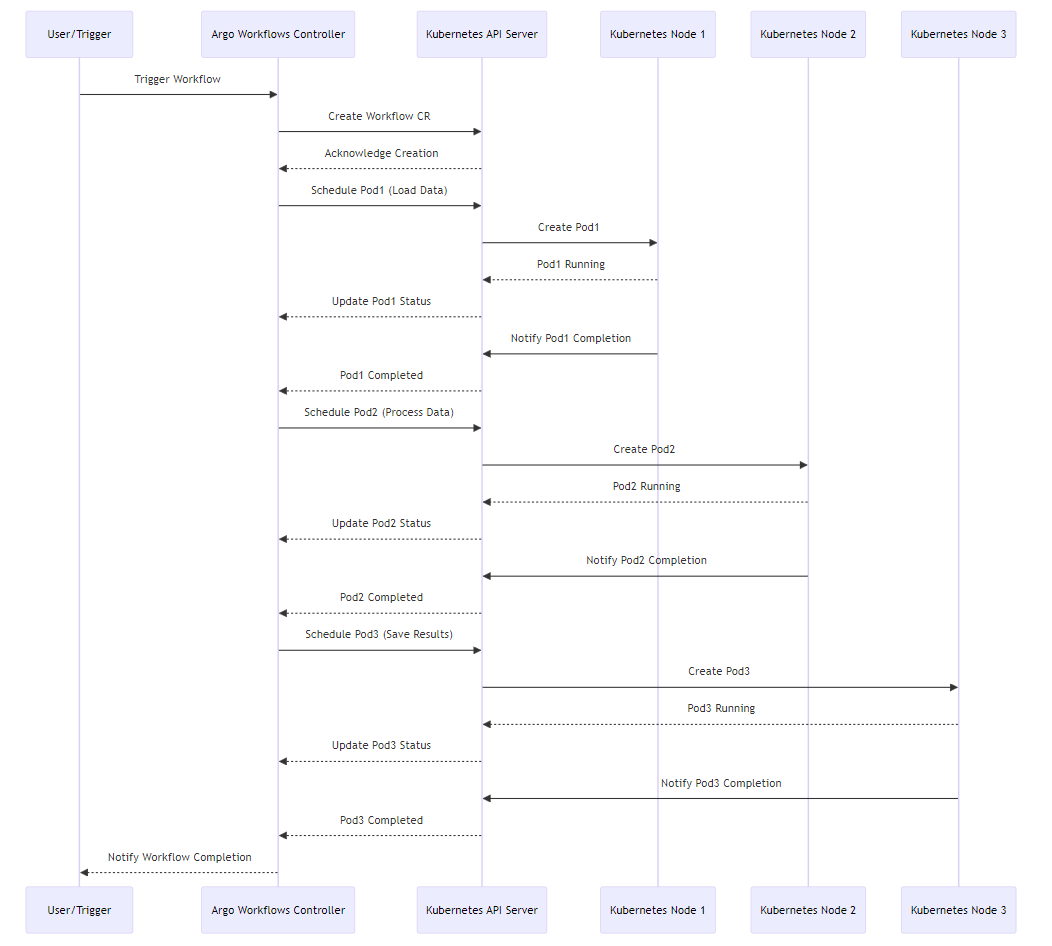
- 사용자 트리거 워크플로
- 컨트롤러가 워크플로 CR(사용자 지정 리소스)를 생성
- Kubernetes API가 생성을 승인
- Pod1이 스케줄링(데이터 로드)
- Node1은 Pod1이 Running인 것을 Kubernetes API 서버에 전달
- Kubernetes API 서버는 Pod1의 상태에 따라 컨트롤러 업데이트
- Pod1이 작업을 완료하면 Node1은 Kubernetes API 서버에 전달
- Kubernetes API 서버는 Pod1이 작업이 완료했음을 컨트롤러에 전달
- Pod2,3도 동일한 Workflow로 진행
- 모든 작업이 완료되면 컨트롤러는 전체 워크플로가 완료된것을 사용자에게 알림
Argo Workflow 설치
Argo Workflow 설치는 해당 사이트를 참고하면 된다.
GCE를 사용해서 VM을 만든뒤 Kind로 간단하게 설치할 예정이다.
kind(Kubernetes in Docker)란?
Overview kind(Kubernetes in Docker)에 대해서 알아보자. kind(Kubernetes in Docker)란? kind는 Docker 컨테이너 노드를 사용하여 로컬 Kubernetes 클러스터를 실행하기 위한 도구이다. kind는 주로 Kubernetes 자체를 테스
somaz.tistory.com
Kind 설치
30000번 포트를 하나 더 포트포워딩 해준다. 그 이유는 외부에서 30000번을 타고 argo-server로 접속을 해야하기 때문이다.
# cluster yaml 파일 생성
cat <<EOF > cluster-3nodes.yaml
kind: Cluster
apiVersion: kind.x-k8s.io/v1alpha4
nodes:
- role: control-plane
  extraPortMappings:
  - containerPort: 30000
    hostPort: 30000
    listenAddress: "0.0.0.0"
    protocol: TCP
- role: worker
- role: worker
EOF

# kind 설치
kind create cluster --name somaz-3nodes-kubernetes --config ./cluster-3nodes.yaml

# 설치 확인
k get nodes
NAME                                    STATUS   ROLES           AGE   VERSION
somaz-3nodes-kubernetes-control-plane   Ready    control-plane   77s   v1.27.3
somaz-3nodes-kubernetes-worker          Ready    <none>          54s   v1.27.3
somaz-3nodes-kubernetes-worker2         Ready    <none>          53s   v1.27.3
Argo Workflow 설치
최신버전의 Release 페이지를 보고싶으면 여기를 누르면 된다.
2024.01.08 기준
k create ns argo
k apply -n argo -f <https://github.com/argoproj/argo-workflows/releases/download/v3.5.4/quick-start-minimal.yaml>
NodePort로 오픈해준다.
k patch svc argo-server -n argo -p '{"spec": {"type": "NodePort", "ports": [{"nodePort": 30000, "port": 2746, "protocol": "TCP"}]}}'

# 확인
k get svc -n argo
NAME          TYPE        CLUSTER-IP     EXTERNAL-IP   PORT(S)             AGE
argo-server   NodePort    10.96.179.67   <none>        2746:30000/TCP      2m8s
httpbin       ClusterIP   10.96.141.30   <none>        9100/TCP            2m8s
minio         ClusterIP   10.96.182.4    <none>        9000/TCP,9001/TCP   2m8s
웹 접속을 위해 Compute Engine 방화벽을 오픈한다.
## Firewall ##
resource "google_compute_firewall" "test_server_ssh" {
  name    = "allow-ssh-test-server"
  network = var.shared_vpc

  allow {
    protocol = "tcp"
    ports    = ["22", "30000"]
  }

  source_ranges = ["${var.public_ip}/32", "${var.public_ip2}/32", "0.0.0.0/0"]
  target_tags   = [var.test_server]

  depends_on = [module.vpc]
}
argo-server는 기본적으로 클라이언트 인증이며, 따라서 UI는 클라이언트가 인증하기 위해 그들의 쿠버네티스 Bear Token을 제공해야 한다. 테스트 환경이기 때문에 일단 UI 로그인을 우회할 수 있도록 인증 모드를 서버로 전환한다.
kubectl patch deployment \\
  argo-server \\
  --namespace argo \\
  --type='json' \\
  -p='[{"op": "replace", "path": "/spec/template/spec/containers/0/args", "value": [
  "server",
  "--auth-mode=server"
]}]'
설치 후 접속 확인한다. `https://<External IP>:30000`

Argo Sensor Crd 설치
k create ns argo-events
k apply -n argo-events -f <https://raw.githubusercontent.com/argoproj/argo-events/stable/manifests/install.yaml>
Argo CLI 설치
해당 페이지를 참고한다. 아래는 Linux 기준이다.
# Download the binary
curl -sLO <https://github.com/argoproj/argo-workflows/releases/download/v3.5.4/argo-linux-amd64.gz>

# Unzip
gunzip argo-linux-amd64.gz

# Make binary executable
chmod +x argo-linux-amd64

# Move binary to path
sudo mv ./argo-linux-amd64 /usr/local/bin/argo

# Test installation
argo version

# auto completion
source <(argo completion bash)
rbac를 설정한다.
cat <<EOF > argo-rbac.yaml
apiVersion: rbac.authorization.k8s.io/v1
kind: ClusterRole
metadata:
  name: argo-workflows-cluster-role
rules:
  - apiGroups: ["argoproj.io"]
    resources:
      - "workflows"
      - "workflows/finalizers"
      - "workflowtemplates"
      - "cronworkflows"
      - "eventsources"
      - "sensors"
      - "workfloweventbindings"
    verbs: ["get", "list", "watch", "update", "patch", "delete"]
---
apiVersion: rbac.authorization.k8s.io/v1
kind: ClusterRoleBinding
metadata:
  name: argo-workflows-cluster-role-binding
roleRef:
  apiGroup: rbac.authorization.k8s.io
  kind: ClusterRole
  name: argo-workflows-cluster-role
subjects:
  - kind: ServiceAccount
    name: argo-server
    namespace: argo
EOF

k apply -f argo-rbac.yaml
Sample Workflow를 실행한다.
argo submit -n argo --watch <https://raw.githubusercontent.com/argoproj/argo-workflows/main/examples/hello-world.yaml>
...
STEP                  TEMPLATE  PODNAME            DURATION  MESSAGE
 ● hello-world-tcgdf  whalesay  hello-world-tcgdf  30s
Name:                hello-world-tcgdf
Namespace:           argo
ServiceAccount:      unset (will run with the default ServiceAccount)
Status:              Succeeded
Conditions:
 PodRunning          False
 Completed           True
Created:             Thu Jan 18 05:15:40 +0000 (30 seconds ago)
Started:             Thu Jan 18 05:15:40 +0000 (30 seconds ago)
Finished:            Thu Jan 18 05:16:10 +0000 (now)
Duration:            30 seconds
Progress:            1/1
ResourcesDuration:   8s*(100Mi memory),12s*(1 cpu)

STEP                  TEMPLATE  PODNAME            DURATION  MESSAGE
 ✔ hello-world-tcgdf  whalesay  hello-world-tcgdf  18s

Argo Workflow 실습
해당 페이지의 docs를 참고하여 실습을 진행해본다.
1. 다른 ServiceAccount를 사용하여 배포
# sa 생성
k create sa somaz -n argo

# clusterrolebinding yaml 파일 생성
cat <<EOF > somaz-rbac.yaml
apiVersion: rbac.authorization.k8s.io/v1
kind: ClusterRoleBinding
metadata:
  name: argo-workflows-cluster-role-binding-somaz
roleRef:
  apiGroup: rbac.authorization.k8s.io
  kind: ClusterRole
  name: argo-workflows-cluster-role
subjects:
  - kind: ServiceAccount
    name: somaz
    namespace: argo
EOF

# rbac 적용
k apply -f somaz-rbac.yaml
argo-rbac 수정한다.
cat <<EOF > argo-rbac.yaml
apiVersion: rbac.authorization.k8s.io/v1
kind: ClusterRole
metadata:
  name: argo-workflows-cluster-role
rules:
  - apiGroups: [""]
    resources: ["pods", "pods/log", "pods/exec"]
    verbs: ["create", "get", "list", "watch", "update", "patch", "delete"]
  - apiGroups: ["argoproj.io"]
    resources:
      - "workflows"
      - "workflows/finalizers"
      - "workflowtemplates"
      - "cronworkflows"
      - "eventsources"
      - "sensors"
      - "workfloweventbindings"
    verbs: ["get", "list", "watch", "update", "patch", "delete"]
---
apiVersion: rbac.authorization.k8s.io/v1
kind: ClusterRoleBinding
metadata:
  name: argo-workflows-cluster-role-binding
roleRef:
  apiGroup: rbac.authorization.k8s.io
  kind: ClusterRole
  name: argo-workflows-cluster-role
subjects:
  - kind: ServiceAccount
    name: argo-server
    namespace: argo
EOF

k apply -f argo-rbac.yaml
서비스 어카운트 지정하여 새로 생성한다.
# serviceaccount 지정하여 새로 생성
cat <<EOF > somaz-helloworld.yaml
apiVersion: argoproj.io/v1alpha1
kind: Workflow
metadata:
  generateName: hello-world-
  annotations:
    workflows.argoproj.io/description: "This is a somaz hello world sample."
spec:
  serviceAccountName: somaz  # Use your custom ServiceAccount here
  entrypoint: whalesay
  templates:
    - name: whalesay
      container:
        image: docker/whalesay
        command: [cowsay]
        args: ["hello world"]
        resources:  # limit the resources
          limits:
            memory: 32Mi
            cpu: 100m
EOF

k create -f somaz-helloworld.yaml -n argo
생성 완료되었다.
# 확인
k get workflow -n argo
NAME                           STATUS      AGE   MESSAGE
hello-world-vdt8g              Succeeded   42m
hello-world-wmnlt              Succeeded   40m

# 삭제
k delete workflow -n argo hello-world-vdt8g hello-world-wmnlt

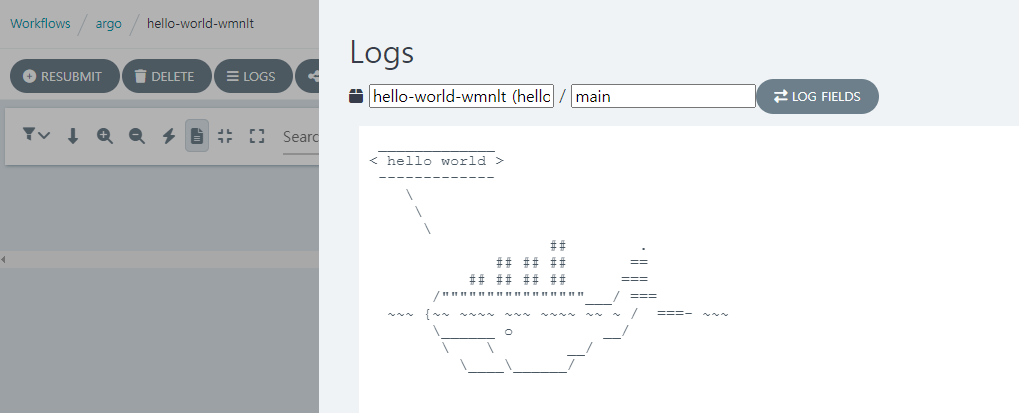
Workflow 선택후 Log 버튼을 누르면 아래와 같이 고래가 보인다?
2. Parameters
매개변수가 포함된 작업에 대해 알아보자.
# 파라미터 yaml 파일 생성
cat <<EOF > arguments-parameters.yaml
apiVersion: argoproj.io/v1alpha1
kind: Workflow
metadata:
  generateName: hello-world-parameters-
spec:
  # invoke the whalesay template with
  # "hello world" as the argument
  # to the message parameter
  entrypoint: whalesay
  arguments:
    parameters:
    - name: message
      value: hello world

  templates:
  - name: whalesay
    inputs:
      parameters:
      - name: message       # parameter declaration
    container:
      # run cowsay with that message input parameter as args
      image: docker/whalesay
      command: [cowsay]
      args: ["{{inputs.parameters.message}}"]
EOF

# 제출
argo submit arguments-parameters.yaml -p message="goodbye somaz" -n argo

# 확인1 kubectl
k get workflow -n argo
NAME                           STATUS      AGE    MESSAGE
hello-world-parameters-bj4nx   Succeeded   104s

# 확인2 argo cli
argo list -n argo
NAME                           STATUS      AGE   DURATION   PRIORITY   MESSAGE
hello-world-parameters-bj4nx   Succeeded   1m    10s        0
3. Parameters 활용
nginx pod 생성
# yaml 파일 생성
cat <<EOF > nginx-deployment.yaml
apiVersion: apps/v1
kind: Deployment
metadata:
  name: nginx-deployment
spec:
  replicas: 2
  selector:
    matchLabels:
      app: nginx
  template:
    metadata:
      labels:
        app: nginx
    spec:
      containers:
      - name: nginx
        image: nginx:latest
        ports:
        - containerPort: 80
EOF

# 배포
k apply -f nginx-deployment.yaml -n argo
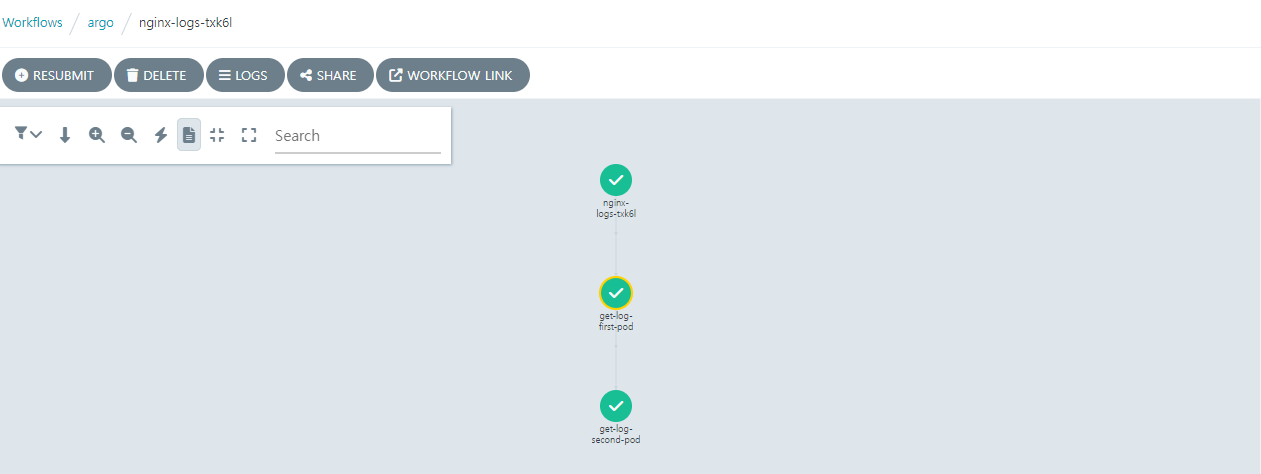
Argo Workflow를 생성하여 로그를 검색한다.
cat <<EOF > nginx-logs-workflow.yaml
apiVersion: argoproj.io/v1alpha1
kind: Workflow
metadata:
  generateName: nginx-logs-
spec:
  entrypoint: get-nginx-logs
  serviceAccountName: argo-server  # Assuming argo-server has the necessary permissions
  templates:
  - name: get-nginx-logs
    steps:
    - - name: get-log-first-pod
        template: log
        arguments:
          parameters:
          - name: pod-name
            value: "nginx-deployment-57d84f57dc-4g5vv"  # Adjust the pod name as needed
    - - name: get-log-second-pod
        template: log
        arguments:
          parameters:
          - name: pod-name
            value: "nginx-deployment-57d84f57dc-5jc4t"  # Adjust the pod name as needed

  - name: log
    inputs:
      parameters:
      - name: pod-name
    container:
      image: bitnami/kubectl  # Use an image with kubectl installed
      command: [sh, -c]
      args: ["kubectl logs {{inputs.parameters.pod-name}} -n argo"]
EOF

argo submit nginx-logs-workflow.yaml -n argo --parameter nginx-pod-1=nginx-deployment-57d84f57dc-4g5vv --parameter nginx-pod-2=nginx-deployment-57d84f57dc-5jc4t
그럼 아래와 같이 Workflow가 보인다.
이렇게 log도 보인다.

CLI로 확인해도 동일하다.
k logs -n argo nginx-logs-txk6l-log-1797578939
time="2024-01-18T09:14:49.951Z" level=info msg="capturing logs" argo=true
/docker-entrypoint.sh: /docker-entrypoint.d/ is not empty, will attempt to perform configuration
/docker-entrypoint.sh: Looking for shell scripts in /docker-entrypoint.d/
/docker-entrypoint.sh: Launching /docker-entrypoint.d/10-listen-on-ipv6-by-default.sh
10-listen-on-ipv6-by-default.sh: info: Getting the checksum of /etc/nginx/conf.d/default.conf
10-listen-on-ipv6-by-default.sh: info: Enabled listen on IPv6 in /etc/nginx/conf.d/default.conf
/docker-entrypoint.sh: Sourcing /docker-entrypoint.d/15-local-resolvers.envsh
/docker-entrypoint.sh: Launching /docker-entrypoint.d/20-envsubst-on-templates.sh
/docker-entrypoint.sh: Launching /docker-entrypoint.d/30-tune-worker-processes.sh
/docker-entrypoint.sh: Configuration complete; ready for start up
2024/01/18 09:10:53 [notice] 1#1: using the "epoll" event method
2024/01/18 09:10:53 [notice] 1#1: nginx/1.25.3
2024/01/18 09:10:53 [notice] 1#1: built by gcc 12.2.0 (Debian 12.2.0-14)
2024/01/18 09:10:53 [notice] 1#1: OS: Linux 5.15.0-1048-gcp
2024/01/18 09:10:53 [notice] 1#1: getrlimit(RLIMIT_NOFILE): 1048576:1048576
2024/01/18 09:10:53 [notice] 1#1: start worker processes
2024/01/18 09:10:53 [notice] 1#1: start worker process 35
2024/01/18 09:10:53 [notice] 1#1: start worker process 36
2024/01/18 09:10:53 [notice] 1#1: start worker process 37
2024/01/18 09:10:53 [notice] 1#1: start worker process 38
4. Steps
단계별 Workflow를 만드는 방법, 두개 이상의 템플릿 정의 그리고 중첩된 Workflow를 만드는 방법에 대해서 알아보려고 한다.
cat <<EOF > step-hello.yaml
apiVersion: argoproj.io/v1alpha1
kind: Workflow
metadata:
  generateName: steps-
spec:
  entrypoint: hello-hello-hello

  # This spec contains two templates: hello-hello-hello and whalesay
  templates:
  - name: hello-hello-hello
    # Instead of just running a container
    # This template has a sequence of steps
    steps:
    - - name: hello1            # hello1 is run before the following steps
        template: whalesay
        arguments:
          parameters:
          - name: message
            value: "hello1"
    - - name: hello2a           # double dash => run after previous step
        template: whalesay
        arguments:
          parameters:
          - name: message
            value: "hello2a"
      - name: hello2b           # single dash => run in parallel with previous step
        template: whalesay
        arguments:
          parameters:
          - name: message
            value: "hello2b"

  # This is the same template as from the previous example
  - name: whalesay
    inputs:
      parameters:
      - name: message
    container:
      image: docker/whalesay
      command: [cowsay]
      args: ["{{inputs.parameters.message}}"]
EOF

argo submit step-hello.yaml -n argo
템플릿 `hello-hello-hello`은 3개로 구성 구성된다. `hello1`이라는 이름의 첫 번째 단계는 순차적으로 실행되고 `hello2a`와 `hello2b`라는 이름의 다음 두 단계는 서로 병렬적으로 실행된다.

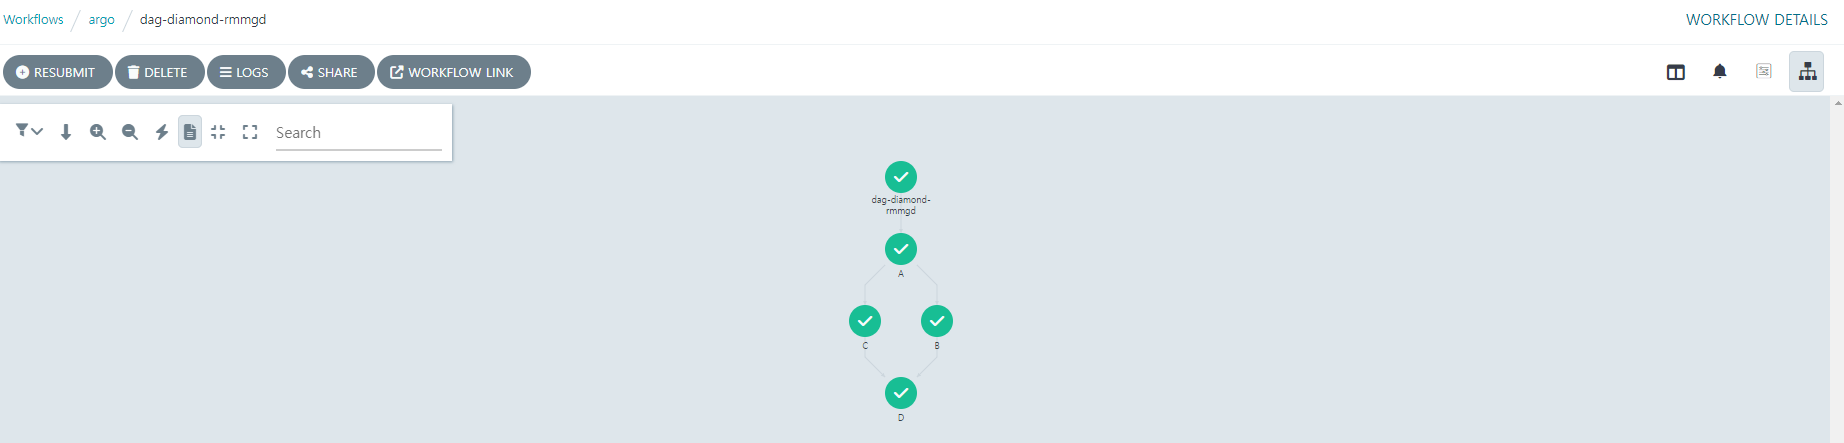
5. DAG
각 작업의 종속성을 지정하여 워크플로를 방향성 비순환 그래프(DAG)로 정의할 수 있다. DAG는 복잡한 워크플로를 유지하기가 더 간단할 수 있으며 작업을 실행할 때 최대 병렬 처리를 허용한다.
cat <<EOF > dag.yaml
apiVersion: argoproj.io/v1alpha1
kind: Workflow
metadata:
  generateName: dag-diamond-
spec:
  entrypoint: diamond
  templates:
  - name: echo
    inputs:
      parameters:
      - name: message
    container:
      image: alpine:3.7
      command: [echo, "{{inputs.parameters.message}}"]
  - name: diamond
    dag:
      tasks:
      - name: A
        template: echo
        arguments:
          parameters: [{name: message, value: A}]
      - name: B
        dependencies: [A]
        template: echo
        arguments:
          parameters: [{name: message, value: B}]
      - name: C
        dependencies: [A]
        template: echo
        arguments:
          parameters: [{name: message, value: C}]
      - name: D
        dependencies: [B, C]
        template: echo
        arguments:
          parameters: [{name: message, value: D}]
EOF

argo submit dag.yaml -n argo
해당 워크플로에서는 종속성이 없는 A가 먼저 실행된다. A가 끝난뒤 B와 C가 동시에 실행된 후 B와 C가 종료 된 후에 D가 실행된다.
마무리: Kubernetes 네이티브 CI/CD의 진화, Argo Workflows
Argo Workflow는 단순한 워크플로우 실행 엔진을 넘어, 다양한 Kubernetes 네이티브 기능과 연동이 가능하다는 점에서 그 활용 범위가 상당히 넓다.
예를 들어, Argo Events와의 통합을 통해 특정 Git 이벤트나 S3 업로드, Pub/Sub 메시지 수신 등을 트리거로 하여 워크플로우를 자동 실행할 수 있다. 이로 인해 이벤트 기반 CI/CD, 데이터 파이프라인 자동화, 실시간 로그 처리와 같은 시나리오까지 손쉽게 구축할 수 있다.
또한, Argo Workflow는 Helm과의 결합도 뛰어나 HelmRelease 리소스를 템플릿화하여 선언적으로 Helm Chart 배포도 가능하다. 이처럼 GitOps, Helm, Event Trigger 등 다양한 방식과 자연스럽게 엮이면서 DevOps 환경 내 중심축으로 자리잡을 수 있다.
고급 기능 중 하나로는 CronWorkflow를 통해 스케줄 기반 실행도 가능하다는 점이 있다.
일반적인 CronJob보다 유연한 DAG 설계와 재시도, 에러 처리 기능이 탑재되어 있어, 반복되는 운영 작업에도 적합하다. 예를 들어 매일 정해진 시간에 로그 압축, 보고서 생성, 백업 처리 등의 작업을 수행할 수 있다.
Argo Workflow는 GitOps 방식의 배포만 제공하는 ArgoCD와는 달리, 데이터 처리, 백오피스 작업, ML 파이프라인, 테스트 자동화 등 다양한 목적의 컨테이너 워크플로우를 Kubernetes 상에서 선언형으로 구성할 수 있는 강력한 도구이다.
특히 다음과 같은 환경에 매우 유용하다.
- 경량화된 CI/CD 파이프라인이 필요한 프로젝트
- 복잡한 작업 흐름(Dependency Graph)이 필요한 배치/분석 환경
- Kubernetes 기반의 데이터 파이프라인, AI/ML 워크플로 설계
향후에는 Argo Workflow를 Argo Events, Argo Rollouts 등과 통합하거나, GitHub Actions 등 외부 시스템과 연동하여 하이브리드 자동화 환경을 구성하는 사례도 소개할 예정이다.
워크플로우 기반 자동화의 새로운 접근을 고려 중이라면, Argo Workflow는 분명 강력한 선택지가 될 것이다.
Reference
https://coffeewhale.com/kubernetes/workflow/argo/2020/02/14/argo-wf/
https://argo-workflows.readthedocs.io/en/latest/quick-start/
https://velog.io/@curiosity806/KubernetesArgoCD-Argo-WorkflowsEvents-도입기
https://argo-workflows.readthedocs.io/en/latest/walk-through/
https://github.com/argoproj/argo-workflows/blob/main/examples/README.md
https://engmisankim.tistory.com/23
'IaC > CI CD Tool' 카테고리의 다른 글
| 5. Github Action (With Using jobs in a workflow & Choosing the runner for a job) (0) | 2024.03.15 |
|---|---|
| 4. Github Action (With Matrix Strategy) (2) | 2024.03.12 |
| ArgoCD ApplicationSet이란? (작성 방법) (0) | 2023.10.06 |
| 5. GitLab ArgoCD 연동 (0) | 2023.08.10 |
| ArgoCD 설치 AWS & GCP (0) | 2023.08.09 |