
Overview
이번 글에서는 Cilium의 개념부터 설치, 구성, 관측, 정책 적용, 그리고 네트워크 트래픽 흐름 분석까지 전반적인 실습을 통해 알아보았다.
Cilium은 eBPF(Extended Berkeley Packet Filter) 기술을 기반으로 하여, 기존 iptables 기반 CNI보다 더 높은 성능과 보안, 그리고 정교한 관찰 가능성(Observability)을 제공하는 쿠버네티스 네트워크 및 보안 솔루션이다.
Cilium은 단순한 CNI 플러그인을 넘어, 다음과 같은 핵심 기능들을 제공한다.
- 고성능 네트워크 정책 제어
- L7 (HTTP/gRPC) 기반 정책 지원
- Hubble을 통한 실시간 트래픽 관찰 및 시각화
- Sidecar 없는 쿠버네티스 서비스 메시 구현
- 쿠버네티스와의 완벽한 통합
이번 실습에서는 Kubespray로 Cilium을 설치하고, 다양한 네트워크 정책 및 트래픽 흐름을 실시간으로 관찰하면서 Cilium의 실질적인 운영 방식을 이해할 수 있었다.

📅 관련 글
2024.02.02 - [Container Orchestration/Kubernetes] - Kubernetes Network
2025.01.14 - [Container Orchestration/Kubernetes] - Kubernetes IPVS vs iptables
2025.03.21 - [Container Orchestration/Kubernetes] - Kubernetes Gateway API 완전 정복
2024.12.03 - [Container Orchestration/Kubernetes] - Kubernetes Headless Service란?
2025.03.05 - [Container Orchestration/Kubernetes] - Kubernetes Endpoint와 EndpointSlice 완벽 정리
Cilium이란?
Cilium은 컨테이너 워크로드 간의 네트워크 연결을 제공, 보안 및 관찰하기 위한 오픈 소스 소프트웨어이다. 클라우드 네이티브 환경에 중점을 두고 개발된 Cilium은 특히 Kubernetes에서 실행되는 애플리케이션에 적합하다.
Cilium은 eBPF(Extended Berkeley Packet Filter)라는 강력한 기술을 기반으로 하여 기존 오버레이 네트워크 없이 리눅스 커널 내에서 직접 고급 네트워킹, 보안 및 로드 밸런싱 기능을 수행할 수 있다.
eBPF를 사용하면 Cilium이 매우 효율적이고 확장성이 높아지는데, 이는 마이크로서비스 아키텍처와 같은 동적이고 분산된 환경에서 매우 중요하다. 컨테이너 기반 시스템에서 라우팅, 로드 밸런싱, 방화벽과 같은 표준 네트워킹 작업에 대한 유연하고 안전한 접근 방식을 제공한다.
- 네트워킹 및 보안
- Cilium은 Cubernetes를 위한 CNI (Container Network Interface) 플러그인으로 기능하며, 포드와 외부 서비스 간의 네트워킹 및 보안을 처리한다. 기존의 IP-table 기반 접근 방식을 eBPF로 대체하여 보다 효율적인 패킷 라우팅, 대역폭 관리 및 액세스 제어를 가능하게 한다.
- eBPF 기술
- Cilium의 초석은 리눅스 커널 내에서 프로그래밍 가능한 패킷 처리를 허용하는 혁신적인 기술인 eBPF이다. 이로 인해 기존 방법으로는 달성할 수 없는 고성능 및 저지연 네트워킹이 발생한다.
- 관찰 가능성 및 모니터링
- Cilium은 네트워크 동작, 보안 사고 및 전반적인 성능에 대한 자세한 정보를 제공하는 광범위한 관찰 가능성 기능을 제공한다. 이러한 측면은 복잡한 분산 시스템에서 디버깅과 모니터링에 매우 중요하다.
- 보안 정책
- 패킷 수준에서 보안 정책을 투명하게 삽입하고 시행하여 보안을 강화한다. Cilium의 보안 기능으로는 API 인식 네트워크 보안, ID 기반 보안, 응용 계층(Layer 7)에서 정책을 시행하는 기능 등이 있다.
- 클라우드 네이티브 툴과의 통합
- Cilium은 클라우드 네이티브 환경에 맞게 설계되어 Kubernetes와 같은 인기 있는 오케스트레이션 툴과 원활하게 통합되어 네트워크 정책, 서비스 로드 밸런싱 및 포드의 원활한 네트워크 연결을 지원한다.
- 확장성 및 성능
- Cilium은 eBPF를 활용하여 높은 효율성으로 작동하므로 고부하 환경에 적합하다. 대규모 애플리케이션에 필수적인 대규모 클러스터 및 고처리량 네트워크를 큰 오버헤드 없이 처리한다.
Cilium 아키텍처

Cilium Component
Agent
Cilium 에이전트( cilium-agent)는 클러스터의 각 노드에서 실행된다. 높은 수준에서 에이전트는 네트워킹, 서비스 로드 밸런싱, 네트워크 정책, 가시성 및 모니터링 요구 사항을 설명하는 Kubernetes 또는 API를 통해 구성을 허용한다.
Client(CLI)
Cilium CLI 클라이언트( cilium)는 Cilium 에이전트와 함께 설치되는 명령줄 도구이다. 동일한 노드에서 실행되는 Cilium 에이전트의 REST API와 상호 작용한다. CLI를 사용하면 로컬 에이전트의 상태를 검사할 수 있다. 또한 eBPF 맵에 직접 액세스하여 상태를 검증할 수 있는 도구도 제공한다.
Operator
Cilium Operator는 클러스터의 각 노드에 대해 한 번이 아닌 전체 클러스터에 대해 논리적으로 한 번 처리되어야 하는 클러스터의 업무를 관리하는 일을 담당한다. Cilium 운영자는 전달 또는 네트워크 정책 결정에 있어 중요한 경로에 있지 않다. 클러스터는 일반적으로 운영자가 일시적으로 사용할 수 없는 경우에도 계속 작동한다. 그러나 구성에 따라 운영자 가용성에 실패하면 다음과 같은 결과가 발생할 수 있다.
- IPAM(IP 주소 관리) 이 지연 되어 운영자가 새 IP 주소를 할당해야 하는 경우 새 워크로드 예약이 지연된다.
- kvstore 하트비트 키를 업데이트하지 못하여 에이전트가 kvstore 비정상 상태를 선언하고 다시 시작하게 된다.
CNI Plugin
CNI 플러그인( cilium-cni)은 노드에서 포드가 예약되거나 종료될 때 Kubernetes에 의해 호출된다. 이는 노드의 Cilium API와 상호 작용하여 포드에 대한 네트워킹, 로드 밸런싱 및 네트워크 정책을 제공하는 데 필요한 데이터 경로 구성을 트리거한다.
Cilium 설치
Kubespray를 사용해 Kubernetes를 설치해보려고 한다. CNI는 Calico가 아닌 Cilium으로 구성하겠다.
2024.01.22 기준이다.
시스템 구성
OS : Ubuntu 20.04 LTS(Focal)
Cloud: Google Compute Engine
| Master Node(Control Plane) | IP | CPU | Memory |
| test-server | 10.77.101.62 | 2 | 8096MB |
| Worker Node | IP | CPU | Memory |
| test-server-agent | 10.77.101.57 | 2 | 8096MB |
VM 생성
Control Node
## test_server ##
resource "google_compute_address" "test_server_ip" {
  name = var.test_server_ip
}

resource "google_compute_instance" "test_server" {
  name                      = var.test_server
  machine_type              = "n2-standard-2"
  labels                    = local.default_labels
  zone                      = "${var.region}-a"
  allow_stopping_for_update = true

  tags = [var.kubernetes_server, var.kubernetes_client]

  boot_disk {
    initialize_params {
      image = "ubuntu-os-cloud/ubuntu-2004-lts"
      size  = 10
    }
  }

  metadata = {
    ssh-keys = "somaz:${file("~/.ssh/id_rsa_somaz94.pub")}"
  }

  network_interface {
    network    = var.shared_vpc
    subnetwork = "${var.subnet_share}-mgmt-a"

    access_config {
      ## Include this section to give the VM an external ip ##
      nat_ip = google_compute_address.test_server_ip.address
    }
  }

  depends_on = [google_compute_address.test_server_ip]

}

# test
variable "test_server" {}
variable "test_server_ip" {}
variable "kubernetes_server" {}
variable "kubernetes_client" {}

test_server     = "test-server"
test_server_ip  = "test-server-ip"
kubernetes_server  = "kubernetes-server"
kubernetes_client  = "kubernetes-client"
Worker Node
## test_server_agent ##
resource "google_compute_address" "test_server_agent_ip" {
  name = var.test_server_agent_ip
}

resource "google_compute_instance" "test_server_agent" {
  name                      = var.test_server_agent
  machine_type              = "n2-standard-2"
  labels                    = local.default_labels
  zone                      = "${var.region}-a"
  allow_stopping_for_update = true

  tags = [var.kubernetes_server, var.kubernetes_client]

  boot_disk {
    initialize_params {
      image = "ubuntu-os-cloud/ubuntu-2004-lts"
      size  = 10
    }
  }

  metadata = {
    ssh-keys = "somaz:${file("~/.ssh/id_rsa_somaz94.pub")}"
  }

  network_interface {
    network    = var.shared_vpc
    subnetwork = "${var.subnet_share}-mgmt-a"

    access_config {
      ## Include this section to give the VM an external ip ##
      nat_ip = google_compute_address.test_server_agent_ip.address
    }
  }

  depends_on = [google_compute_address.test_server_agent_ip]

}

# test_agent
variable "test_server_agent" {}
variable "test_server_agent_ip" {}

test_server_agent     = "test-server-agent"
test_server_agent_ip  = "test-server-agent-ip"
Requirements
SSH 키 생성 및 복사
Google Compute Engine으로 생성했기 때문에 나는 로컬의 SSH Private Key를 옮겨주기만 하였다.
ssh-keygen

ssh-copy-id somaz@10.77.101.57

# vi /etc/hosts
127.0.0.1 localhost

# The following lines are desirable for IPv6 capable hosts
::1 ip6-localhost ip6-loopback
fe00::0 ip6-localnet
ff00::0 ip6-mcastprefix
ff02::1 ip6-allnodes
ff02::2 ip6-allrouters
ff02::3 ip6-allhosts
169.254.169.254 metadata.google.internal metadata

# 추가
10.77.101.62 test-server
10.77.101.57 test-server-agent

# 확인
ssh test-server-agent
패키지 설치
해당 부분이 제일 중요하다. python을 3.10 버전을 설치해 줘야 한다.
# python 3.10 설치
sudo add-apt-repository ppa:deadsnakes/ppa
sudo apt-get update
sudo apt install -y python3.10 python3-pip git python3.10-venv

# python 버전 확인
python3.10 --version
Python 3.10.13
Kubespray 배포
Git 저장소 클론 후 requirements.txt 파일 의존성 확인 및 설치
git clone <https://github.com/kubernetes-sigs/kubespray.git>

VENVDIR=kubespray-venv
KUBESPRAYDIR=kubespray
python3.10 -m venv $VENVDIR
source $VENVDIR/bin/activate
cd $KUBESPRAYDIR

pip install -U -r requirements.txt
Ansible 인벤토리 준비
cp -rfp inventory/sample inventory/somaz-cluster

# 인벤토리 빌더로 Ansible 인벤토리 파일 업데이트
declare -a IPS=(10.77.101.62 10.77.101.57)
CONFIG_FILE=inventory/somaz-cluster/hosts.yaml python3 contrib/inventory_builder/inventory.py ${IPS[@]}
인벤토리 수정
`inventory/somaz-cluster/group_vars/k8s_cluster/k8s-cluster.yml`
...
# Choose network plugin (cilium, calico, kube-ovn, weave or flannel. Use cni for generic cni plugin)
# Can also be set to 'cloud', which lets the cloud provider setup appropriate routing
kube_network_plugin: cilium
`inventory/somaz-cluster/inventory.ini`
# ## Configure 'ip' variable to bind kubernetes services on a
# ## different ip than the default iface
# ## We should set etcd_member_name for etcd cluster. The node that is not a etcd member do not need to set the value, or can set the empty string value.
[all]
test-server ansible_host=10.77.101.62  ip=10.77.101.62 #etcd_member_name=etcd1
test-server-agent ansible_host=10.77.101.57  ip=10.77.101.57 #etcd_member_name=etcd2
# node3 ansible_host=95.54.0.14  # ip=10.3.0.3 etcd_member_name=etcd3
# node4 ansible_host=95.54.0.15  # ip=10.3.0.4 etcd_member_name=etcd4
# node5 ansible_host=95.54.0.16  # ip=10.3.0.5 etcd_member_name=etcd5
# node6 ansible_host=95.54.0.17  # ip=10.3.0.6 etcd_member_name=etcd6

# ## configure a bastion host if your nodes are not directly reachable
# [bastion]
# bastion ansible_host=x.x.x.x ansible_user=some_user

[kube_control_plane]
test-server

[etcd]
test-server
# node2
# node3

[kube_node]
test-server-agent
# node3
# node4
# node5
# node6

[calico_rr]

[k8s_cluster:children]
kube_control_plane
kube_node
calico_rr
`inventory/somaz-cluster/group_vars/k8s_cluster/addons.yml`
여러가지 addon을 함께 설치할 수 있다.
# Helm deployment
helm_enabled: true

# Registry deployment
registry_enabled: false
# registry_namespace: kube-system
# registry_storage_class: ""
# registry_disk_size: "10Gi"

# Metrics Server deployment
metrics_server_enabled: false
# metrics_server_container_port: 10250
# metrics_server_kubelet_insecure_tls: true
# metrics_server_metric_resolution: 15s
# metrics_server_kubelet_preferred_address_types: "InternalIP,ExternalIP,Hostname"
# metrics_server_host_network: false
# metrics_server_replicas: 1

# Rancher Local Path Provisioner
local_path_provisioner_enabled: false
# local_path_provisioner_namespace: "local-path-storage"
# local_path_provisioner_storage_class: "local-path"
# local_path_provisioner_reclaim_policy: Delete
# local_path_provisioner_claim_root: /opt/local-path-provisioner/
# local_path_provisioner_debug: false
# local_path_provisioner_image_repo: "rancher/local-path-provisioner"
# local_path_provisioner_image_tag: "v0.0.24"
# local_path_provisioner_helper_image_repo: "busybox"
# local_path_provisioner_helper_image_tag: "latest"

# Local volume provisioner deployment
local_volume_provisioner_enabled: false
...
ingress_nginx_enabled: true
...
metallb_enabled: true
...
metallb_protocol: "layer2"
...
metallb_config:
  address_pools:
    primary:
      ip_range:
        - 192.168.56.200-192.168.56.209 # Change your ip range
      auto_assign: true
...
  layer2:
    - primary
...
`inventory/somaz-cluster/group_vars/k8s_cluster/k8s-cluster.yml`
...
# configure arp_ignore and arp_announce to avoid answering ARP queries from kube-ipvs0 interface
# must be set to true for MetalLB, kube-vip(ARP enabled) to work
kube_proxy_strict_arp: false
...
- metallb를 사용하려면 true로 설정해야 한다.
`inventory/somaz-cluster/group_vars/k8s_cluster/k8s-net-cilium.yml`
...
# Hubble
### Enable Hubble without install
 cilium_enable_hubble: true
### Enable Hubble Metrics
 cilium_enable_hubble_metrics: true
### if cilium_enable_hubble_metrics: true
 cilium_hubble_metrics:
   - dns
   - drop
   - tcp
   - flow
   - icmp
   - http
### Enable Hubble install
 cilium_hubble_install: true
### Enable auto generate certs if cilium_hubble_install: true
 cilium_hubble_tls_generate: true
- hubble을 설치하려면 해당 파일을 수정한다.
Ansible 통신 가능 확인
# 주의할점 ~/kubespray 해당경로에서 진행
ansible all -i inventory/somaz-cluster/inventory.ini -m ping
[WARNING]: Skipping callback plugin 'ara_default', unable to load
test-server-agent | SUCCESS => {
    "ansible_facts": {
        "discovered_interpreter_python": "/usr/bin/python3"
    },
    "changed": false,
    "ping": "pong"
}
test-server | SUCCESS => {
    "ansible_facts": {
        "discovered_interpreter_python": "/usr/bin/python3"
    },
    "changed": false,
    "ping": "pong"
}

# apt cache update(option)
ansible all -i inventory/somaz-cluster/inventory.ini -m apt -a 'update_cache=yes' --become
플레이북 실행
# 주의할점 ~/kubespray 해당경로에서 진행
ansible-playbook -i inventory/somaz-cluster/inventory.ini cluster.yml --become
자격증명 가져오기
mkdir ~/.kube
sudo cp /etc/kubernetes/admin.conf ~/.kube/config
sudo chown $USER:$USER ~/.kube/config
kubelet 설치 및 자동완성
echo '# kubectl completion and alias' >> ~/.bashrc
echo 'source <(kubectl completion bash)' >> ~/.bashrc
echo 'alias k=kubectl' >> ~/.bashrc
echo 'complete -F __start_kubectl k' >> ~/.bashrc

# bashrc 적용
source ~/.bashrc
설치 확인
k get nodes
NAME                STATUS   ROLES           AGE     VERSION
test-server         Ready    control-plane   2m34s   v1.28.6
test-server-agent   Ready    <none>          107s    v1.28.6

k cluster-info
Kubernetes control plane is running at <https://127.0.0.1:6443>

To further debug and diagnose cluster problems, use 'kubectl cluster-info dump'.

k get po -n kube-system
NAME                                  READY   STATUS      RESTARTS   AGE
cilium-5s4ll                          1/1     Running     0          107s
cilium-operator-94687ffb9-f8wnw       1/1     Running     0          109s
cilium-operator-94687ffb9-hfjxf       1/1     Running     0          109s
cilium-rnnfg                          1/1     Running     0          107s
coredns-77f7cc69db-nlccn              1/1     Running     0          70s
coredns-77f7cc69db-wnd7b              1/1     Running     0          75s
dns-autoscaler-8576bb9f5b-rt4kf       1/1     Running     0          71s
hubble-generate-certs-qxqq6           0/1     Completed   0          100s
hubble-relay-7885f9fbfd-hxrw7         1/1     Running     0          100s
hubble-ui-588b99bb69-jxclv            2/2     Running     0          100s
kube-apiserver-test-server            1/1     Running     1          2m59s
kube-controller-manager-test-server   1/1     Running     2          2m59s
kube-proxy-2mv58                      1/1     Running     0          2m9s
kube-proxy-8bbnn                      1/1     Running     0          2m9s
kube-scheduler-test-server            1/1     Running     1          2m59s
nginx-proxy-test-server-agent         1/1     Running     0          2m11s
nodelocaldns-44kv4                    1/1     Running     0          71s
nodelocaldns-j85t8                    1/1     Running     0          71s
Cilium CLI 설치
curl -LO <https://github.com/cilium/cilium-cli/releases/latest/download/cilium-linux-amd64.tar.gz>

sudo tar xzvfC cilium-linux-amd64.tar.gz /usr/local/bin
rm cilium-linux-amd64.tar.gz

# 상태확인
cilium status
    /¯¯\\
 /¯¯\\__/¯¯\\    Cilium:             OK
 \\__/¯¯\\__/    Operator:           OK
 /¯¯\\__/¯¯\\    Envoy DaemonSet:    disabled (using embedded mode)
 \\__/¯¯\\__/    Hubble Relay:       OK
    \\__/       ClusterMesh:        disabled

DaemonSet              cilium             Desired: 2, Ready: 2/2, Available: 2/2
Deployment             hubble-ui          Desired: 1, Ready: 1/1, Available: 1/1
Deployment             hubble-relay       Desired: 1, Ready: 1/1, Available: 1/1
Deployment             cilium-operator    Desired: 2, Ready: 2/2, Available: 2/2
Containers:            cilium             Running: 2
                       hubble-ui          Running: 1
                       hubble-relay       Running: 1
                       cilium-operator    Running: 2
Cluster Pods:          5/5 managed by Cilium
Helm chart version:
Image versions         hubble-relay       quay.io/cilium/hubble-relay:v1.13.4: 1
                       cilium-operator    quay.io/cilium/operator:v1.13.4: 2
                       cilium             quay.io/cilium/cilium:v1.13.4: 2
                       hubble-ui          quay.io/cilium/hubble-ui:v0.11.0: 1
                       hubble-ui          quay.io/cilium/hubble-ui-backend:v0.11.0: 1
Cilium CNI의 Pod 통신
아래의 블로그를 참고하였다.
- https://arthurchiao.art/blog/cilium-life-of-a-packet-pod-to-service/
- https://malwareanalysis.tistory.com/290
서비스의 백엔드 파드가 다른 노드에서 실행되는 노드의 파드에서 ServiceIP에 액세스하는 예를 통해 Cilium의 자세한 패킷 전달 경로를 탐색하거나 발견할 것이다.

각 노드 cilium 클라이언트 alias설정
# 확인
kubectl get pods -n kube-system -l k8s-app=cilium -o wide
NAME           READY   STATUS    RESTARTS   AGE   IP              NODE                 NOMINATED NODE   READINESS GATES
cilium-clssc   1/1     Running   0          46m   10.77.101.57    test-server-agent    <none>           <none>
cilium-f7srt   1/1     Running   0          27m   10.77.101.200   test-server2-agent   <none>           <none>
cilium-tzvgd   1/1     Running   0          46m   10.77.101.62    test-server          <none>           <none>

# pod name 변수지정
CILIUMPOD0=$(kubectl get pods -n kube-system -l k8s-app=cilium --field-selector spec.nodeName=test-server -o jsonpath='{.items[0].metadata.name}')
CILIUMPOD1=$(kubectl get pods -n kube-system -l k8s-app=cilium --field-selector spec.nodeName=test-server-agent -o jsonpath='{.items[0].metadata.name}')
CILIUMPOD2=$(kubectl get pods -n kube-system -l k8s-app=cilium --field-selector spec.nodeName=test-server2-agent -o jsonpath='{.items[0].metadata.name}')

# 확인
echo $CILIUMPOD0
echo $CILIUMPOD1
echo $CILIUMPOD2

# 단축키(alias) 지정
alias c0="kubectl exec -it $CILIUMPOD0 -n kube-system -- cilium"
alias c1="kubectl exec -it $CILIUMPOD1 -n kube-system -- cilium"
alias c2="kubectl exec -it $CILIUMPOD2 -n kube-system -- cilium"
- 특히 Cilium과 같은 CNI를 사용할 때 Kubernetes 환경에서 트래픽 라우팅이 작동하는 방식과 이 라우팅 정보를 볼 수 있는 방법에 대한 설명을 자세히 살펴보겠다.
트래픽 라우팅 이해
- 기본 게이트웨이 및 라우팅 주소
- 패킷이 포드에서 전송되면 먼저 기본 게이트웨이에 도달한다.
- 기본 게이트웨이는 패킷의 다음 홉을 결정한다. 이 결정은 라우팅 테이블을 기반으로 한다.
- Kubernetes 클러스터에서 다음 홉은 대상 Pod가 있는 노드 IP인 경우가 많다.
- 라우팅 테이블
- 라우팅 테이블에는 다양한 네트워크 경로와 해당 목적지에 대한 정보가 포함되어 있다.
- 키는 일반적으로 대상 네트워크이고 값은 다음 홉 또는 종료 인터페이스인 키-값 형식으로 저장된다.
- Kubernetes 노드는 클러스터 내에서 트래픽을 올바르게 전달하기 위해 이러한 라우팅 테이블을 유지한다.
- 커널 라우팅
- 라우팅 테이블에서 다음 홉(노드 IP)이 결정되면 Linux 커널의 라우팅 메커니즘이 이어받는다.
- 커널은 목적지에 도달하기 위해 적절한 네트워크 인터페이스를 통해 패킷을 라우팅한다.
Cilium 및 IPCache
- Cilium의 역할: Cilium은 네트워크 정책, 로드 밸런싱 등을 효율적으로 관리하여 Kubernetes 네트워킹 및 보안을 강화한다. 고성능 패킷 필터링 및 라우팅을 위해 eBPF 기술을 사용한다.
eBPF = Extended Berkeley Packet Filter 의 약자이다.
원래는 리눅스 커널에서 패킷 필터링을 효율적으로 하기 위한 기술(네트워크 패킷 검사용)이었는데
지금은 범용적인 커널 프로그래밍 기술로 진화했다.
쉽게 말하면?
→ 리눅스 커널 내부에서 "유저가 작성한 작은 프로그램"을 안전하게 실행할 수 있도록 하는 기술
기존에는 리눅스 커널 기능을 확장하려면 커널 모듈 개발 → 재컴파일 → 매우 무거운 과정
eBPF는 커널 자체는 수정하지 않고 → 작은 바이트코드 프로그램을 안전하게 삽입/실행 가능
- 네트워크 패킷 처리
- 시스템 콜 모니터링
- 성능 분석
- 보안 정책 적용
- 트레이싱
eBPF 특징
- 고성능 (유저 스페이스-커널 스페이스 컨텍스트 스위칭 최소화)
- 커널 안정성 유지 (검증 후 실행)
- 동적 업데이트 가능
- 커널 버전별로 API 안정성 보장
- Cilium IPCache
- Cilium은 IP 주소와 해당 보안 ID 및 기타 메타데이터의 매핑을 포함하는 IPCache라는 내부 맵을 유지 관리한다.
- 이 IPCache는 효율적인 라우팅 및 정책 결정을 내리는 데 중요한다.
- 정보 확인
- cilium CLI 도구를 사용하면 Cilium의 IPCache 내용을 볼 수 있다. `cilium get cilium_ipcache` 명령은 이 캐시의 세부정보를 제공한다.
- Cilium이 배포된 노드에서 이 명령을 실행하면 IP-ID 매핑이 표시되어 Cilium이 트래픽 라우팅 및 정책 시행을 처리하는 방법을 이해하는 데 도움이 된다.
c0 map get cilium_ipcache
Defaulted container "cilium-agent" out of: cilium-agent, mount-cgroup (init), apply-sysctl-overwrites (init), clean-cilium-state (init), install-cni-binaries (init)
Key                Value                                                                  State   Error
0.0.0.0/0          identity=2 encryptkey=0 tunnelendpoint=0.0.0.0 nodeid=0                sync
169.254.25.10/32   identity=1 encryptkey=0 tunnelendpoint=0.0.0.0 nodeid=0                sync
10.233.65.124/32   identity=62444 encryptkey=0 tunnelendpoint=0.0.0.0 nodeid=0            sync
10.233.66.231/32   identity=6 encryptkey=0 tunnelendpoint=10.77.101.200 nodeid=1232       sync
10.233.64.153/32   identity=4 encryptkey=0 tunnelendpoint=10.77.101.57 nodeid=12111       sync
10.77.101.62/32    identity=1 encryptkey=0 tunnelendpoint=0.0.0.0 nodeid=0                sync
10.77.101.200/32   identity=6 encryptkey=0 tunnelendpoint=0.0.0.0 nodeid=0                sync
10.233.66.38/32    identity=4 encryptkey=0 tunnelendpoint=10.77.101.200 nodeid=1232       sync
10.233.65.226/32   identity=1 encryptkey=0 tunnelendpoint=0.0.0.0 nodeid=0                sync
10.233.64.92/32    identity=54280 encryptkey=0 tunnelendpoint=10.77.101.57 nodeid=12111   sync
10.233.65.186/32   identity=4 encryptkey=0 tunnelendpoint=0.0.0.0 nodeid=0                sync
10.233.65.5/32     identity=54280 encryptkey=0 tunnelendpoint=0.0.0.0 nodeid=0            sync
10.233.0.3/32      identity=1 encryptkey=0 tunnelendpoint=0.0.0.0 nodeid=0                sync
10.77.101.57/32    identity=6 encryptkey=0 tunnelendpoint=0.0.0.0 nodeid=0                sync
10.233.64.95/32    identity=6 encryptkey=0 tunnelendpoint=10.77.101.57 nodeid=12111       sync
Cilium에서 eBPF는 왜 사용하나?
Cilium은 쿠버네티스 CNI (Container Network Interface) 플러그인이다.
→ 쉽게 말해 쿠버네티스 Pod 간 네트워크 연결과 보안 정책을 담당하는 구성 요소이다.
기존 CNI는 보통 iptables 를 사용한다.
| 기술 | 특징 |
| iptables 기반 CNI | 트래픽 처리시 iptables 규칙 체인 처리 → 성능 저하 발생 |
| eBPF 기반 Cilium | 커널 내부에서 eBPF 프로그램으로 네트워크 패킷 직접 처리 → 매우 고성능 + 유연성 |
Cilium에서 eBPF 활용 영역
쿠버네티스 Pod 네트워킹 (L3, L4)
Load Balancing (L4, L7 eBPF 기반 Load Balancer)
Network Policy (쿠버네티스 네트워크 정책 eBPF로 처리)
Observability (패킷 트레이싱, Hubble → eBPF 기반 가시성 제공)
Security (Runtime Security)
왜 Cilium + eBPF가 주목받는가?
| 기존 기술 (iptables 등) | Cilium + eBPF |
| 성능 한계 존재 (iptables scale 문제) | 고성능 (kernel native 처리) |
| 복잡한 체인 → 유지보수 어려움 | eBPF 프로그램으로 간결하고 안전하게 처리 |
| 변경 시 재적용 비용 발생 | eBPF는 실시간 동적 업데이트 가능 |
| 네트워크 관측 기능 제한 | eBPF 기반 Hubble로 깊은 observability 제공 |
엔드포인트 목록 확인
Cilium에서 관리하는 각 Pod의 엔드포인트 정보를 확인한다. 엔드포인트에는 Pod의 IP 주소, 보안 ID, 상태 정보가 포함된다.
c0 endpoint list
Defaulted container "cilium-agent" out of: cilium-agent, mount-cgroup (init), apply-sysctl-overwrites (init), clean-cilium-state (init), install-cni-binaries (init)
ENDPOINT   POLICY (ingress)   POLICY (egress)   IDENTITY   LABELS (source:key[=value])                                                  IPv6   IPv4            STATUS
           ENFORCEMENT        ENFORCEMENT
463        Disabled           Disabled          4          reserved:health                                                                     10.233.65.186   ready
1816       Disabled           Disabled          1          k8s:node-role.kubernetes.io/control-plane                                                           ready
                                                           k8s:node.kubernetes.io/exclude-from-external-load-balancers
                                                           reserved:host
3199       Disabled           Disabled          54280      k8s:io.cilium.k8s.namespace.labels.kubernetes.io/metadata.name=kube-system          10.233.65.5     ready
                                                           k8s:io.cilium.k8s.policy.cluster=default
                                                           k8s:io.cilium.k8s.policy.serviceaccount=coredns
                                                           k8s:io.kubernetes.pod.namespace=kube-system
                                                           k8s:k8s-app=kube-dns
3744       Disabled           Disabled          62444      k8s:io.cilium.k8s.namespace.labels.kubernetes.io/metadata.name=kube-system          10.233.65.124   ready
                                                           k8s:io.cilium.k8s.policy.cluster=default
                                                           k8s:io.cilium.k8s.policy.serviceaccount=dns-autoscaler
                                                           k8s:io.kubernetes.pod.namespace=kube-system
                                                           k8s:k8s-app=dns-autoscaler
보안 정책 로그 확인
Cilium은 네트워크 보안 정책에 대한 로깅 기능을 제공한다.
c0 bpf policy list 1816
Defaulted container "cilium-agent" out of: cilium-agent, mount-cgroup (init), apply-sysctl-overwrites (init), clean-cilium-state (init), install-cni-binaries (init)
/sys/fs/bpf/tc/globals/cilium_policy_00463:

POLICY   DIRECTION   LABELS (source:key[=value])   PORT/PROTO   PROXY PORT   BYTES   PACKETS
Allow    Ingress     reserved:unknown              ANY          NONE         70382   883
Allow    Ingress     reserved:host                 ANY          NONE         57308   650
                     reserved:kube-apiserver
Allow    Egress      reserved:unknown              ANY          NONE         0       0

/sys/fs/bpf/tc/globals/cilium_policy_01816:

POLICY   DIRECTION   LABELS (source:key[=value])   PORT/PROTO   PROXY PORT   BYTES   PACKETS
Allow    Ingress     reserved:unknown              ANY          NONE         0       0
Allow    Egress      reserved:unknown              ANY          NONE         0       0

/sys/fs/bpf/tc/globals/cilium_policy_03199:

POLICY   DIRECTION   LABELS (source:key[=value])   PORT/PROTO   PROXY PORT   BYTES    PACKETS
Allow    Ingress     reserved:unknown              ANY          NONE         7209     92
Allow    Ingress     reserved:host                 ANY          NONE         400556   4527
                     reserved:kube-apiserver
Allow    Egress      reserved:unknown              ANY          NONE         46597    475

/sys/fs/bpf/tc/globals/cilium_policy_03744:

POLICY   DIRECTION   LABELS (source:key[=value])   PORT/PROTO   PROXY PORT   BYTES    PACKETS
Allow    Ingress     reserved:unknown              ANY          NONE         0        0
Allow    Ingress     reserved:host                 ANY          NONE         209676   2386
                     reserved:kube-apiserver
Allow    Egress      reserved:unknown              ANY          NONE         333815   3891
네트워크 디버깅
특정 엔드포인트나 서비스에 문제가 있는 경우 Cilium의 디버깅 도구를 사용하여 문제를 진단할 수 있다.
c0 endpoint health 1816
Defaulted container "cilium-agent" out of: cilium-agent, mount-cgroup (init), apply-sysctl-overwrites (init), clean-cilium-state (init), install-cni-binaries (init)
Overall Health:   OK
BPF Health:       OK
Policy Health:    OK
Connected:        yes
네트워크 정책 확인
Cilium에 의해 적용된 네트워크 정책을 확인한다. 이를 통해 각 Pod 간의 통신이 어떻게 제어되고 있는지 파악할 수 있다.
Cilium 네트워크 정책을 배포한다. 다음은 `role=frontend` 라벨이 있는 Pod에 대한 HTTP 트래픽을 허용하는 정책의 예이다.
k create ns network-policy-test

cat <<EOF > frontend-backend-policy.yaml
apiVersion: "cilium.io/v2"
kind: CiliumNetworkPolicy
metadata:
  name: "allow-frontend"
spec:
  endpointSelector:
    matchLabels:
      role: frontend
  ingress:
  - fromEndpoints:
    - matchLabels:
        role: backend
    toPorts:
    - ports:
      - port: "80"
        protocol: TCP
EOF

k apply -f frontend-backend-policy.yaml -n network-policy-test
배포한 정책을 확인한다.
c0 policy get

Defaulted container "cilium-agent" out of: cilium-agent, mount-cgroup (init), apply-sysctl-overwrites (init), clean-cilium-state (init), install-cni-binaries (init)
[
  {
    "endpointSelector": {
      "matchLabels": {
        "any:role": "frontend",
        "k8s:io.kubernetes.pod.namespace": "network-policy-test"
      }
    },
    "ingress": [
      {
        "fromEndpoints": [
          {
            "matchLabels": {
              "any:role": "backend",
              "k8s:io.kubernetes.pod.namespace": "network-policy-test"
            }
          }
        ],
        "toPorts": [
          {
            "ports": [
              {
                "port": "80",
                "protocol": "TCP"
              }
            ]
          }
        ]
      }
    ],
    "labels": [
      {
        "key": "io.cilium.k8s.policy.derived-from",
        "value": "CiliumNetworkPolicy",
        "source": "k8s"
      },
      {
        "key": "io.cilium.k8s.policy.name",
        "value": "allow-frontend",
        "source": "k8s"
      },
      {
        "key": "io.cilium.k8s.policy.namespace",
        "value": "network-policy-test",
        "source": "k8s"
      },
      {
        "key": "io.cilium.k8s.policy.uid",
        "value": "36d6b7bb-acef-4178-9b43-e127dbbd056c",
        "source": "k8s"
      }
    ]
  }
]
Revision: 2
프론트엔드 Pod 배포한다.
cat <<EOF > frontend-deployment.yaml
apiVersion: apps/v1
kind: Deployment
metadata:
  name: frontend
spec:
  replicas: 2
  selector:
    matchLabels:
      role: frontend
  template:
    metadata:
      labels:
        role: frontend
    spec:
      containers:
      - name: nginx
        image: nginx
        ports:
        - containerPort: 80
EOF

cat <<EOF > frontend-service.yaml
apiVersion: v1
kind: Service
metadata:
  name: frontend
  namespace: network-policy-test
spec:
  selector:
    role: frontend
  ports:
    - protocol: TCP
      port: 80
      targetPort: 80
EOF

k apply -f frontend-deployment.yaml -n network-policy-test
k apply -f frontend-service.yaml -n network-policy-test
백엔드 Pod 배포한다.
cat <<EOF > backend-pod.yaml
apiVersion: v1
kind: Pod
metadata:
  name: backend
  labels:
    role: backend
spec:
  containers:
  - name: busybox
    image: busybox
    command: ['sh', '-c', 'echo Backend Pod is Running; sleep 3600']
EOF

kubectl apply -f backend-pod.yaml -n network-policy-test
통신해본다. 잘 되는 것을 볼 수 있다.
kubectl exec -n network-policy-test -it backend -- /bin/sh

# wget
wget -qO- http://frontend

<!DOCTYPE html>
<html>
<head>
<title>Welcome to nginx!</title>
<style>
html { color-scheme: light dark; }
body { width: 35em; margin: 0 auto;
font-family: Tahoma, Verdana, Arial, sans-serif; }
</style>
</head>
<body>
<h1>Welcome to nginx!</h1>
<p>If you see this page, the nginx web server is successfully installed and
working. Further configuration is required.</p>

<p>For online documentation and support please refer to
<a href="http://nginx.org/">nginx.org</a>.<br/>
Commercial support is available at
<a href="http://nginx.com/">nginx.com</a>.</p>

<p><em>Thank you for using nginx.</em></p>
</body>
</html>

# curl
curl http://frontend
인터페이스 확인
# netpod 생성
cat <<EOF | kubectl create -n network-policy-test -f -
apiVersion: v1
kind: Pod
metadata:
  name: netpod
  labels:
    app: netpod
spec:
  nodeName: test-server-agent
  containers:
  - name: netshoot-pod
    image: nicolaka/netshoot
    command: ["tail"]
    args: ["-f", "/dev/null"]
  terminationGracePeriodSeconds: 0
EOF

# 테스트 Pod IP
NETPODIP=$(kubectl get pods netpod -n network-policy-test -o jsonpath='{.status.podIP}')

# 단축키(alias) 지정
alias p0="kubectl exec -n network-policy-test -it netpod  -- "
p0 ip -c route

ip -c -br addr show | grep cil

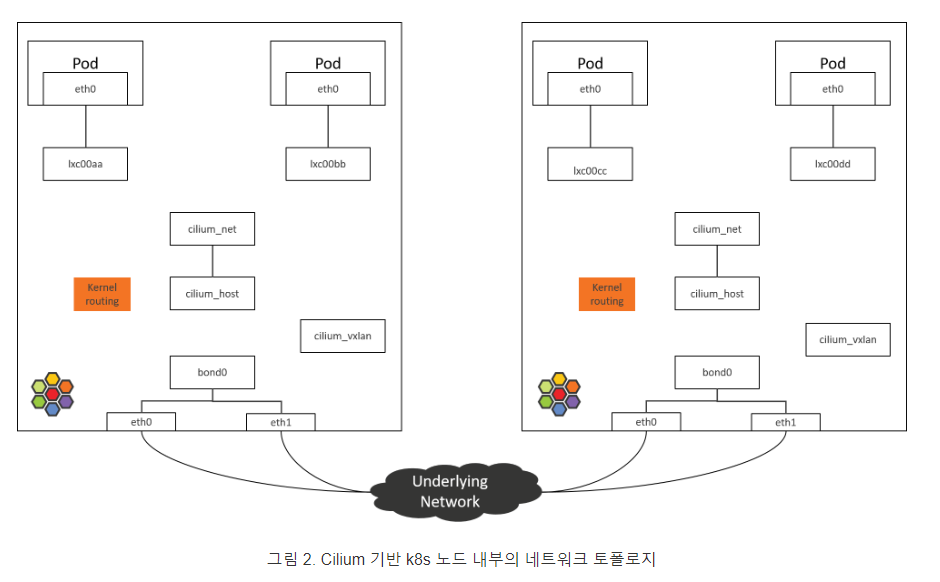
etpod 파드의 디폴트게이트웨이 주소는 cilium_net ip와 다르다. 왜 다를까?
cilium_net: eBPF 기반의 네트워킹을 관리하기 위해 Cilium에서 만든 가상 인터페이스이다. 패킷을 캡슐화하고 클러스터 내의 다른 노드에 전달하는 데 사용된다.
cilium_host: 이 인터페이스는 cilium_net 인터페이스와 호스트의 네트워크 네임스페이스 사이의 브리지 역할을 한다. 이 인터페이스는 포드에서 외부로 트래픽을 라우팅하는 데 사용되며, 그 반대의 경우도 마찬가지이다.
`cilium_net@cilium_host` 라는 표기법은 cilium_net이 사실상 cilium_host에 연결되어 있음을 나타낸다. 마찬가지로 `cilium_host@cilium_net` 은 cilium_host가 cilium_net에 연결되어 있음을 의미한다. 리눅스에서 인터페이스 간의 가상 링크를 나타내는 방법이다.
cilium_host의 10.233.65.226/32 주소는 cilium에서 관리하는 Pod IP 주소일 가능성이 높다. cilium은 Pod CIDR 범위에서 클러스터의 각 Pod에 고유한 IP를 할당한다.
kubectl get configmap -n kube-system cilium-config -o yaml |grep cluster-pool-ipv4-cidr
  cluster-pool-ipv4-cidr: 10.233.64.0/18

# endpoint 확인
c1 endpoint list
Defaulted container "cilium-agent" out of: cilium-agent, mount-cgroup (init), apply-sysctl-overwrites (init), clean-cilium-state (init), install-cni-binaries (init)
ENDPOINT   POLICY (ingress)   POLICY (egress)   IDENTITY   LABELS (source:key[=value])                                                          IPv6   IPv4            STATUS
           ENFORCEMENT        ENFORCEMENT
1077       Enabled            Disabled          7439       k8s:io.cilium.k8s.namespace.labels.kubernetes.io/metadata.name=network-policy-test          10.233.64.191   ready
                                                           k8s:io.cilium.k8s.policy.cluster=default
                                                           k8s:io.cilium.k8s.policy.serviceaccount=default
                                                           k8s:io.kubernetes.pod.namespace=network-policy-test
                                                           k8s:role=frontend
1358       Disabled           Disabled          4          reserved:health                                                                             10.233.64.153   ready
1621       Disabled           Disabled          1          reserved:host                                                                                               ready
3481       Disabled           Disabled          34719      k8s:app=netpod                                                                              10.233.64.126   ready
                                                           k8s:io.cilium.k8s.namespace.labels.kubernetes.io/metadata.name=network-policy-test
                                                           k8s:io.cilium.k8s.policy.cluster=default
                                                           k8s:io.cilium.k8s.policy.serviceaccount=default
                                                           k8s:io.kubernetes.pod.namespace=network-policy-test
3799       Disabled           Disabled          54280      k8s:io.cilium.k8s.namespace.labels.kubernetes.io/metadata.name=kube-system                  10.233.64.92    ready
                                                           k8s:io.cilium.k8s.policy.cluster=default
                                                           k8s:io.cilium.k8s.policy.serviceaccount=coredns
                                                           k8s:io.kubernetes.pod.namespace=kube-system
                                                           k8s:k8s-app=kube-dns
- fe80::... 주소는 각 인터페이스에 자동으로 할당되는 링크 로컬 IPv6 주소이다. 로컬 네트워크 세그먼트 내의 통신에 사용된다.
- 따라서 이렇게 다양한 인터페이스와 IP 주소를 가진 이유는 Cilium이 eBPF 기술을 사용하여 Kubernetes 클러스터에서 네트워크 고립, 로드 밸런싱, 라우팅 등의 고급 네트워킹 기능을 구현하기 때문이다.
- cilium_net과 cilium_host는 협력하여 포드 간 트래픽을 효율적으로 라우팅하고 네트워크 정책을 적용하며 다른 네트워킹 작업을 수행한다.
서비스 및 로드 밸런싱 확인
Cilium은 클러스터 내의 서비스 및 로드 밸런싱을 관리한다. 서비스 맵을 확인하여 서비스 뒤에 어떤 Pod가 있는지 확인할 수 있다. 아까 추가한 `network-policy-test` 네임스페스의 서비스도 등록되어 있다.
c0 service list
Defaulted container "cilium-agent" out of: cilium-agent, mount-cgroup (init), apply-sysctl-overwrites (init), clean-cilium-state (init), install-cni-binaries (init)
ID   Frontend           Service Type   Backend
1    10.233.0.1:443     ClusterIP      1 => 10.77.101.62:6443 (active)
2    10.233.0.3:9153    ClusterIP      1 => 10.233.65.5:9153 (active)
                                       2 => 10.233.64.92:9153 (active)
3    10.233.0.3:53      ClusterIP      1 => 10.233.65.5:53 (active)
                                       2 => 10.233.64.92:53 (active)
4    10.233.41.106:80   ClusterIP      1 => 10.233.66.179:80 (active)
                                       2 => 10.233.64.191:80 (active)

# 서비스 확인
k get svc -n network-policy-test
NAME       TYPE        CLUSTER-IP      EXTERNAL-IP   PORT(S)   AGE
frontend   ClusterIP   10.233.41.106   <none>        80/TCP    3m8s

# 쿠버네티스 서비스 확인
k get svc
NAME         TYPE        CLUSTER-IP   EXTERNAL-IP   PORT(S)   AGE
kubernetes   ClusterIP   10.233.0.1   <none>        443/TCP   73m
트래픽 흐름 모니터링
Cilium의 트래픽 모니터링 기능을 사용하여 클러스터 내의 트래픽 흐름을 실시간으로 관찰할 수 있다. 네트워크 문제를 디버깅할 때 유용하다.
c0 monitor
Defaulted container "cilium-agent" out of: cilium-agent, mount-cgroup (init), apply-sysctl-overwrites (init), clean-cilium-state (init), install-cni-binaries (init)
Press Ctrl-C to quit
level=info msg="Initializing dissection cache..." subsys=monitor
-> overlay flow 0x5a63ad49 , identity health->remote-node state reply ifindex cilium_vxlan orig-ip 0.0.0.0: 10.233.65.186:4240 -> 10.233.64.95:34996 tcp ACK
-> endpoint 463 flow 0x0 , identity remote-node->health state established ifindex lxc_health orig-ip 10.233.64.95: 10.233.64.95:34996 -> 10.233.65.186:4240 tcp ACK
-> overlay flow 0x28b9a576 , identity remote-node->health state unknown ifindex cilium_vxlan orig-ip 0.0.0.0: 10.233.65.226:47432 -> 10.233.66.38:4240 tcp ACK
-> overlay flow 0x28b9a576 , identity remote-node->health state unknown ifindex cilium_vxlan orig-ip 0.0.0.0: 10.233.65.226:47432 -> 10.233.66.38:4240 tcp ACK
-> endpoint 463 flow 0x249a78ce , identity host->health state established ifindex lxc_health orig-ip 10.233.65.226: 10.233.65.226:57372 -> 10.233.65.186:4240 tcp ACK
-> overlay flow 0x2a8463d0 , identity remote-node->health state unknown ifindex cilium_vxlan orig-ip 0.0.0.0: 10.233.65.226:38334 -> 10.233.64.153:4240 tcp ACK
-> stack flow 0x3e22cc52 , identity health->host state reply ifindex 0 orig-ip 0.0.0.0: 10.233.65.186:4240 -> 10.233.65.226:57372 tcp ACK
-> overlay flow 0x2a8463d0 , identity remote-node->health state unknown ifindex cilium_vxlan orig-ip 0.0.0.0: 10.233.65.226:38334 -> 10.233.64.153:4240 tcp ACK
-> stack flow 0xc27adfea , identity 62444->host state established ifindex 0 orig-ip 0.0.0.0: 10.233.65.124:47050 -> 10.77.101.62:6443 tcp ACK
-> endpoint 3744 flow 0x3a1b6c3b , identity host->62444 state reply ifindex lxc7e16af7e6c7e orig-ip 10.77.101.62: 10.233.0.1:443 -> 10.233.65.124:47050 tcp ACK
-> endpoint 3744 flow 0xcd30abf8 , identity host->62444 state new ifindex lxc7e16af7e6c7e orig-ip 10.233.65.226: 10.233.65.226:45488 -> 10.233.65.124:8080 tcp SYN
-> stack flow 0xd5d51f13 , identity 62444->host state reply ifindex 0 orig-ip 0.0.0.0: 10.233.65.124:8080 -> 10.233.65.226:45488 tcp SYN, ACK
-> endpoint 3744 flow 0xcd30abf8 , identity host->62444 state established ifindex lxc7e16af7e6c7e orig-ip 10.233.65.226: 10.233.65.226:45488 -> 10.233.65.124:8080 tcp ACK
-> endpoint 3744 flow 0xcd30abf8 , identity host->62444 state established ifindex lxc7e16af7e6c7e orig-ip 10.233.65.226: 10.233.65.226:45488 -> 10.233.65.124:8080 tcp ACK
-> stack flow 0xd5d51f13 , identity 62444->host state reply ifindex 0 orig-ip 0.0.0.0: 10.233.65.124:8080 -> 10.233.65.226:45488 tcp ACK
-> stack flow 0xd5d51f13 , identity 62444->host state reply ifindex 0 orig-ip 0.0.0.0: 10.233.65.124:8080 -> 10.233.65.226:45488 tcp ACK, FIN
-> endpoint 3744 flow 0xcd30abf8 , identity host->62444 state established ifindex lxc7e16af7e6c7e orig-ip 10.233.65.226: 10.233.65.226:45488 -> 10.233.65.124:8080 tcp ACK, FIN
데이터베이스용 Cilium 네트워크 정책
Cilium 네트워크 정책을 정의하여 데이터베이스 팟(Pod)과의 트래픽을 제어할 수 있다. 예를 들어 특정 Pod 또는 네임스페이스에서만 포트 3306의 트래픽을 허용할 수 있다.
apiVersion: "cilium.io/v2"
kind: CiliumNetworkPolicy
metadata:
  name: allow-db-access
spec:
  endpointSelector:
    matchLabels:
      app: database  # Assuming your DB pod has this label
  ingress:
  - fromEndpoints:
    - matchLabels:
        app: webapp  # Allow 'webapp' pods to access the database
    toPorts:
    - ports:
      - port: "3306"
        protocol: TCP
Hubble이란?
Hubble은 Cilium의 관찰성 구성 요소로, Kubernetes 클러스터 내의 네트워크 트래픽 및 보안 정책에 대한 가시성을 제공한다.
NodePort 오픈
# NodePort 변경
kubectl patch -n kube-system svc hubble-ui -p '{"spec": {"type": "NodePort"}}'

# 확인
k get svc -n kube-system
NAME                   TYPE        CLUSTER-IP      EXTERNAL-IP   PORT(S)                  AGE
coredns                ClusterIP   10.233.0.3      <none>        53/UDP,53/TCP,9153/TCP   2m43s
hubble-metrics         ClusterIP   None            <none>        9091/TCP                 3m8s
hubble-peer            ClusterIP   10.233.60.111   <none>        443/TCP                  3m8s
hubble-relay           ClusterIP   10.233.16.156   <none>        443/TCP                  3m8s
hubble-relay-metrics   ClusterIP   None            <none>        9966/TCP                 3m8s
hubble-ui              NodePort    10.233.38.152   <none>        80:32107/TCP             3m8s
방화벽 오픈
## Firewall ##
resource "google_compute_firewall" "test_server_ssh" {
  name    = "allow-ssh-test-server"
  network = var.shared_vpc

  allow {
    protocol = "tcp"
    ports    = ["22", "32107"]
  }

  source_ranges = ["${var.public_ip}/32""]
  target_tags   = [var.test_server]

  depends_on = [module.vpc]
}
아래와 같이 접속이 잘된다.

아래와 같이 네임스페이스를 선택해서 볼 수도 있다.

아까와 동일하게 해당 네임스페이스에서 통신을 해보면 아래와 같이 나온다.
kubectl exec -n network-policy-test -it backend -- /bin/sh

# wget
wget -qO- <http://frontend>

테스트를 더 해본다.
# 테스트 Pod IP
NETPODIP=$(kubectl get pods netpod -n network-policy-test -o jsonpath='{.status.podIP}')
FRONTPODIP=$(kubectl get pods frontend-756f778467-ksrrx -n network-policy-test -o jsonpath='{.status.podIP}')
BACKENDPODIP=$(kubectl get pods backend -n network-policy-test -o jsonpath='{.status.podIP}')

# 단축키(alias) 지정
alias p0="kubectl exec -n network-policy-test -it netpod  -- "
alias p1="kubectl exec -n network-policy-test -it frontend-756f778467-ksrrx  -- "
alias p2="kubectl exec -n network-policy-test -it backend  -- "

# test
p0 ping -c 1 $FRONTPODIP && p0 ping -c 1 $BACKENDPODIP
p2 wget -qO- <http://frontend>
p0 ping -c 1 8.8.8.8 && p0 curl -s wttr.in/seoul

통신이 되지 않는다. network policy를 만들어준다.
cat <<EOF > frontend-backend-icmp-policy.yaml
apiVersion: "cilium.io/v2"
kind: CiliumNetworkPolicy
metadata:
  name: "frontend-backend-icmp-communication"
  namespace: network-policy-test
spec:
  endpointSelector:
    matchLabels:
      role: frontend
  ingress:
    - fromEndpoints:
        - matchLabels:
            app: netpod
---
apiVersion: "cilium.io/v2"
kind: CiliumNetworkPolicy
metadata:
  name: "backend-frontend-icmp-communication"
  namespace: network-policy-test
spec:
  endpointSelector:
    matchLabels:
      role: backend
  ingress:
    - fromEndpoints:
        - matchLabels:
            app: netpod
EOF

k apply -f frontend-backend-icmp-policy.yaml
다시 테스트를 해본다. 통신이 잘 되는 것을 볼 수 있다.
# test
p0 ping -c 1 $FRONTPODIP && p0 ping -c 1 $BACKENDPODIP
p2 wget -qO- <http://frontend>
p0 ping -c 1 8.8.8.8 && p0 curl -s wttr.in/seoul

마무리
Cilium은 클라우드 네이티브 환경에서 복잡한 마이크로서비스 네트워킹 요구를 충족시킬 수 있도록 설계된 현대적인 솔루션이다.
특히 eBPF 기술을 바탕으로 한 유연성과 확장성, 성능은 기존 CNI보다 뛰어나며, 보안, 관측, 제어 측면에서 확실한 이점을 제공한다.
이번 글에서는 다음과 같은 내용을 다루었다.
- Cilium 아키텍처와 주요 컴포넌트 (Agent, Operator, CLI 등)
- Kubespray를 활용한 Kubernetes + Cilium 설치
- Hubble UI를 통한 트래픽 흐름 시각화
- CiliumNetworkPolicy를 이용한 L3/L4/L7 보안 정책 적용
- endpoint, ipcache, monitor, service list 명령어를 통한 트래픽 라우팅 및 상태 확인
- 실제 Pod 간 통신 테스트와 정책에 따른 제어 결과 분석
쿠버네티스 환경에서 보안 강화, 관측 도입, Sidecar 없는 서비스 메시, 정밀한 정책 제어를 원한다면 Cilium은 매우 훌륭한 선택지이다.
Reference
https://docs.cilium.io/en/latest/installation/k8s-install-migration/
https://github.com/jetstack/cni-migration
https://docs.cilium.io/en/stable/overview/component-overview/
https://arthurchiao.art/blog/cilium-life-of-a-packet-pod-to-service/
https://malwareanalysis.tistory.com/290
https://docs.cilium.io/en/stable/gettingstarted/hubble/#deploy-cilium-and-hubble
https://gitlab.openminds.be/mirror/kubespray/-/blob/master/docs/cilium.md
'Container Orchestration > Kubernetes' 카테고리의 다른 글
| Kubernetes Affinity 및 Scheduling 설정 가이드 (0) | 2024.04.19 |
|---|---|
| Kubernetes Network (0) | 2024.02.17 |
| Kubernetes 클러스터 구축하기(kubespray 2024v.) (0) | 2024.02.02 |
| k3d(k3s in docker)란? (2) | 2024.01.14 |
| kind(Kubernetes in Docker)란? (2) | 2024.01.13 |