
728x90
반응형
Overview
오늘부터 본격적으로 Kubernetes 실습에 돌입해보았다.
실습에 앞서 KVM 기반의 가상 머신 환경을 구성하고, Docker 컨테이너를 Kubernetes에 배포하는 전체 흐름을 체험했다.

N/W
| 서버 유형 | Hostname | OS | CPU | 메모리 | 서비스망 IP | 내부망 IP | 계정 |
| 가상 머신 | dh-kube-master | CentOS 7 | 2 Cores | 4G | 192.168.21.112 (/24) | 10.1.1.112 (/8) | root, clex |
| 가상 머신 | dh-kube-node | CentOS 7 | 2 Cores | 4G | 192.168.21.113 (/24) | 10.1.1.113 (/8) | root, clex |
- KVM 기반으로 VM을 생성하고, virt-clone으로 master와 node를 구성
- Node.js로 간단한 웹 서버(hello.js)를 작성하고, 이를 Dockerfile로 이미지 빌드
- 빌드된 Docker 이미지를 Docker Hub (somaz94/hello)에 Push
- 해당 이미지를 이용해 Kubernetes Pod 및 Service로 배포 테스트
VM은 KVM으로 구성한다.
$ qemu-img create -f qcow2 centos7.qcow2 50G
Formatting 'centos7.qcow2', fmt=qcow2 size=10737418240 cluster_size=65536 lazy_refcounts=off refcount_bits=16
virt-install --virt-type kvm --name centos7 \
  --ram 2048 \
  --cpu=host \
  --vcpus=2 \
  --os-type=centos \
  --os-variant=centos7.0 \
  --disk path=/data/dong/disk/centos7.qcow2,format=qcow2,bus=virtio \
  --cdrom=/data/dong/iso/CentOS-7-x86_64-Minimal-2009.iso  \
  --network bridge=mgmt,model=virtio \
  --network bridge=external,model=virtio \
  --graphics vnc,listen=0.0.0.0,password=xxx(비밀)
$ cat dh-k8s-master.sh
virt-clone \
--original centos7 \
--name dh-k8s-master \
--file /data/dong/disk/dh-k8s-master.qcow2

$ cat dh-k8s-node.sh
virt-clone \
--original centos7 \
--name dh-k8s-node \
--file /data/dong/disk/dh-k8s-node.qcow2

$ virsh start dh-k8s-master
$ virsh start dh-k8s-node
Linux

1. CentOS에 nodejs 설치
yum -y update
yum install epel-release
yum -y install nodejs
1-1) hello.js
var http = require('http');
var content = function(req, resp) {
 resp.end("Hello Kubernetes!" + "\n");
 resp.writeHead(200);
}
var w = http.createServer(content);
w.listen(8000);
node hello.js

# 공용서버를 사용하고 있기 때문에 터널링으로 확인

 ssh -p [포트번호] -L localhost:9999:192.168.21.113:8000 [server id]@[server ip]
2. Docker

2-1) Dockerfile
vi Dockerfile

FROM node:slim
EXPOSE 8000
COPY hello.js .
CMD node hello.js
2-2) Docker Hub Site
2-3) Docker install
yum repolist
yum install -y yum-utils
# --config-manager 사용하기 위한 패키지 설치

yum-config-manager --add-repo \
> https://download.docker.com/linux/centos/docker-ce.repo
# repository 추가

yum install docker-ce docker-ce-cli containerd.io -y
# docker 설치

systemctl start docker
# docker 실행
systemctl enable docker
# reboot해도 유지되게 enable(활성화)

systemctl status docker
# docker 엔진 상태 확인
2-4) Docker Container Run
docker build -t tmkube/hello .
-t : 레파지토리/이미지명:버전

docker images
REPOSITORY     TAG       IMAGE ID       CREATED       SIZE
somaz94/hello  latest    360e02156cdb   5 weeks ago   248MB
kubetm/hello   latest    360e02156cdb   5 weeks ago   248MB
node           slim      99defcfc3a10   6 weeks ago   248MB
tmkube/hello   latest    e5137372eeab   3 years ago   150MB

docker run -d -p 8100:8000 tmkube/hello
-d : 백그라운드 모드
-p : 포트변경

docker ps
CONTAINER ID   IMAGE          COMMAND                  CREATED         STATUS         PORTS                                       NAMES
c589216cc396   tmkube/hello   "docker-entrypoint.s…"   4 minutes ago   Up 4 minutes   0.0.0.0:8100->8000/tcp, :::8100->8000/tcp   eager_hamilton

docker exec -it c589216cc396 /bin/bash
# 동일하게 터널링으로 확인
ssh -p [포트번호] -L localhost:9999:192.168.21.112:8100 [server id]@[server ip]
2-5) Docker Image Push
docker login
Login with your Docker ID to push and pull images from Docker Hub. If you don't have a Docker ID, head over to https://hub.docker.com to create one.
Username: somaz94
Password:
WARNING! Your password will be stored unencrypted in /root/.docker/config.json.
Configure a credential helper to remove this warning. See
https://docs.docker.com/engine/reference/commandline/login/#credentials-store

docker push somaz94/hello
Using default tag: latest
The push refers to repository [docker.io/somaz94/hello]
2fa21bb903cd: Pushed
91664b9ef030: Mounted from library/node
ccfc9c391c3f: Mounted from library/node
9ae1f99bd2f3: Mounted from library/node
fe5ae6be2231: Mounted from library/node
43b3c4e3001c: Mounted from library/node
latest: digest: sha256:e93ba9dcd7e9f41b988f9adb9319ba429de978a9136371df5b860328198031df size: 1574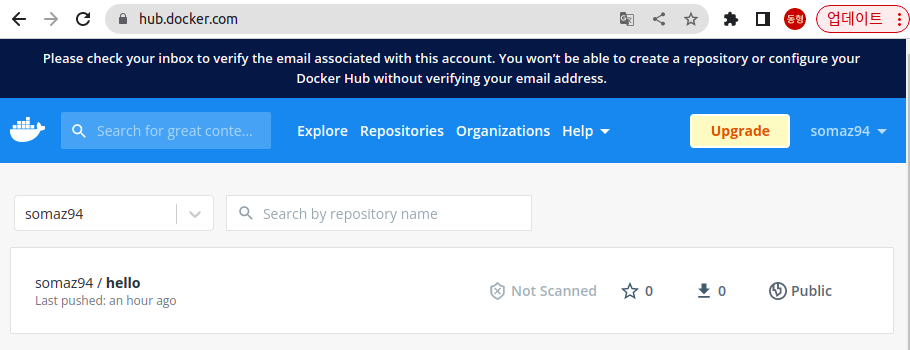
위의 이미지를 통해서 kubernetes pod를 배포해 보려고 한다.
3. Kubernetes
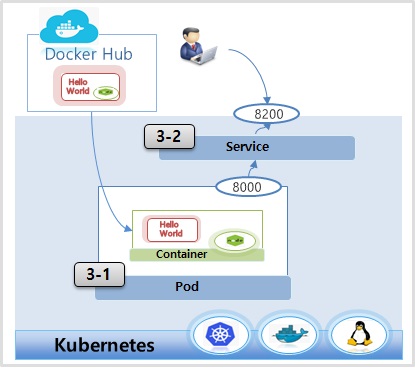
3-1) Pod
apiVersion: v1
kind: Pod
metadata:
  name: hello-pod
  labels:
    app: hello
spec:
  containers:
  - name: hello-container
    image: somaz94/hello
    ports:
    - containerPort: 8000
3-2) Service
v1.15
apiVersion: v1
kind: Service
metadata:
  name: hello-svc
spec:
  selector:
    app: hello
  ports:
    - port: 8200
      targetPort: 8000
  externalIPs:
  - 192.168.21.112
마무리
이번 실습에서는 Docker와 Kubernetes를 자연스럽게 연결하는 흐름을 경험했다.
단순히 컨테이너를 실행하는 데 그치지 않고, Pod → Service → 네트워크 연동까지 Kubernetes의 기본 객체들을 하나씩 구성하며 실습을 이어나갔다.
특히, 실습을 통해 다음을 직접 다뤄봤다.
- VM 생성부터 시스템 준비까지의 Infrastructure Layer 이해
- Docker 이미지 빌드, 컨테이너 실행, 이미지 Push 과정
- Kubernetes Pod, Service 객체 구성 및 배포
앞으로는 이 기반 위에서 ReplicaSet, Deployment, Ingress 등 보다 고급 Kubernetes 리소스와 기능들을 연계하여
운영 환경에 가까운 인프라 구성까지 확장해보는 실습을 진행해볼 예정이다.
이제 진짜 Kubernetes의 세계로 입장했다. 다음 단계는 운영을 위한 쿠버네티스다.
728x90
반응형
'교육, 커뮤니티 후기 > 인프런 교육' 카테고리의 다른 글
| <인프런> 대세는 쿠버네티스 [초급] - No.6 Kubernetes Cluster 설치(v1.22) (0) | 2022.08.29 |
|---|---|
| <인프런> 대세는 쿠버네티스 [초급] - No.5 Kubernetes Overview (0) | 2022.08.29 |
| <인프런> 대세는 쿠버네티스 [초급] - No.3 VM vs Container (0) | 2022.07.16 |
| <인프런> 대세는 쿠버네티스 [초급] - No.2 Why Kubernetes (0) | 2022.07.16 |
| <인프런> 대세는 쿠버네티스 [초급] - No.1 Content (0) | 2022.07.16 |